All Activity
- Yesterday
-
i think i will give this a try i ordered one for a 2001 forrester plug was the same but the tread was a m12 i belive mine is a m10
-
i have it holds vaccum
-
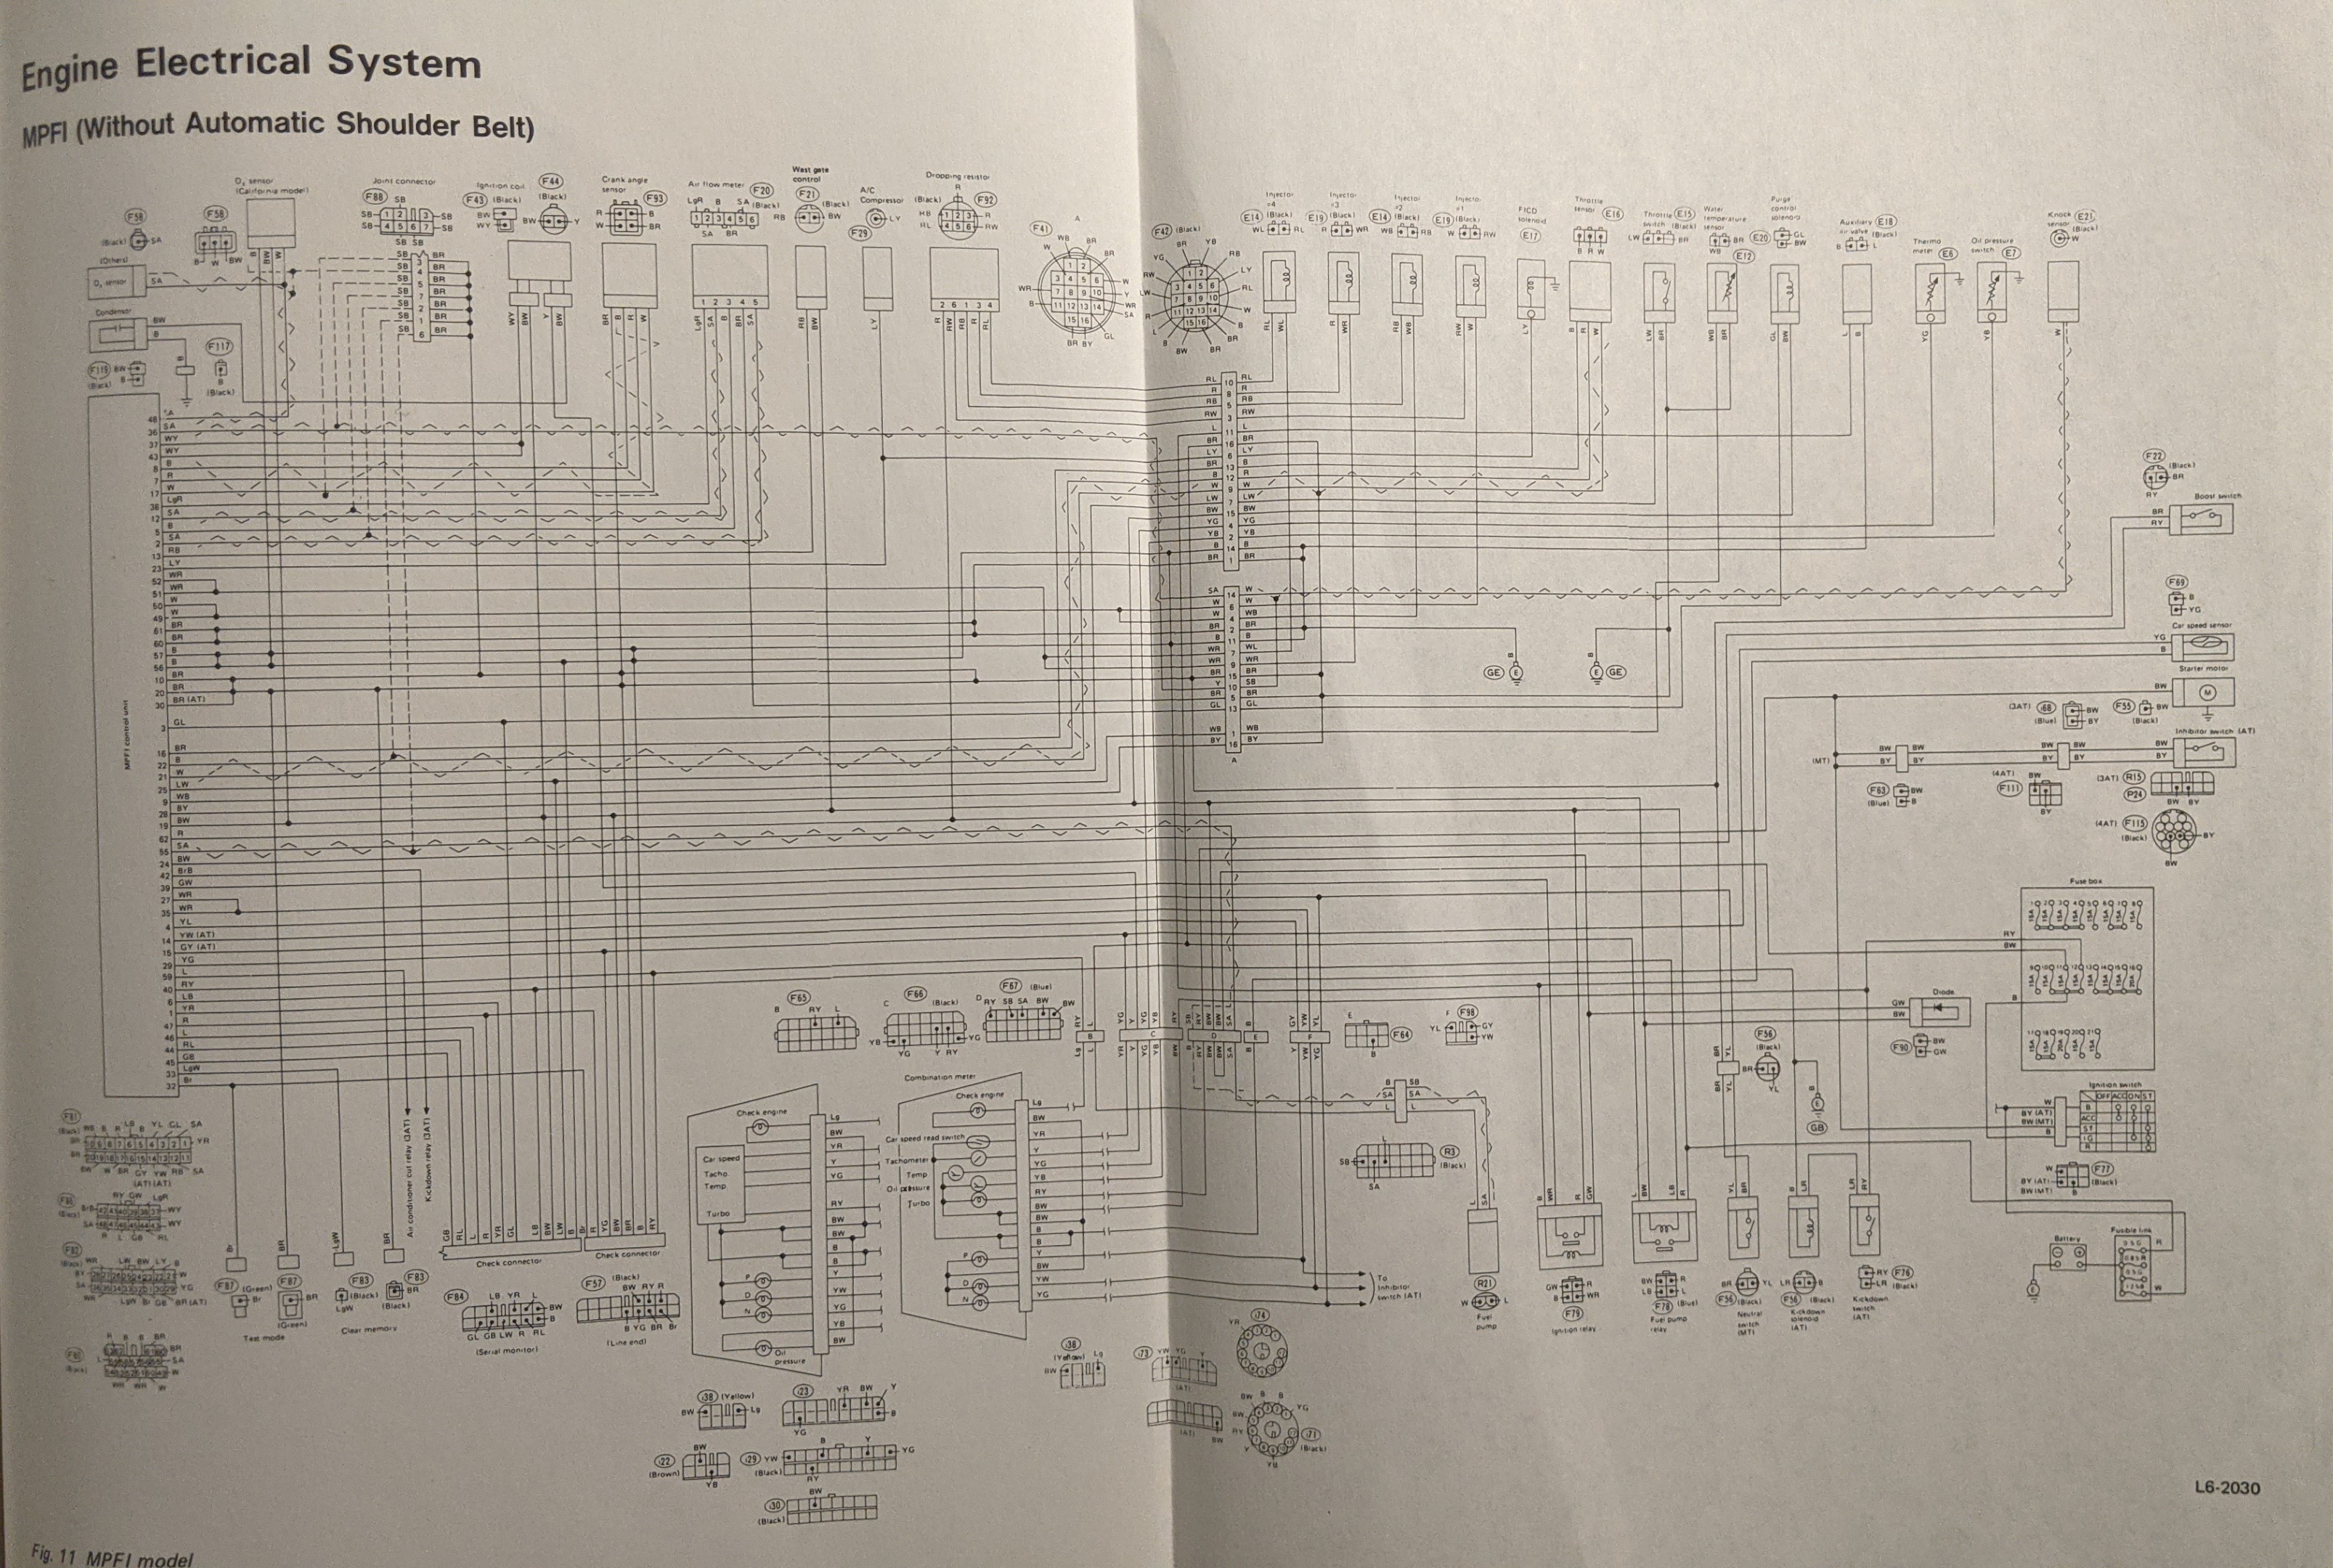
Hi All, So I'm trying to verify what should be a real simple wiring hookup for my '88 DL with no air cond.- the radiator fan, and the thermoswitch. Long story short, my Rad fan connector got hot and melted due to corrosion, and I had to redo all the ends with spade connectors. This obviously meant I had to cut the other wires and redo them with spades too. I was dumb enough to not label the wires 🤨. I'm going by this diagram- the wiring colors seem to be the same except for the thermoswitch, which for some reason shows a black and yellow wire where I have two black wires. I have my stuff connected: Blue/Red from Harness to Blue/Red on Fan Black Thermoswitch to Black Harness Black Thermoswitch to Yellow/White Harness Yellow/White Fan to Yellow/White Harness The diagram shows the male connectors, but not the female off the harness, which leaves me wondering if I mixed up one or two. My car runs midpoint and slightly under on the gauge, and I don't hear the fan coming on. I know the fan works. I jumpered it to verify a short time BEFORE the wire connector changes. Not sure which of the connectors I'd do that with anymore! Any input to verify my wiring would be much appreciated!
.thumb.jpg.ee2c88a2308b1e60876d2b7058623d7b.jpg)
-
Lot of manuals...LOTS! https://jdmfsm.info/Auto/Japan/Subaru/--Old Models--/
-
 Herdmentality2 joined the community
 -
 Hello, I live in Oregon. Looking for a windshield in the northwest. I believe 72-79 possibly 80 will fit please correct me if I’m wrong. Thanks!
 -

Retired Mechanical Engineer
moosens replied to ADC100's topic in Meet n' Greet. Your USMB Welcome Center
Welcome ! Once upon a time I was going to be a mechanical engineer. Enjoy the Board. It’s one of the more pleasant stops among any car forum I’m aware of. Plenty of folks from the outside world have appreciated this Board and its classy moderation during its heyday. Hey speaking of 79 I own and often drive a 79. 4WD wagon cheers! What kind of stuff did you and your dad have for wheels in your lifetimes ? Funny story - going through our parents stuff my mom kept every car’s paperwork from a 1949 Dodge, 52 Hillman,etc right up to the current Honda I’ve taken possession of. Enjoy! - Last week
-
 I haven't worked on one of those, but the most common cause of such problems is bad wiring between the body and the door where it flexes, followed by burnt out speakers. Does opening and closing the door, or wiggling the bundle of wires to the door, make it go on and off? Does thwapping the door over the speaker make it go on and off? Does poking something through the grille and pushing on the speaker cone make it go on and off? If it's not the door flex wiring or the speaker, then look into the radio itself and the rest of the harness wiring.
 -
 The driver's side door speaker on my 14 Impreza seems to work only when it wants to. Today after a couple of seconds of running in park, the dead speaker started working again. Two minutes later it crapped out again. Is there a way to factory reset the (non touchscreen) stock stereo to see if that's the issue? Am I going to have to take the door panel off to check the connection? Is this a common issue?
 -
Pretty good handle on theory and application of Lubrication as I was a Maintenance Supervisor of a Power Plant. Always my favorite subject. Started wrenching with Dad at the age of 14 (I'm 79). Looks like a great forum
-
 ADC100 joined the community
 -

-
I have a service manual with wiring diagrams. I'll post photos later tonight after work. It's an '89 service manual so wire colors and connector colors may vary but terminal positions should be the same, your mileage may vary so it wouldn't hurt to confirm continuity between terminals with a multimeter. :]
-
 Was the torque converter properly seated before the engine was refitted? Cheers Bennie
 -
as a test you can just skip it all together and short the connector pins together. the compressor should kick on. its function is pretty basic, too high or too low pressure it'll switch off. it'll short the pins when the pressure is nominal.
-

'79 Brat EJ22 Retrofit Build Thread
mka replied to mka's topic in Historic Subaru Forum: 50's thru 70's
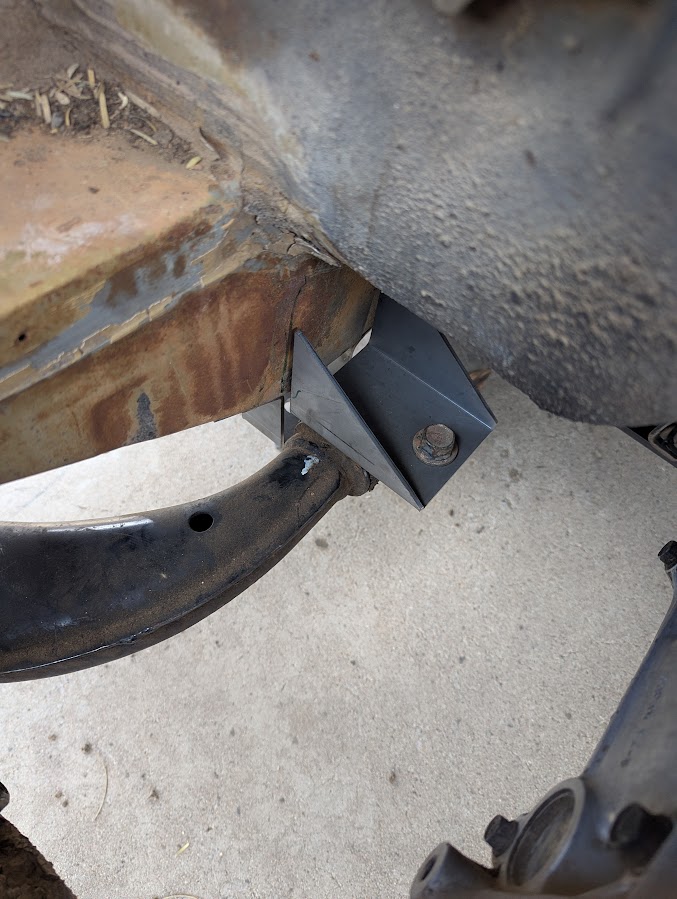
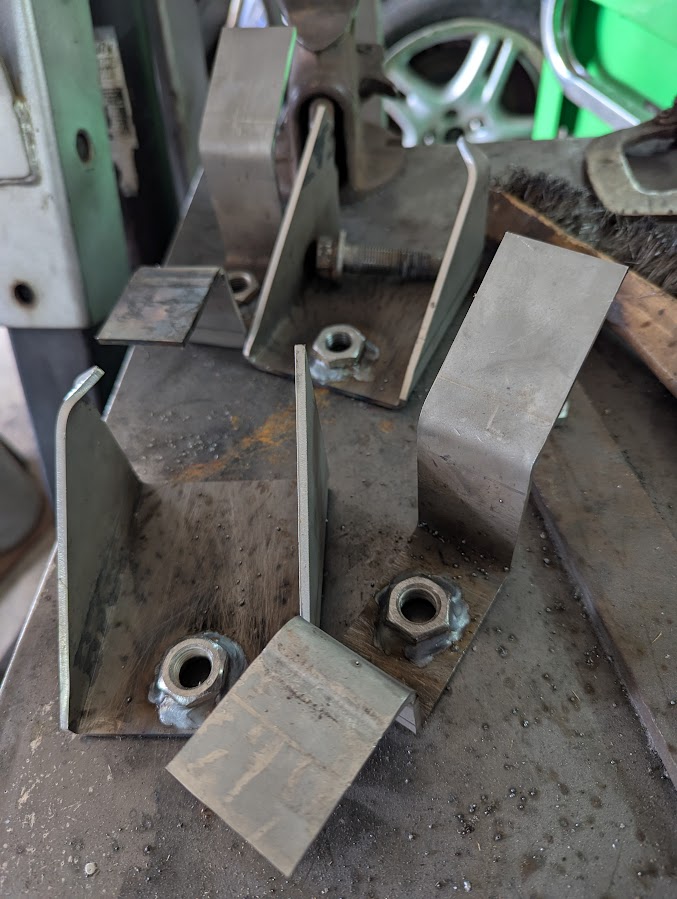
And a major milestone has come to pass. The Brat touched back down on all four tires for a brief time here this afternoon, and the stock Impreza wheels really fill those wheel wells up nicely. I've left out images of the tacked in brackets because they're A) extremely ugly albeit functional, and B ) not particularly different from where they sit in the mockup. After having completed this milestone I will say for those following in my footsteps - getting these brackets to site evenly and where I want them was very tedious to do by myself, on the ground, in the sun, in my driveway. They also need about a quarter inch spacer installed underneath them to allow the vertical edge of the upper bracket to get good contact for welding to the frame. I'll be welding a chunky fender washer or fabricating a spacer to thicken the base of the bracket to accomplish this. Installation of the bracket sets would have been much, much easier if I'd had a lift to use or removed the engine first (or ideally both.), neither of which I have or did. Egg on my face there. I'll get some more images of the engine bay and bracketry once I've put this thing back up on the stands to pull the engine and subframe. Next up is getting these welded in completely, boxing the frame rails back in, and modifying the subframe to accept the impreza power steering, as stated in earlier posts.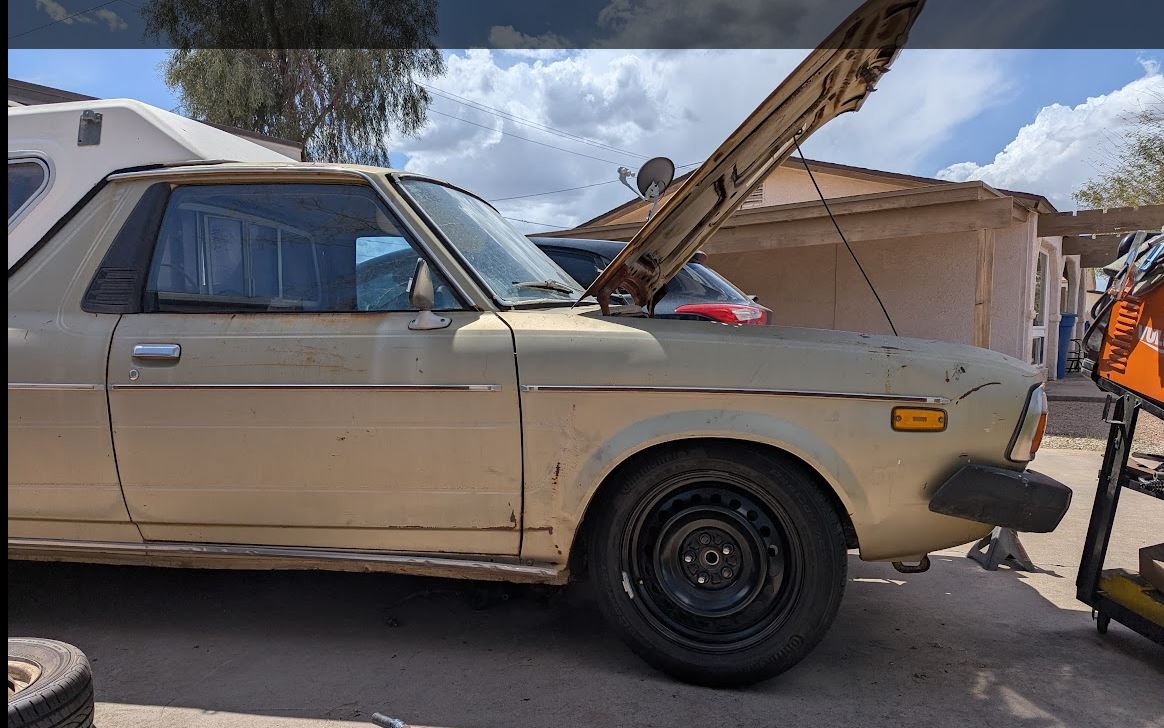
-
would you shrare it with us i too have EA82T 1987 model whose wirining needs to be redone.thanks
-
 Of course, anything mechanical needs to be addressed, however "Lucas" transmission treatment is quite good. Check the fluid, etc.. I did a change and filter replacement last year.
 -
'79 Brat EJ22 Retrofit Build Thread
mka replied to mka's topic in Historic Subaru Forum: 50's thru 70's
Well, It's been a couple more weeks, and I have a couple more updates! I had to go through a few design iterations of the brackets in order to get them even made. I'd hoped to design a version that was one piece, however due to some equipment limitations I had to go with a two-part construction. However, this appears be a more convenient method when it comes to installation, at least at the outset, and since i sprung for some chromoly steel I expect this to be adequate in terms of strength, though I may go back and add some gusseting later - I'll have to report back when I've actually got the parts permanently attached to the truck. Enough blathering, though - let's get to the actual part and placement photos! The first image is of the bracket set as received. Pretty damn close as a first fitup, but in the second image you'll see I ran into a few interference issues. The 90 degree bend on what i'm calling the "lower" bracket needed to be rebent to place it about 3/8" lower than the 45 degree bend, and the rearmost flange on what I'm calling the "upper" bracket bumped into the floorboard by about the same amount. This is true on both sides, so at least I'm consistent. I've adjusted the design files to match these changes, but for my purposes I was able to make these changes here without completely recutting the brackets. These adjustments can be noted on the third image, as well as the fact that I've also welded captive nuts onto the assemblies. Usually I'd just let the fixation carry me through and I'd actually have these installed at this point but I had some prior obligations that forced me to leave the final weldup to another day. The plan there is to clean the mating surfaces to be welded of paint and gunk, bolt the brackets to the pivot then use my floor jack to push them into place so I can tack them up. Not the most precise of motorsport fixturing and fabrication, but for this build it will have to do. Also, the way I see it these factory bushing housings have some room for slop in the way of slots for the bolts, so I have some pretty significant leeway when it comes to placing them as long as I'm even on both sides. More updates to follow soon when I have the front end on the ground (briefly) before I move onto fabrication for the steering gear and have to take it all back apart. 😅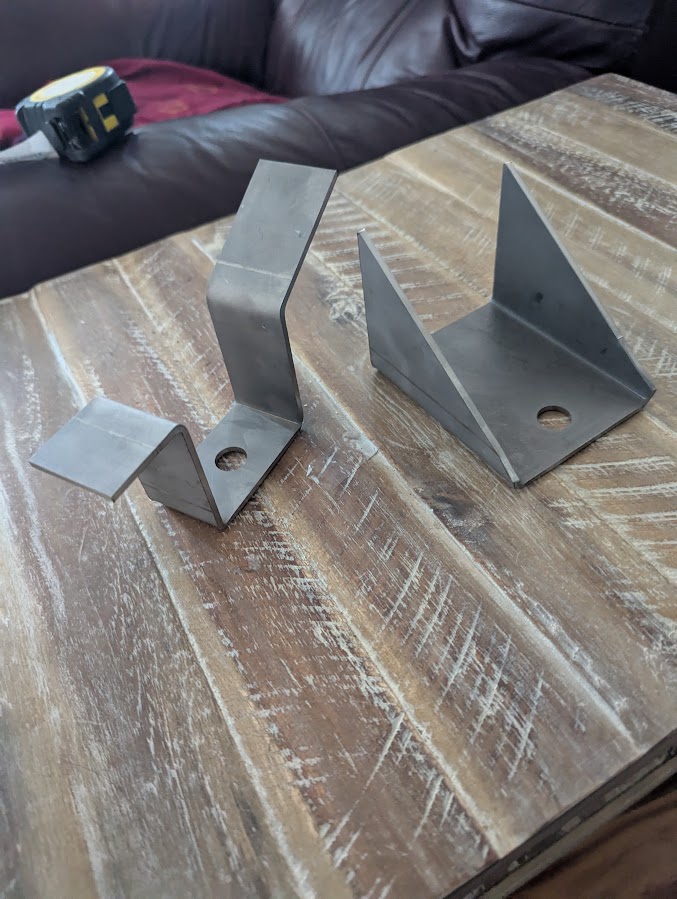
-
Yep. It slows the oil from draining down, so everything is oilier on startup.
-
 I would be tempted to to try a thicker grade of oil (but still within the recommended range).
 -
Which Lucas stuff are you talking about? The stabilizer?
-
Have you put gauges on the system?
-
thankyou im not very computer literate i did do tests with my multimeter ohms and continuity checked the switch the compressor fuses relays and the only thing i didnt get a reading on was the switch so i decided start with it considering they are fairly cheap
-
Yeah there are a lot out this way, I just haven’t noticed any lately. I don’t have any social media like fb or instagram. Thanks gor the part number
-
Yeah I had seen they burn oil so I changed it right after I bought it. I've put maybe 500 miles on it so I'll take a look. This is the first car I've ever owned where the freaking oil filter is on top. It's an odd car but I dig it so far.
-
Oh man you’re out in Oregon. I’m way out East. You guys have lots more out there. Shipping would bite. And 72-79 sedan or wagon or Brat will have the exact same front windshield. Only the Coupe and Hardtop are different. PRP carries the gasket. Part number WCR-288


.jpg.f1154f991c731c700d37652ff2eb19f2.jpg)