Leaderboard
Popular Content
Showing content with the highest reputation on 12/21/18 in all areas
-
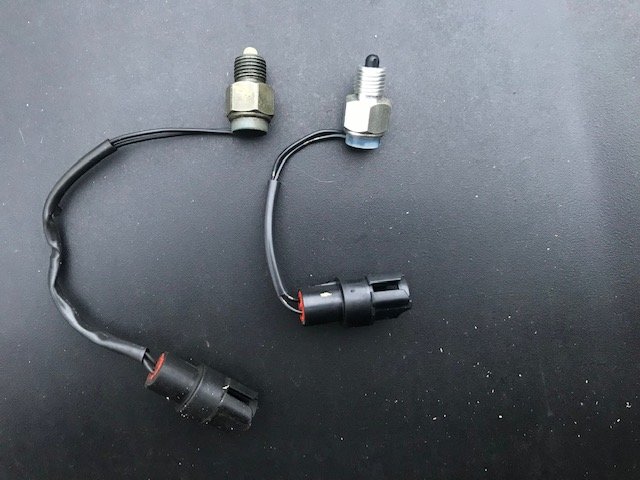
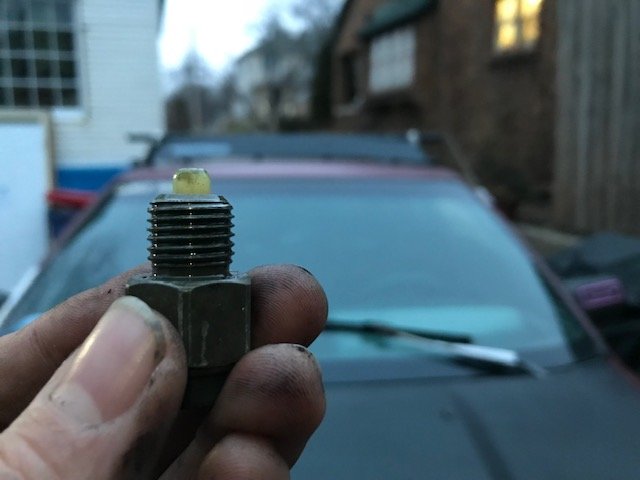
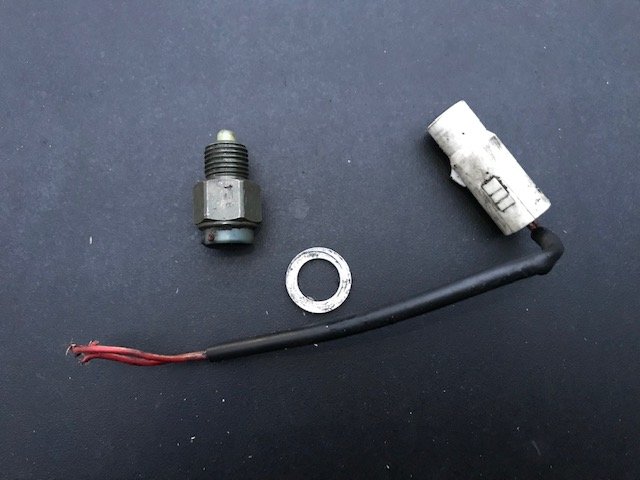
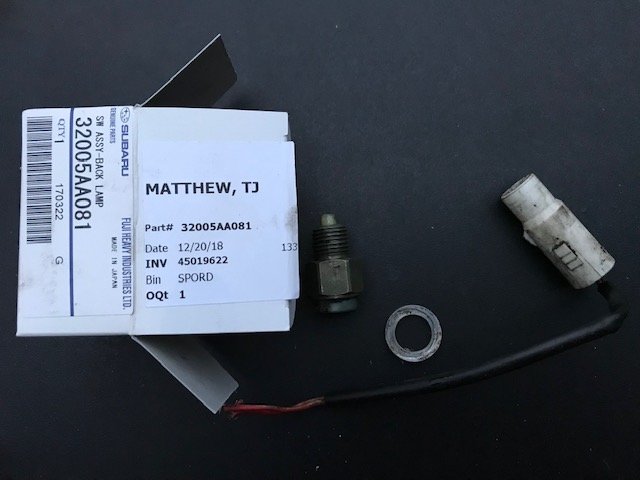
Hey everyone just wanted to post this here incase anyone else has this issue. I didn't see anything come up in my searches and figured it would be good if the process was documented....OEM part numbers and all. I'll keep it quick. Got my 88 GL Dual Range about 2 years ago now. Reverse lights have never worked and besides being dangerous it just bothered me. I finally figured it out! ****** PICTURES ARE LINKED FOR REFERENCE On the rear case of the transmission, about 7" in from the shifter rod, on the drivers side you'll find the Back Lamp Assembly. Looks like a bolt with 2 wires coming out of the side. This can be removed with a 19mm wrench. It's a bit tricky to get to the plug, you have to un-do two metal "clamps" that hold the wires for this assembly and others. The "clamps" are located between the top of the transmission and underbody of the car. Find someone with small hands to help you haha. Anyway, this switch has a little plastic piece that gets depressed when you shift into reverse, the circuit then closes and the reverse lights come on. I think there are two reasons for my reverse light failure. 1) plastic nub on switch worn and cannot produce a closed circuit. 2) wires were falling apart. (as you'll see below) This part can still be purchased new from the dealer (I just got on from my local Subaru Dealer) although some sites list that it is no longer in production. I paid $36 (can be got for cheeper, i've seen it for $25) Link to the schematic of the transmission is here, this one is for a turbo, which I do not have, but it's just about in the same position. Back Lamp Assembly is #5 on the diagram. Diagram > https://parts.subaru.com/a/Subaru_1990_Loyale-WAGON-TURBO/_80160_6027483/MT--REAR-CASE/A11-120-01.html Can Purchase Here > https://parts.subaru.com/p/Subaru__/SWITCH-ASSEMBLY-BACK-LAMP/49242840/32005AA030.html It's interesting that this switch functions similarly to the Neutral Safety Switch. Actually they are just about identical (besides the plug ends)....makes me wonder if they can be interchanged....I did a bit of cross referencing and it looks like newer manual Subarus also have both of these switches, so if these part numbers go bad we might be able to pull from newer models. Images are from my old Back Lamp Assembly....as you can see it's toast.....3 points
-
Hello USMB family! It's Gloyale now FerGloyale After trying and tryting since hte site change, I was unable to recover my old account here. Don't have that ol' Earthlink or Charter or whatever the heck it was in 2004 ISP based email anymore! So I am back. Rocking some new subies in the stable, as well as the old favorites. I may not be as active as I once was on here......but likely I will be around quite a bit. If you are someone who I had PMs about getting parts from me please contact me, as I have lost all of those communications and contacts. Good to be back. Regards, FerGloyale1 point
-
After putting insulation & drywall up first. And an overhead space heater or two.....1 point
-
Many times. I've never tried to disassemble the joint itself, but I've pulled the boot off, and flushed with quite a bit of parts cleaner. packed with fresh grease and a new boot, and driven. Most of my cars have suspension/knuckle/brake setups swapped around often, so I'm not sure how many miles, but several axles were used and reused on different cars, some of them lifted, and my only outer CV failures were clearly a result of excessive lift and offroad abuse.1 point
-
1 point
-
Sure - a highly volatile degreaser like trichloroethylene is residue-free, but that strikes me as a pricey way to clean CV components. They're really referring to common cleaners, esp. the varsol we have in our parts cleaning tanks. Anyone who uses gas as a cleaning solvent (indoors) deserves to have the fumes creep into his basement and blow his house off its foundation. Gasoline is evil.1 point
-
1 point
-
1 point
-
On EZ30s I grind the back side of the shim which doesn’t contact the cam. I quit working on EJ25Ds since I started doing that - is there a reason that would be less effective on those than EZs?1 point
-
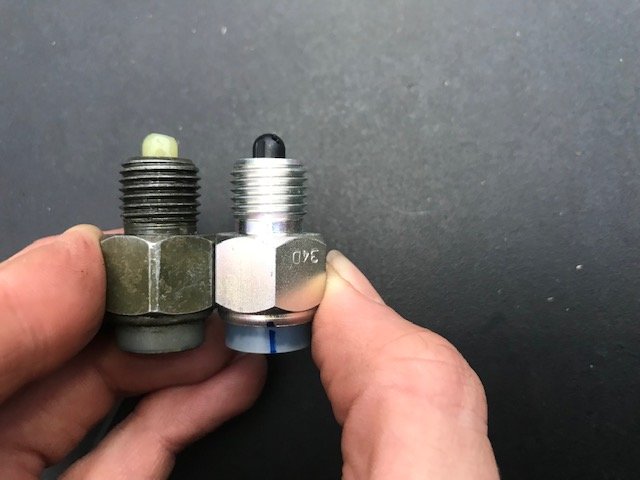
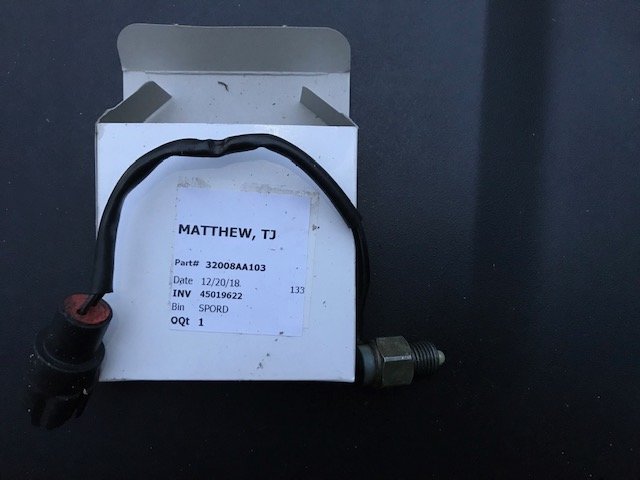
Bought a new Neutral Switch Assembly from the dealer. You can find the part number in the images I've linked. Also for comparison purposes you will see the old switch and new switch side by side below. new switch has black plastic nub. Old switch is off white and quite worn. After I cleaned and re-installed my old switch I could actually feel it cutting in and out which was making the car jerk a bit in gear. I figured heck it might as well just buy a new one! Got it for $36. Crazy thing is this switch looks almost the same as the Back Lamp Assembly that turns on the reverse lights for manual transmissions. Only difference I can see are the plugs. Double crazy is that newer Subarus also have this switch....different plugs though, but possible to source these if for some reason they stop producing either the Back Lamp or Neutral Switch. Cheers ya'll! Purchase Part Here > https://parts.subaru.com/p/SWITCH-ASSEMBLY-NEUTRAL/49242865/32008AA041.html1 point
-
Make sure you are 100% positive on the size you need. 10 out of 10 tech's at the dealer level according to my dealer parts guy get it wrong the first time, and most get it wrong the second time too. Math..... it's a problem. GD1 point
-
Figured I'd close the loop on this. Issue resolved. There was a PEBTAC (Problem Exists Between Tool and Chair) component in that I (inexplicably) had the top and middle rings swapped. Yeah, stupid, but I don't think it caused the trouble. It was simply that there was a little tiny ridge on the chamfer that was catching the ring, and with each tap of the piston the ring just made it a little bigger. I still don't get what originally caused the ridge to form, but once I dressed it off with a little emery cloth (and corrected the ring order, of course), all four seated in just fine.1 point
-
oh my word you did this without gloves, you deserve an award! gloves and work over a large cardboard box so you can just throw the mess away when you're done.1 point
-
I would use the grease only if it specifically says good for CV joints. Generally CV joint greases are great for wheel bearings too, but not the other way around. Redline CV-2 from a race shop or summitracing.com might be a nice choice. If the joint you're working on can't be fully disassembled to flush out all the old grease, then I'd stick with OE grease. Not all greases mix well together. If you order a kit from a dealer or online dealer, you'll get a nice new boot, bands, and grease.1 point
-
My favorite quick remedy is a heavy-duty ziplock bag wrapped around and secured with wire ties and duct tape. Works for months if you need it too. You can even get fancy and inject more CV grease with a needle injector on your grease gun. Rebooting really isn't all that bad once you're in the mood for black grease. TRW brand boots are the best I've seen...very strong rubber. I stick the axle shaft in a bench vice and carefully remove the metal bands. Put on rubber gloves and have plenty of rags handy. Pull back the big end of the boot and reach in with a hook shaped tool to flip out the wire retainer clip. Slide the joint apart and put a rag over the bearing assembly. Remove the C-clip on the end of the axle and slide off the bearing assy. Now you can swap boots and re-assembly in reverse order with fresh CV grease.1 point





.thumb.jpg.96479a473cd1ed4b8bac667c0ee181f5.jpg)
