Leaderboard
-
bushytails
Members3Points184Posts -
azdave
Members2Points182Posts -
moosens
Members2Points7876Posts -
el_freddo
Members1Points4494Posts


Popular Content
Showing content with the highest reputation since 04/21/26 in all areas
-
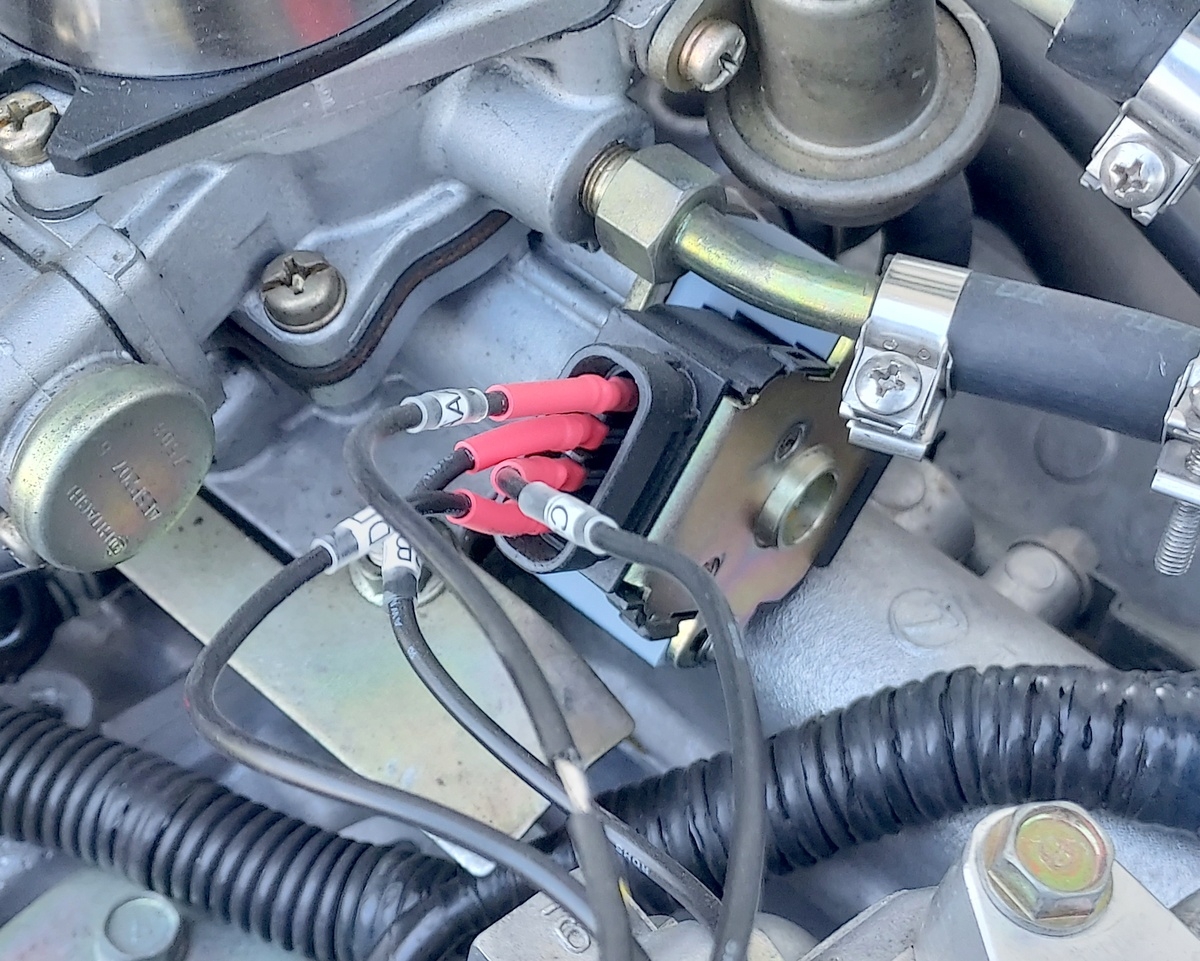
I'm quoting my own post from 2025 because I have since revisited the question of using a SERA484-10 4-wire throttle position sensor as a $30 alternative to the OEM TPS that, when available, sell for over $300 (if you are lucky enough to find one). It's not a quick PNP solution but it is working for my 1987 EA82 DL wagon with the SPFI engine and not that difficult to install. The functions of this substitute TPS are all a mirror image of the OEM part and it even had the Hitachi logo on the plastic case. By mounting the TPS upside down, and creating a new mounting bracket, I was able to make it work quite well. I have about 150 miles on it so far with no issues. The idle switch is still adjustable and functions properly. The resistance range at idle and full throttle are easily within the range of the factory service manual recommendations. I will clean up the wiring in the near future but for now, I have simply made a set of jumper wires to go between the old TPS plug and the new TPS body as the 4-wire plugs are not compatible.
 1 point
 -
Got the AWD box and if you decide to get a dual range version it’ll bolt straight in place of the single range gearbox ;) Really though, if you don’t go offroad, you don’t need the dual range. Plus the shipping will be more than the gearbox will cost you! My thought on the rear subframe would be to cut the mounts to the body and relocate them to where you want them to be on the chassis rails, maybe even pick up the old diff hanger bolts. Leave everything else so it’s all stock geometry to work with. It’s not a wearable item so once it’s sorted you don’t need to replace it for the life of the vehicle. Well this is the tricky bit. Each state is different in what they require. Here in Victoria you need to find an engineer that’s on the approved list with Vicroads, our vehicle department. Then you need to meet their requirements and they may change a bit between engineers. I do know that any welding needs to be certified as done by a qualified welder. Brake changes may need a performance test for stability. Using a complete swap like you are makes that easy. It’s the welding of brackets for major components that trips us up here. Same for things like the transmission tunnel grafting. Can be done, but you need to discuss with your engineer about how you’ll do it and they’ll let you know if they’re happy with it. Of course, the more you modify, the more engineering generally costs - and you want to get EVERYTHING modified on that report, otherwise road authorities can pick you for things they find that aren’t on the list if you’re pulled over and they decide to inspect your vehicle. Doesn’t happen often, but it’s something they can do if they want. Once engineered, you need to carry a copy of the certificate/report with the vehicle at all times. And further modifications need to be engineered, so you really only want to do it once then enjoy the vehicle! I heard of one model like yours that someone over here crammed a wrx drivetrain into and got it engineered. Not sure which state they were in, maybe Queensland… My 1990 brumby will end up WRX swapped, but without cutting chassis rails to do it like everyone else. It’s halfway there in a rusty old halfcut with everything dummies up. Engine and wiring loom all works which was a big hurdle with the cut down (my third, first turbo though). I wish my gearbox mount was as easy as yours to make too! Sorry for the long post! Good to see your progress and hopefully you have it back on all four permanently soon!1 point
-
1 pointWould be for 1975-79 4WD Wagons and 1977-81 Brat 1600 EA71 Top starter location is the give away. They’re fairly plentiful for their age. I scrapped and gave away several and now still have at least two sitting around.1 point
-
Okay. Sketchy repair maybe (because I don't know 100% what I did) but it is running as well as it ever has. I set out to shoot a short video of the issue last night and decided to check the IAC one more time. It is NOT a b-metal control. It is an on-off solenoid that has the flow metered by a small adjustment screw that is in the throttle body, not in IAC itself. That screw allows minor adjustments to the idle speed while the IAC is active. I turned it in a few revolutions and then backed out to the same spot where it was. I went to start the engine and then do the same adjustment while it was idling but nothing else was required. The engine started as well as ever but never stuttered or bogged down. It idled perfectly and I've now driven it about 45 miles with zero issues. Maybe the port was blocked inside and turning the screw opened up something that has been blocked or too restricted. It runs like a champ now so we'll see if it ever repeats again. The really cool part about all of this is trouble that I figured out a way to use those reversed TPS sensors (SERA484-10) that others have experimented with. I'll detail that in another thread.1 point
-
1 pointTach jumping around could mean the pickup module is going bad or the shaft in the distributor has excessive wobble due to worn bushings. I'd toss my MODIS on it and go for a test drive if it were mine, but that's hard to do over the internet...1 point
-
1 pointYep, will we ever learn? One wonders doesn't one! Bill Rigsby - Florissant, CO - 8,213 feet 1982 Brat1 point
-
1 pointBar the engine over until the timing marks are visible in the access hole on the bellhousing, wire brush both the flywheel and the pointer, then use a white paint marker to mark the 8 degrees BTDC line. Set timing at idle with the vacuum hose(s) to the distributor unplugged. Set idle speed before setting timing. If idle speed changes while setting timing, re-adjust, re-set timing, etc. But, a miss isn't usually timing. Too advanced timing causes pinging before it causes misses, and too retarded timing causes power loss without misses. Check plugs, wires, cap, rotor in good condition, then look at mixture. A 'scope on the primary is also a quick check for ignition misses.1 point
-
1 pointI hate trying to remember things. It's not like I've done this several dozen times or anything. lol. I'll try... The thumbnail (I haven't watched the video) shows the drive flange and caliper mount removed. Don't need to do that if just doing pads. The only bolt you need to remove is the little one on the bottom caliper slide pin, then rotate the caliper up. Squeaker goes on inner pad bottom. If you use the pad from the other side of the car, the squeaker will end up on top, and gets mushed by the caliper and makes noise instantly. Pads go in bottom first, push the spring clip in so it goes in the notch in the pad, angle the top of the pad in, do the same with the upper spring clip. The pads will sit perfectly flush and solid on the rotor when the clips are all properly sprung. Any wiggle at all means one of the clips isn't in the right place. Regrease the slide pins every time you do brakes. On the top one, slide the caliper off, wipe the pin clean, coat with fresh high temperature grease (ceramic, often purple - not wheel bearing grease), put a bit of grease in the caliper, slide caliper back on. For the bottom pin, pop it out from the boots, do the same thing. Failure to regrease will cause them to get sticky and trash your pads. Work back and forth and pop boots back on once sliding nice and smooth. A bit of brake fluid also works well for lubricating the boot. Spin the piston in with any available tool until it's almost flush with the casting. Align the piston so the V notches face parallel with the claws, that is, the short way across the caliper, which will be radially in and out when the caliper is installed. When you rotate the caliper back onto the pads, there's a bump on the back of the inner pad that needs to end up in one of the notches. If you have the piston rotated the wrong way, it will end up on top of the bump, and may mush the piston or your brakes will suck until it self-rotates until it lines up. If the piston is difficult to spin in, the caliper is crusty, and may also drag. If you spin it in, then step on the pedal three times to push it back out, then spin it back in, etc, a few times, you can get it sliding a bit better. Or wear your seal out more. One or the other. Spring clip kits are still available and are dirt cheap if you need them. After you put the new pads in, and spin the piston back in, making sure it's rotated to the position where it'll sit over the bump when you tilt the caliper back down, tilt the caliper down and reinstall the bolt in the lower slider. You'll usually need to push the slider pin back a bit to get the caliper down, then wiggle it around to line the bolt up with the hole. Then, with the car off, step on the brake pedal several times until it gets solid. Then do a visual inspection to make sure the pads are still sitting perfectly flush on the rotor. Then put the wheel back on. The brakes will suck at first; I usually power brake for a little on a quick test drive. You may need to step on the pedal hard a few times to get the e-brake to adjust, depending on caliper crustyness level.1 point
