

Uberoo
-
Posts
3884 -
Joined
-
Last visited
-
Days Won
14
Content Type
Profiles
Forums
Gallery
Store
Everything posted by Uberoo
-
external to internal regulator
Uberoo replied to Uberoo's topic in Old Gen.: 80's GL/DL/XT/Loyales...
thank you very much! -
external to internal regulator
Uberoo replied to Uberoo's topic in Old Gen.: 80's GL/DL/XT/Loyales...
it was going flat because i wired the sense wire so it was constant hot.In the factory setup that wire is 12V switched.As I typed that I remembered what to do.Find the wire in the connector that has continutity to the orginal sense wire and find a wire that is 12V switched from the connector and slice them together. -
My 81 hatch originally had an externally regulated alternator.While I was doing the EJ swap I chucked the externally regulator in the trash and wired up the EJ alternator to work independent of the original wiring.Anyway Right now I am re-doing some of that because I got tired of having to disconnect my battery otherwise it would go flat. I am wondering what wires on the body side of the externally regulated plug need to be connected to each other so everything works as it should. Thanks in advance.
-
The only problem with that is 2" .120 wall will not fit in the hub/spindle.As far as the travel goes I will see how long the EA82 axles hold up.
-
honda boys talking smack. need motor ideas
Uberoo replied to drake13's topic in Old Gen.: 80's GL/DL/XT/Loyales...
Even moar better if you find one of the 2.2 caravans... -
honda boys talking smack. need motor ideas
Uberoo replied to drake13's topic in Old Gen.: 80's GL/DL/XT/Loyales...
race on a bumpy dirt road.A crack head on a 18 speed mountain bike could probally beat a EA82 off the line on pavement... -
You have to change the diff in the transmission if you change the rear diff ratio.From your post I wasn't sure if you were doing that or not.The ratios front to back have to be within 1% to work right.
-
Ok monstaru rather than name calling how would you do it?Everyone is talking about welding some sleeve for the strut to go into and other stuff like that but there just wasnt room.. the OD of the subaru strut is 1.75" the OD of the VW strut is 1.67" a .08" difference.The ONLY way you could make a sleeve for the strut and have it still fit in the hub would be with 20 gauge 1.75" tube/pipe even then the weld seam would be a problem.Go to a steel shop and find some 20 gauge 1.75" round tube.Maybe you get lucky and find some,no one around here had even seen tube that thin so I used 16 gauge steel.I had to cut along the weld seam and hammer it on,even that was so thick that I had to pry apart the hub and use alot of force just to get the strut tube into the subaru suspension. Yes it is ALOT of work for the amount of travel I gained,but now that the strut is in there I just have to find some softer springs to get more travel. So with that being said please monstaru tell us ALL how you would have done it differently.How would you make it work with the subaru suspension?
-
When you look at EVERYTHING we do to make our subarus go better offroad is SKETCHY to the rest of the offroading world.Suspension lift made from blocks of steel that space the suspension down from the body/frame-sketchy,drilling a couple extra holes in rims-super sketchy.Even welding the rear diff is looked down as sketchy. As far as the struts go torxxx is right the only thing I have to worry about with the struts is them being blown from welding.When I welded them I drained the oil to prevent the oil from heating all the seals and valves,I did my welding as far away from the all the seals and valves as possible. I allowed everything to cool before welding another section.Every single welding related step that the pictures show was spaced apart by an hour's worth of cooling time. Me,my car,and my welded on struts will be at the summer run at evan's creek if you want to check it out.For those that wont be there I will make an update post after I haven't died.
-
ok so ford tempo springs are 130-140 in-lbs depending on how much you cut them stock subaru is 120-125 according to moog's spring listing the springs for a 80's chevy nova/toyota coralla are 113 in-lbs tempo springs raise my car up 1".I wonder if nova springs would be soft enough to compress an extra 2.5" to at least compress down to where the car is sitting on the spring compression bump stop at full compression?
-
Here is some compression and extension shots.sadly I am only getting about 5" of travel because the springs are a little too stiff.Anyone know where I can find some slightly softer springs? extension compressed. I have room to go for more compression but the factory subaru springs are too stiff.
-
the 5 speed wont hold to to the power of a h6. H6 have to be paired with a 6 speed if you want manual. Thats in a subaru though so the light weight 914 might not stress the 5 speed as much.
-
Meanwhile in Japan...
Uberoo replied to jarl's topic in BRZ and its Sister the Scion FRS/Toyota GT86
you might be a car enthusiast if you would take a rollcage over AC if it was offered. -
3" shorter than stock toyota track width would fit groovy on a subaru. Where is a toyota IFS to play with...
-
carefull going to wide the toyota guys with the long travel setups can't go on some some trails.Even on something as small as a toyota with a long travel suspension it pushes the outside edge of the tires at 80+" A tacoma for instance is 66" wide,which is just about as wide as my rear tires from outside to outside.My front is even wider.So even on the taco's if you increase the track width 3" per side to get long travel you start getting wide..
-
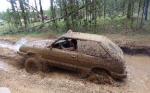
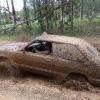
Show me it when I get there.I haven't found an obstacle I wont attempt yet.
-
monstaru can we just agree to disagree?If they work great if not it was only a $70 experiment.There is enough steel on them that they aren't gonna collapse or fold over while going down the road.So if they don't work then I am just out the money.There is no need for name calling.
-
My gas tank is sitting in my garage while I am doing all the work on the car. I am not quite brave enough to do all the welding back there with the tank in place,But I am brave enough to weld on struts.Go figure.. I was looking into a angled spare tire mount but it would cut too much of my rearward visibility.I could mount the spare tire angled where the rear seat used to be but then I loose out on some of the weight balance effect.
-
seeing as this thread is more like a rear end remodel I thought I would post this pic of how I plan to organize my trunk area.I am putting my toolbox,my battery,my spare tire,my windshield washer resivour, the winch and its electronics in the cargo area for better weight distributution and I was wondering if anyone could suggest a layout that wouldn't quite waste so much space. Tetris people this is your chance.Heres a pic of how I have everything layed out right now.Nothing other than the winch is mounted yet. any ideas for how to optimize that space?I want at least an inch gap on all sides of the spare to account for differences between brands.
-
Got the strut more or less finished today.First order is to grind all of your welds on the soon to be strut down smooth.Down at the bottom especially because thats where the strut goes into the hub/spindle.That and it makes it easier to place the mount and spring perch.While your at it grind the welds on the subaru strut that hold the mount and spring perch,and if you want to the little bracket that holds the brake lines.When your done a few smacks with a hammer should free them. clean them up and get them ready for welding then measure where to put them.In my case from the bottom of the mount to the seam weld at the bottom of the strut was 2 1/16".From the top surface of the mount the spring perch is 7" to one of the flat dimples on the spring perch.In my case I welded that at 8" to counter act all of the extra weight I have in the front.It is worth noting that I put the hole drilled in the strut facing towards the engine.The bolt hole of the strut mount goes 90* from there,and the spring perch is mounted 90* from that.Which direction depends on what side strut your working on.This is a driver side so I went CCW from the hole in the strut. measure and weld where the mount goes then measure and weld the spring perch on the next item is to weld/solder/braze a schrader valve on over the hole in the strut so you can fill the strut back with oil and nitrogen. If you managed to save all of the oil that came out of the strut pour it into the hole and put 30 PSI of nitrogen in and your done.If you lost some oil then put 10 OZ of motorcycle fork oil/strut oil and fill it nitrogen. assuming your welds don't leak and you didn't warp the strut body the strut will be ready to install just like any other strut.Have fun installing the strut because its a bear because the strut is so long.Installation will max out the travel of the radius rod/control arm...You will need alot of lift to use most of the travel or lots of fender cutting.I used stock springs The idea for the VW struts came from monstaru,although my result is not his idea. I take no responsibility for any of you guys doing this,yada,yada,yada this is just how I got longer travel in the front you all are free to go another way..
-
In addition to making my own front struts Ive also been making a rear winch bumper for my EA81 hatch.I put the winch in the rear for a couple reasons. 1. My car is a hatchback,with the addition of an EJ22,transfercase,and front diff my car was front heavy as it was.No sense in adding any more weight to the already overweight front end. 2. For self recovery purposes a rear mount winch is often superior to a front mounted winch.Most of the time when you get stuck its alot easier to back through the tracks you already made than it is to go forwards into the muck.Most of the time I probably wont need the winch because I never wheel alone.On the other hand If I get stuck somewhere they can't go I need to get myself back out. So without further ado.I had to reinforce the rear "strap down" points because they are not up to the task of recovery.Mine were ripped off.To reinforce the mounts I cut them out and used 2" thin wall square tube to make up the channel part of the frame. 2" angle iron was then welded to the square tube and the body to tie into as much sheet metal as I could. After the reinforcing it became clear that my actual bumper mounts would have to be made from 1.75" thick wall square tube because it fit tightly in the reinforcements.the bumper mounts extend 20" into the "frame" on each side.They will be secured by 3 bolts on each side. The bumper is 2x5x.125 box tube,because I am mounting a winch to the bumper it needed a hole cut in both sides for the cable to pass through.So I cut a hole about the size of the roller fairlead.I also boxed in the hole on the sides and top to get back the strength that was lost from cutting the hole and to give the cable a smooth surface to slide against. The actual winch mount is a 3/16" plate welded to the bottom of the bumper,it extends towards the front of the car and bolts to the rear most gas tank crossmember .Obviously that thin stamped steel crossmember will not take the load of winching so I ran some support pieces from the middle of the plate down to my rear diff mount.The support pieces are made from 1.5 x .085 wall round tube.To attach the support pieces to the car I crushed the ends of the tube in my vice then welded them closed.From there they are bolted to some 2x2 angle iron that is welded to the diff mount or the winch plate. here is the rear bumper this is the winch mounting plate.To get the right clearance the floor hat to be cut,this also allows me to watch the cable spooling in. here is my 5000 lb harbor freight winch. here is a couple pics of the support brackets. I am going to add some angle iron behind the support bars on the mounting plate for some rear impact protection.I am also going to weld on some D ring shackles to the bumper,I haven't done that yet because the car is not sitting level and I don't want to mounts to be crooked.The roller fairlead will get mounted over the hole for the winch cable.
-
I'll remember that when I take another pic of it flexed out with the other strut in.Speaking of the other strut I worked on it a little bit yesterday so I have some pics to put up of the whole process. old strut,new strut, and sleeve next sand off all the paint on the VW dub strut insert To make the "sleeve" fit over the strut insert it needs to be cut down the middle,cut the weld seem if possible.I used a 4 1/2" angle grinder with a cut off wheel. Next go drill a 1/8" hole into the VW strut insert to relieve the pressure that would be created from welding.I put my hole 8" from the bottom because thats where the hole ended up being on my first strut.If you keep the hole on top only the 30 PSI of nitrogen will escape.Then you can turn the insert so the hole is on the bottom you can force all the oil into a bucket for later use.Moving the strut through its travel will remove most of the oil from the strut.If you aim is correct most of the oil will go into the bucket... Then slide the sleeve over the strut so you can drill a large hole around the 1/8" hole in the strut insert in the sleeve.Mark where the hole needs to be and remove the sleeve then drill the hole.I used a 9/16" drill bit. next go weld the sleeve onto the strut insert when you have it where you want it.Take your time and go slow when your welding it.I more or less used a TON of spot welds to keep the heat down.Keep the valve at the end of the rod as far away from where you are welding.Also keep the heat down and let everything cool as needed.Air cooling only.You do not want to warp or deform the strut body in any way because it will be ruined. Thats what I have so far.
-
The old gen stuff is smaller width and length wise while offering more ground clearance,So right off the bat its a better starting point for an offroad vehicle.Swap in a EJ22 and it will be faster than the EJ series car it came out of.Sure it might need some driveline upgrades but in the end A EA vehicle will be more capable than a comparable EJ vehicle with similar mods.The only possible exception would be the fact that you can put rally suspension under a EJ vehicle and it will be way stronger than anything that could be retrofitted to a EA. Then again my EA81 hatch has parts from just about every subaru generation newer than it.EA82 suspension,EA82 DR 5 speed,EJ22,Legacy based rear axles,4.11 diffs from a legacy....
-
I wouldn't say that lifting a subaru 9-12" makes it unstable.My hatch is lifted 8" and its on some 31x10.5x15 mud tires and I can still rally it around.Mine is a transfercase lift so the engine is located 8" higher than a conventional 8" lift would place the engine.Even with all that height its still more stable than a stock toyota or jeep.BTW mine with the lift and tires is 11.5" taller than stock. However for a first lift it is way to complicated. a 2-4" lift with some 235/75/15's would work great,and would be in budget for a 17 year old.Both in money and time that your car is down.A 2" lift takes about a day to make and install.
-
extra weight when/if you slip off the line and center punch a rock?For better or worse my skidplate consistently takes the most beating offroad. Every single outing it comes back with more scratches and dings. On the other hand no skidplate seems to be working for ya.
