


porcupine73
-
Posts
5252 -
Joined
-
Last visited
-
Days Won
3
Content Type
Profiles
Forums
Gallery
Store
Everything posted by porcupine73
-
Air ratches can be useful in general situations just to speed things up, i.e. when I R&R the auto transmission pan it is nice to use the matco 1/4" because it just makes it faster to get those like 18 bolts out of there. Ditto the timing belt cover. But there you have to loosen all the bolts first anyway in this rust belt area unless you want to crack the covers. For air tools I really like my IR right angle die grinder. I probably use that the most of my air tools. I have an IR2131 impact I use a lot too, I really like it and it works well. I got a IR 1/2" air drill off eBay a couple years ago. I used it a few times, and I was amazed how much power that thing has. I have the Chicago Pneumatic 1/2" air ratchet. It's pretty powerful but yes it won't really break anything loose, plus it is too big to fit into tight spaces. I usually end up using my shortie 1/4" matco ratchet if I am going to use one. The cheapie $5 air cutoff tool from HF I use quite a bit and it is lasting nicely. I got a HF 3/8" butterfly ratchet that I really like but the thing leaks air like crazy. Those HF small pencil like die grinders are nice but they leak a lot of air after a few times of use. I have some HF air staplers and nailers that are holding up ok but I don't use them too much. I use a 4lb dead blow hammer on my wrenches all the time to break fasteners loose. Even ones that aren't too stuck it just makes it easier getting it broken free. I've used an impact on the caliper bracket bolts before but I had to use a short flex socket and an extension to fit it back in there. The hammer smack technique is easier though I think. And remember to get good penetrating oil on those caliper bracket bolts. Those bolts do get seized in there pretty good in the rust belt areas and they will snap off on you if you simply try to outforce them. If you have the caliper bracket off, and the parking brake __released__ on the rear, the rotor should be able to come off. Now they will often get rust between the rotor and hub making them hard to remove. So if you have the two holes in the rotor you can put the M8 bolt in there to drive it off the hub. Otherwise if you aren't saving the rotors some hammering on the old rotor might be necessary to convince it to part company with the hub.
-
 I'm assuming that model had electric radiator fans? Are they coming on with the A/C? Sometimes if you don't get cold air when stopped, but then do get cold air when the vehicle starts moving, it's because the fans aren't coming on. If it is cycling like crazy it could indicate a low refrigerant charge too.
 -
Well I'm sure the Select Monitor can do that.
-
It all depends how much power you're drawing. If you have a large system and were really cranking it you could drain a starter battery in that amount of time. Especially if the battery is more than a couple years old. Starter batteries do not like to be discharged very much - doing that greatly decreases their life. Get a deep cycle battery if you want to run the stereo a lot without the engine running, such as an Odyssey or Optima or other AGM.
-
Right the tool slides over the inner tie rod end after you thread off the outer tie rod end. No access from underneath is needed, except what might be needed to fiddle with the steering rack boot. Oh edit: and possibly to bend over the ears on the new lock washer. For the strings I use some sets of jackstands with thread, set exactly the same distance on each side measured from the ends of the axles. It's pretty close. I think I have some pics here http://www.porcupine73.com/pics/alignment/ Many people use that method at race tracks to check and adjust their toe so it can't be too bad a method. I have a white out mark on my steering columns for dead center on the steering wheel.
-
Yes, the inner tie rod end screws into the rack. Then you hit the new lock washer with a chisel or similar tool so that it 'ears' into the slots on the end of the inner tie rod end so that it can't unthread itself (which would be bad of course). I just use the strings method to check the toe afterward. But if you have access to a rack that is probably easier.
-
Hm, possibly, I don't know. I've done the driver side on '96 Legacy and '00obw and didn't have to drop any parts of the exhaust. The HF tool fits right up in there no problem.
-
Some silicone spray on the steering gear boot will help it pop right back onto the rack like buttah. I was struggling like crazy even though I had greased the lip thoroughly. Then nipper told me to try silicone spray. I couldn't believe the difference that might. What I spent 15 minutes horsing around with and couldn't get on all the way went on in 5 seconds with the silicone spray.
-
Yes it's that second link, the long tube looking thing with the bunch of clips. After separating the outer tie rod end then you put the right size clip over the inner tie rod end where it meets the rack, then slip the tube over the inner tie rod end until it clicks into the clip. Then a breaker bar will loosen up the old tie rod end. Count the turns when removing the outer tie rod end. Then as long as the new inner tie rod end is identical you can thread the outer tie rod end back on the exact same number of turns and the toe should still be correct. In my experience the toe still needs adjusting one or two turns after the new inner tie rod end is installed, for some reason they don't seem to be quite identical.
-
Yes it looks like the Moog one in that pic has a new lock washer and also a jam nut. The jam nut isn't absolutely necessary if the old one is in good shape but it is nice to have. The genuine Subaru part includes neither of those. A 17mm or was it 19mm flare nut wrench is very nice when working with the jam nut since a regular wrench can tend to want to round it off. I apply a torch and kroil before working with it. If the cotter pin on the castle nut is rusty I just pound it with an impact wrench and shear the old cotter pin right off since it isn't going to come out if it's rusty anyway.
-
Oh, forgot to mention, I always loctite red the new inner tie rod ends. They're supposed to be good if tightened right but I have heard sometimes they will loosen. The lock washer will keep it from loosening very much but it can still loosen itself up. You're supposed to turn down this clearance adjusting screw on the rack before undoing the old tie rod end but I don't know, I never bother with that step.
-
Just get the inner tie rod tool from Harbor Freight, it's not too expensive and it makes it sooooo much easier. (As in you don't have to remove the rack from the vehicle to get the inner tie rod off). You need a new lock washer for the new inner tie rod end, and it isn't included with the tie rod end (at least not the genuine part). http://www.porcupine73.com/pics/tie-rod-ends/
-
Well before buying wheels you should check the number of lugs and spacing and center bore diameter to make sure they fit the soob. That soob is 5 lugs, 100mm spacing. I forget what the hub bore size is. The offset on soobs is generally around +48 to +55mm. The limiting factor on tire size for soobs seems to be the lower strut spring seats (unless you go to Outback struts). If the wheel center bore size is larger than the soob hub, which most aftermarket wheels will be, centering rings can be a plus.
-
Tire shops especially the larger chains will sometimes refuse to install lower speed rated tires than the vehicle originally came with, all a liability/lawsuit thing of course. Even then exceeding the speed rating doesn't mean the tire will blow right away. It will take some time for it to heat up more etc.
-
There is a a good article explaining it on endwrench.com as well but you'd have to search the archives for it (provided they haven't taken it down yet). It said to adjust the bands slowly, not too much at once. And it had a special tool you can make out of a piece of 2x3 to help with the process.
-
Battery or Alternator
porcupine73 replied to The Dude Abides's topic in Non Soob Cars and Bikes Discussion
Make sure all ground connections are tight too. Load test the battery. If it's a normal starter battery more than a couple years old, if it went dead a few times for any reason, it might be shot. Starter batteries do not like to be discharged deeply, it greatly reduces their lifespan every time that happens. -
Right, as long as your gauge is functioning you don't necessarily need the stock pressure switch. You can either leave it unhooked or ground the sensor wire, whichever is required to make the lamp stay off. You can get a BSPT or BSPP tee. They might have one that has two female and one male ports on it. You have to check to make sure you have space under the alt too, the aftermarket pressure senders are quite a bit larger than the stock switch so you will need enough room to fit it in there unless you use the hose to reroute it.
-
I don't know of any, but someone, I think it was nipper, was saying there is a plugged port somewhere that is for the turbo oil supply that can be used if you don't have a turbo.
-
They are electrically operated solenoids, but they are never fully on nor fully off during operation. The TCU drives them 5% to 95% duty cycle with a square wave around 50Hz. How about a band adjustment? I think the procedure describes something about the 2-3 shifts and which way to adjust it in this case. The adjustment is a slight pita though iirc.
-
I have not yet had to replace any fuel lines. That spot on the fuel tank was the brake line leak somewhere above the tank.
-
I think Tirerack really sells many accessories just as a convenience for people who are already ordering tires and wheels. I don't think they're trying to be the lowest price out there on accessories. However they do have great prices on Valeo wipers, they're cheaper than many parts store wipers and for me they last around 3 years.
-
Here are some of my brake line replacement pics on '96 Legacy: http://www.porcupine73.com/pics/brakes/leak96/
-
The port under the alternator where the stock pressure switch is at is a fairly easy to access location to do it. The port is 1/8" BSPT, British Standard Pipe, tapered thread. You need thread sealant on this fitting. Do not try to use an NPT fittnig here, it will start to thread in but BSPT has a slightly different angle on the threads and is like 27 threads per inch I think whereas NPT is 28 iirc. You can get sets of 1/8" BSPT to NPT and NPT to BSPT adapters from most places that sell gauges. Places like mcmaster.com and smallparts.com have them too. If you use hose to place your sender somewhere else, I highly suggest hydraulic hose and fittings. Hose barb fittings I do not suggest for this application, because if one of those ruptures you are going to have a mess on your hands and possible engine damage if you don't realize fast enough that it happened. Also you will need to make sure your sender is grounded if you use the hose to put it elsewhere. If you tee it up right, you can keep the stock pressure switch and also your new gauge.
-
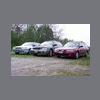
Yes I got the bolts from Summit as well. I buy a lot of stuff from them because they have great service and are 1 ups day away from me. I forget now whether I put the bolt in the top or the bottom on the rear. Somewhere I have a great link about how to use those bolts on a Subaru...if I can find it. Read the directions that come with them and play around with them a little to understand how they work. It's pretty simple but the tab on the washer has to be in the right position to get adjustment. Here is my '96 rear after the swap (using Outback struts and king springs outback lift springs). Also has Outback size studless snow tires on it. I did not change the trailing arm. You can see the tire is very close the leading edge of the fender. These tires to do rub a lot in tight front turns. I do camber myself by getting the vehicle on the level garage floor, using a level, measuring, and calculating the arctan to get the angle. It's close enough for gov't work. I check the toe with the strings method. This is a comparison with a stock height '94 Legacy:
-
Hello Pete and welcome. There was just a recent thread about such starter issues. A knowledgeable member mentioned he has installed an interposing relay in the circuit feeding the starter solenoid to fix this type of issue in the past. If it's an auto trans sometimes if the switch letting it start in park and neutral is off a little bit that can cause problems too. The rusty brake lines seem to be popping up more and more on that year Legacy and Outback. But of course being they're 15 years old now it's not too surprising I guess. I fixed mine by replacing the entire section of line from under the rear seat where it penetrates the floor (right/passenger side) and routing the lines where convenient back to the calipers/wheel cylinders. I could see the lines were in poor condition so I wasn't going to try just replacing one section; I just replaced the entire sections. I removed nothing from the car to do this job except the rear wheels. I have some pics somewhere.