

TheLoyale
-
Posts
7169 -
Joined
-
Last visited
-
Days Won
18
Content Type
Profiles
Forums
Gallery
Store
Everything posted by TheLoyale
-
Thats awesome! Looks great with the KM2s.
-
Go with 6x139 wheels, it will be easier to convert them and drill them properly. The rack is 45x50" by the way.
-
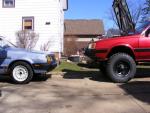
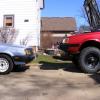
I forgot how big the roof rack is, I can measure it today and post it up. As for the tires, they were about 26.6" in total diameter. I did have to trim the front fenders and it also rub on the rear wheel arch going over pretty bad railroad tracks. I would try to find a tire that is about 25" total. Something like a 195/75 or 205/70. Are you planning on running 14s or going bigger? 15" would be the way to go for a lot more tire options. 14" are starting to fade out as are 13" are non existent, unless you want some cheapie whitewall radials
-
JesZek, Once I finish the welding in the area I am planning on brushing on Rust-Oleum Truck bed liner for the entire floor (Like I did on the Skiwagon) then I will be laying down FatMat sound deadening on the entire floor plus inner body panels. I have already used DynaMat for the roof and also reglued the support slats for the roof, No more banging hopefully! As for the outside, I am planning on painted the Floor/Rockers/Wheel Wells with the same thing, then spraying Paintable, hard undercoating to protect it even more. Bennie, I am stilling thinking about the plumbing for the Snorkel. Looking at it, I may have to notch out and reweld the frame piece that runs behind the fender, it looks like it may be just too tight. Perhaps I brought back the snorkel a little further than you did which is why you didn't have any issue.
-
I think it might be. I even reinforced the actual strut mount, also having full welds Vs. Spot welds is going to increase strength. I kinda wish both sides were equal, but I am not about to cut into the other side again lol...
-
My '92 Landcruiser: Safariwagon-II
TheLoyale replied to TheLoyale's topic in Non Soob Cars and Bikes Discussion
So its been a while. Installed a factory ATF cooler, painted the hood matt black, and am going to take it down to Chenoa, IL soon. READY FOR ADVENTURE...! -
More progress on the rust repair aspect. Finally this is for the most part, complete. I dreaded this part of the build ever since discovering it, as it has very many different bends/twists and also needs to be very strong as its a key structural piece. Now it is finished! Stay tuned for more updates!
-
The Snorkel is 100% finished! I am super keen on the fit!
-
Pulled away all the tower skin, cleaned up the main strut support and reinforced it with some 1/8" Round bar. Next up, remaking the shell skin and rewelding the latching point for the seat backs.
-
Tom, I think you did post pictures of how bad it was? I do remember the rear tube being cracked in half. Here is my main headache right now I did finish the passenger side footwell today! Happy with the results. As for the Snorkel, I was thinking about taking measurements, but I found that it may be easier to bend it while its on the vehicle so I can see right where it needs to be.
-
Oh, yeah I'll have to clean all the sand out lol. I don't have the fender bolted down, I still have to finish the floor pan/rocker area before I can finally bolt it down for good. I should really take a photo of the driver side rear strut tower, I think it'll be "OMFG" moment for everyone on the west coast
-
I am thinking about leaving it on the car to reform the upper part of it closer to the A-pillar, but I am wondering if the Heatgun will take its toll on the Windshield/Seal? If I did take it off the form it, I would indeed need to make something for reference as to how far to bend it. Any ideas...?
-
Snorkel fitted! Just need to heat it up and bent it to follow the A-pillar better. Used a 3" Hole Saw, perfect fit! used a Step drill on the stud holes and adjusted as needed. Just need to make a custom fit connector for the air box outlet.
-
90-97 Mitsubishi Montero/Pajero NK/NH http://www.ebay.com/itm/351059163830?ssPageName=STRK:MEWNX:IT&_trksid=p3984.m1439.l2649 This doesn't match perfect, but a heat gun and some Sand will take care of reshaping it. El_Freddo from AUS did this first and this is where I got the idea.
-
Hmm, whats this?
-
I got the Non-A/C alternator bracket from Mitch (ystrdyisgone) today! I will clean it up and repaint it! I'll post photos.
-
No problem! I always like updating with new info! As for the Welder, I use a Flux-Core. Lincoln WeldPak-100 with either .030 or .035 wire. I would recommend a decent welder, Lincoln, Hobart, Clarke ect. You want a welder that has some temp and wire feed speed adjustments. The Harbor freight welder is more tricky to use as I've seen one in action. For my welder, typically welding 18ga or whatever these floor pans/body panels are made of, I leave mine on A setting for temp and have the wire speed about 2.5. If I need more heat for thicker metal, I'll put it on the B setting with same wire speed (There is a chart on the welder showing what each setting is best suited for and how fast to make the feed) I could probably weld 1/4" steel on D setting and feel safe that I got good penetration. Flux-core can do pretty much, and once you use one all the time you can even make pretty welds with it!
-
Yeah, I took mine apart and lubed up the Motor armature and bearings, also cleaned the contacts. It really helped!
-
This is a write-up on using the Rear Wiper Arm from a '09-14 Honda Fit. This is a direct bolt on upgrade! Parts Needed: Honda Fit Wiper Arm Part Number: 76720-TF0-003 Wiper Blade: Trico Exact Fit 16B Install Duration: 5 Minutes _____________________________________________________________________________________ First off a new genuine Wiper Arm assembly can be found on Ebay for $23 or less, usually free shipping! Most don't come with a Wiper blade as shown, but most parts houses will have the Trico Exact-Fit 16B which is no longer the J-hook style clip. Now once you have the Wiper Arm, remove your original one by removing the one 10mm nut behind the plastic cover, pull off the old Wiper arm (May need to jiggle as they tend to get stuck on the motor shaft) once off, remove the round plastic dust cover which covers the motor shaft and nut, this part will no longer be needed as the new Wiper arm covers that. You will then want to position the new Wiper arm so the Wiper blade will be Level with the Window Trim/Seal, once adjusted, apply the original 10mm nut and tighten down with mild force, the Shaft will press into the Beveled washer inside the new wiper arm and it will not slip under operation! Install the new Plastic nut cover provided with the Wiper arm and you're finished! The new wiper arm will press harder on the window for a cleaner, consistent wiping path. One of the best upgrades you can do for visibly. Enjoy, -Tom Note: This setup may also work on the EA81 Wagon and Hatchback.
-
Hoping it rides similar to its big brother Landcruiser, Nice and firm!
-
-
Finished installed the Tempo springs on the front struts and have bolt the front suspension back together. Also, this is a USMB First! Retrofitted a '09-'14 Honda Fit rear wiper arm on to the Loyale. Direct bolt on upgrade! More updates to come!
-
Put together the new KYB GR-2s with '86-'89 Accord Front springs. No cutting needed! These are gonna be nice and stiff and handle a good amount of gear. Also finished reinforcing the passenger side strut tower. This will be the next thing getting cut out! Cleaned up and recoated the Brake Proportioning Valve. Getting new Stainless hardware to remount it. Work is slowing up due to the week long weather.
-
Replacement Moustache Bushings - polyurethane?
TheLoyale replied to DPDISXR4Ti's topic in Old Gen.: 80's GL/DL/XT/Loyales...
http://www.ultimatesubaru.org/forum/topic/126559-retro-gl-10-turbo-build/ -
If you did want to lift your Legacy and have a nice tight feeling with less body roll, '96-'99 Outback struts with '98-01 Forester springs are the way to go. My '95 handled like a track car with this setup and Potenzas (Granted I used all new components) Food for thought.
