


81EA81
-
Posts
403 -
Joined
-
Last visited
Content Type
Profiles
Forums
Gallery
Store
Everything posted by 81EA81
-
Thank you! I've come to the conclusion this is indeed the flasher. I will replace it tomorow and I will include a pic of its location for future searches.
-
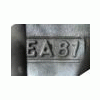
Hi, I have an 84 Gl 4WD 4sp dr wagon. Recently my turn signals would no longer flash,My hazards would stay steady too. So I assume I need to replace the flasher. After a bit of thumbing through a Haynes manual and poking around the dash I think Ive found it. Dose this look like a flasher?It was tucked up above the fuse box mounted vertical. Any input is appreciated. Thank you
-
That is one beautiful Subaru. Every bit of work looks really clean. Nice job on the bushings, I was unaware replacement bushing were available. All of my bushings are in need of replacement. Oh, and I have to mention the 65 Chevy in the background. Dose it belong to you?
-
 No pics currently to prove my measurements, But I used the same technique as pictured before yet with a steel ruler. Measured from the base of the stopper to the tip it was still 10 1/4". The "F" mark was at 9 7/16" from the base and the "L" was at 9 3/4" I hope this helps. Oh, I could always keep an eye out for a dipstick at the junk yard if your interested. Im suprised nobody caught that. glad you noticed and thank you for the thread jack
 -
Slightly off topic, But what about the water pump?I replaced it about a month ago and I used the paper gasket. Of course it is now leaking. I went to the dealer to get an oem gasket thinking it would be like the oem thermostat gasket (now I know its with neoprene,not just foam.thx GD ) and it is the same as the paper one. I think they just picked it up at napa and then sold it to me thru the dealer. I will be getting loctite 518 for it. Im curious. Dose Subaru even make a paper water pump gasket? Thanks
-
Hi, I have just picked up a rear u-joint for my 84 wagon. I have yet to install it so Im not certian its correct, but its a Precision brand in a yellow box. Part number is 391. purchased from NAPA. As far as the drive shaft goes. an ordinary aerosol cap will fit near perfectly in the rear output of the transmission where the yoke of the drive shaft goes in.Just electrical tape it up. I havnt run my car like this but it will seal it up real good while the driveshaft is out. NOTE: as soon as you pull the shaft from the tranny it will start leaking. good luck
-
Im no expert but while its apart I would replace it.seeing as its not correct. however on my 86 gl I run without timing belt covers,so I can easly watch them. The belt on my oil pump pully rides about 2-3mm back from the front lip/ring. Also another thing to consider is the cam pullys dont have any lips on them either. Just my opinion
-
Will a double row radiator fit in an xt?
81EA81 replied to 87.5ea82txt's topic in Old Gen.: 80's GL/DL/XT/Loyales...
Sorry to bump an old thread, But it kind of relates. My 86 gl ea82 has been running a bit warm at higher speeds. I recently replaced the water pump,OEM thermostat, and flushed the cooling system and filled with a 50/50 mix of antifreeze. Yet it is still running warm.It hasn't hit the red mark so Im hoping damage is minimal. Before leaning to a head gasket issue I would like to replace the radiator. So, IF I can find a dual core radiator will it clear the 110mm water pump on my car? -
Ungodly grinding left front
81EA81 replied to OREchipmunk78's topic in Old Gen.: 80's GL/DL/XT/Loyales...
McGuire! Yes,Thank you! I called around locally to price bearings through 3 suppliers and was quoted on average $25 per bearing and having 4-8 in stock I then found GDs recommendation for McGuire.They quoted me $10.95 and said they have about 100 units in stock! And they are right next door to the first place I called. SCORE!! THANKS Nice hot dog refrence btw -
I feel bad for the car and what Ive aimed it at. Id bet the car had never gone off road in its 280,000miles until I got ahold of it.(damn kids) But if it were not for me and the USMB the car would have been junked for sure. I lost all the good pics from the snow but I found the 2 situations where Ive been stuck. and both times I made it out by my self. I drove right into this one at the ORV park. lots of digging but I was able to pull forward out of it. I lost my muffler on that too. http://i1195.photobucket.com/albums/aa389/SUB_RU/FILE0261.jpg swampy grounds in the early spring. lesson learned. Dont bury your car to the frame! Im sure I trashed the wheel bearing from this. and what ever else water seeped into
-
Ive had a few issues. all related to the drivers side tensioner. It has come loose allowing it to knock around a bit, but that was simply caused from me being too cautious and not tightening it down enough. Lucky for me I caught the problem while it was sitting at an idle.all I did was snug it up more and it has stayed put. That along with the intake bolts make me want to invest in a 1/4" drive torque wrench. However I noticed the passengers side belt has developed lines in it, I think it may be too tight but its been like that for about 15,000 miles. So ill let it be. I thought timing belt replacement intervals were every 60k?
-
Wow, it has been awhile.This was kind of fun to read back through, I am such a worry wort. Better safe then sorry. Its funny I didnt know what Anti-Seize was. It seems I use it often now. The EA82 has treated me great. It has since easily passed 300,000 miles On occasion the car would leak a bit of anti freeze. I tightened the bypass hose atop the water pump. it seemed to help a for a month or two of light driving. But all in all the water pump needed to be replaced. Im so thankfull I left the timing belt covers off. Now if only I didnt have A/C that would of been a fast repair. I prepped the mount surface with either 220 or maby it was 400 grit paper. I used the supplied paper gasket with a bit of Grey RTV on each side. I did not want to use this method however it was that or nothing and it suprisingly did form a good seal. With oil changes every 3,000 miles there has been no ticks. I happen to enjoy the mechanics of an EA82. It really isnt too bad. Of course it still needs odds and ends but I am very happy with it. And It Dosent Leak ANYTHING!!! Thank you USMB!!!
-
My first Subie, 1983 Brat GL.
81EA81 replied to vahidisabrat's topic in Meet n' Greet. Your USMB Welcome Center
Nice! I wish mine looked that good. I dont think Ive seen one in that color Are those the front mud flaps in back? -
Are you talking about the aluminium skins on the lower doors? Thankfully this is the worst spot Ive found so far. Ill get more lovely rusty subaru pics soon Im glad I didnt use the white lithium grease. Today some one else at Napa told me it will begin to melt down and sling out at 150 Deg F.I dont know if its true but he seemed more helpfull then the others yesterday. Marine grease it is. I know it will see some water I was able to get the bearings for the DOJ out no problem. I just needed to work it around a little more. So between the spindle and the outer cup on the drivers side rear axle there is a little rubber spacer. Yet it is missing on the other axle. I will look on some old axles to see if they have em. Thanks
-
Side note. Yes rust dose exist in the northwest. More pics to come!!!
-
Craziness
-
4x4 EA series rear wheel bearing
81EA81 replied to 81EA81's topic in Old Gen.: 80's GL/DL/XT/Loyales...
Thank you, I may take you up on that.Ill PM you when I have the money to see if your still willing,However I was able to remove the ring with a punch and hammer. Thank you Morf for the links. Thank you and USMB for that. it helped me get an understanding on how to start. This is my first time dealing with the back half of a Subaru. usually all the action is up front. The outer lip was bent into the slots to lock it in place.It put up a fight at first then it seemed to go real easy.would it hurt to put Anti- seize on the threads during installation or is that a job for wheel bearing grease. Oh, and as far as races needing pressed it.GD, I thought I read somewhere you saying the outter steel on the race is strong yet the underlying layer is brittle and can form micro fractures from the impact of a hammer. My plan is to use a rubber mallet against the old race against the new. Bad idea? I hope all goes well. -
1986 GL Hatchback lurching in 3rd and 4th gear
81EA81 replied to tmax264's topic in Old Gen.: 80's GL/DL/XT/Loyales...
May be fuel starvation. What you replaced is technically called a "Vapor Separator". Its considered the secondary filter. There should be a main filter right before the fuel pump. Normally this will clog before the second filter. It should be located under the car on the drivers side right in front of the rear tire assuming its an EA81 engine. good luck -
I am in the process of replacing the rear wheel bearings on my 84 Gl wagon(EA81). I removed the trailing arm and CV axle from the car and since pulled the outer seal and bearing. My next step is to remove the retaining ring from the inside of the hub. I've done a bit of research and I discovered a Pin Socket specially designed for this job. By the looks of it someone before me used the punch and hammer method and two of the notches look a bit rough.Hopefully pics this evening The question is, Who has been able use this method successfully without tearing up the hub? Ideally I would order the pin socket but the bearings were ALOT more expensive then I thought. I will call around locally to look into borrowing one. Both the old and new bearings are NTN yet they are in a Timken box. Yes its a west coast car but there is still plenty of rust holding it together. It took a good effort to remove the CV axle. I have a question about this too, it will be asked with pics. Thank you.
-
My Subaru addiction struck again:)My intention was to find a beat up Brat to work on and to better my skills and experience with bodywork/rust repair so when the time comes I could properly fix my 86 Brat without being too timid. I found an '84 GL wagon for cheap and I decided to at least take a look at it just for fun. The car had sat for awhile judging by the amount of spiderwebs and weeds that had overtaken the engine compartment. The PO said 3rd and 4th gear was out. He seemed surprised that I asked to take it around the block told me. I checked the oil and it was about a quart low.The EA81 fired right up with a bit of a tick and the tranny whizzed and grinded real loud.It did run in 1st and 2nd the I went to hit 3rd and it sounded horrible. As I went back to 2nd I noticed the dash didnt have a single crack! this was a first for me! I returned safely and crawled all around under the car looking for any extreme rust.The guy thought I was crazy.I t was almost a deal breaker on the rust than I pictured the rusty Subarus back east and I had to appreciate what was in front of me. Of course with the love for an EA81 I couldn't pass it up. Especially for the price. lets just say I could of driven it to the junk yard and made a $50 profit. So the long journey home in 2nd gear began. It was a 30mi trip. I had to navigate some 55mph roads running 25-30mph. I felt bad cause I know I pissed off a few impatient drivers. Sunset I got home safe and sound. Here is the parts car the transmission came out of. Lucky I pulled the engine out last summer so the tranny removal took about 45 minutes.I was able to pull it out from the top The hardest part was the linkage.I found an old blanket and used it as a sling. one person on either end.It was about a quarter mile walk through the woods.That was a workout! Here it is sitting next to the car That night I busted rump roast and got the tranny pulled. I usually work on cars for fun but I now know the meaning really working on a car. Sleep.Dream Subaru.Wake.Coffee.Subaru.Coffee. Swaped parts/brackets and clutch fork. And in went the tranny. Honestly I kind of rushed it. I was stupid not to replace the clutch while it was apart but I had just spent most of my money. The driveway is looking better It now runs and is drivable but It sometimes has a bit of a stumble when you give it gas. I will change the filters and hope thats it. I changed the oil and it still has a slight tick to it. Im pretty sure this has solid lifters so I will need to adjust the valve clearance. It also sounds like the right rear wheel bearing is going out.That should be fun! Hopefully more pics to come Thanks.
-
where is the fuel pump on a 1986 Brat?
81EA81 replied to stinkydogfilms's topic in Old Gen.: 80's GL/DL/XT/Loyales...
The fuel pump should be under the drivers side of the car, between the end of the door and the rear tire. It will be on the topside of a plate with an inline filter right after it. You should be able to hear it "bobble" almost at your tailbone upon startup. The second filter it under the hood near the fire wall on the drivers side. it has a vent line out the top also. so it looks like a 3-pronged filter. its technically called a "vapor separator". Im not sure about the relay switch. To my knowledge the only thing in the tank is the Sending unit.(runs your fuel gauge). My gauge didnt work when I got my Brat and all I did was clean the connection on the back of the tank. Your lighted switch you speak of sounds like a passing lamp switch(center headlight).I though it came on 1980-82 models only but may have been retrofited. By the way Pictures are worth more then 1000 words on this forum. It is perfectly normal for your headlights to power up only with the the key on. this prevents you killing your battery if you accidently were to leave them on with the car off. Its not possible. Hope I helped Pictures!! -
Sorry for the low quality pic,The 4 speed is on the left an the 5 speed it on the right. 4 speed dr measures from the base of the stopper as shown to the end at 7 1/16" to be precise. 5 speed dr measured from the same points with the dipstick straight at 10 1/4" So the difference between them should be 3 and 3/16th". Or just as well 3 in:)
-
I just read this thread all the way through and Im very impressed!looking at the first pic of your Subaru in blue to what it has become now is almost unbelievable. Its cool you have the space and the tools and knowledge to do that. Granted you may have gotten a hand from your dad, that still takes strong organization skills and good time management. Ive never thought of repairing a dash like that.It looks cool black also. Excellent job.I like the mirrors,the bumpers,the contrast of the black on white and especially the Gold rims. Oh,the airbox and even the headliner too!Its almost overwhelming to see all at once. Nicely done! It inspires me to clean up my 84 wagon, but on a smaller scale:)
-
I have the dipstick for a 4speed dr sitting next to a 5 speed dr. the 5 speed is about 3" longer. Id show you but I cant find my camera at the moment
-
Simple EA82 water pump questions
81EA81 replied to 81EA81's topic in Old Gen.: 80's GL/DL/XT/Loyales...
I replaced that when I replaced the intake manifold gaskets.I should of replaced the pump too. the hose hasnt leaked for 10,000mi but It still wouldn't hurt to check it out again to guarantee it is the pump that is leaking. Thank you MilesFox, that is key information.I need the 110mm pump.I do remember reading Aisin being the prefered brand. I will have to try this, have you used it on EA oil pumps too?both my ea81s leak.I know Idasho used a Permatex equivalent on his EA81 case halfs,so I assume it is quality. Thankyou