-
Posts
118 -
Joined
-
Last visited
-
Days Won
3
Content Type
Profiles
Forums
Gallery
Store
Everything posted by dirty_mech
-
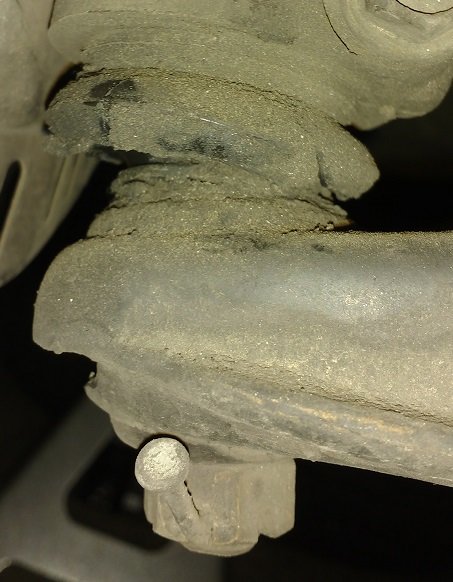
It's not a picture, it's an album. Scroll down and you can see the other pictures. And pardon me, they are my rear upper control arm bushings, for the lateral arm at the top of the wheel, which has the round plate for the cone shaped bumper attached to the frame. That's why I included that first picture, to provide a zoomed out perspective. Thanks for the tip on the ball joint. I suspect it is still functioning more or less correctly. The noise so far hardly qualifies as a nuisance, and there are no driveability issues. Ball joint is relatively cheap from the dealer so I will get it for sure. About dealership parts, I know some are low quality. For example, their blue oil filters are made by Fram and crap, as you can confirm here: I really wonder what parts are higher quality and what parts aren't when it comes to the dealer sometimes. Thank you for the input on ball joints, sound like they are the good stuff. OEM ball joints are $41.50. So even a good brand like Moog didn't do it for you? That one is 24 before tax, so I guess the dealer part isn't that much more. The rear link (rear control arm) bushings are $13 each, so $52 total. Not bad either. But the front rear control arm bushing is a sealed unit complete with mounting bracket, and costs $117. I think I might just go with an OEM junk yard control arm bushing in that case, on a car that looks like it had fewer miles. I think the nail was me when I mistakenly removed then reinstalled that nut during the shock replacement job. Maybe I overtorqued the nut. Maybe I messed with the alignment. The position of the ball joint thread shank and the nut affects alignment, right? I'll get it redone done when I replace my tires later. Damn, how do you wreck a knuckle?
-
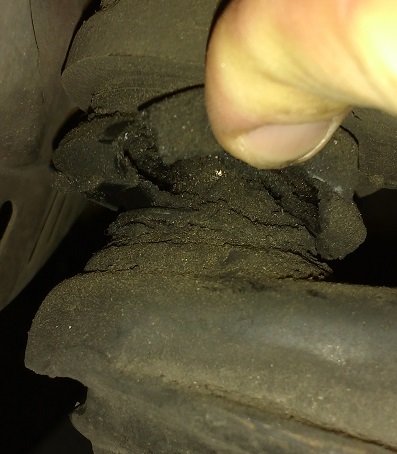
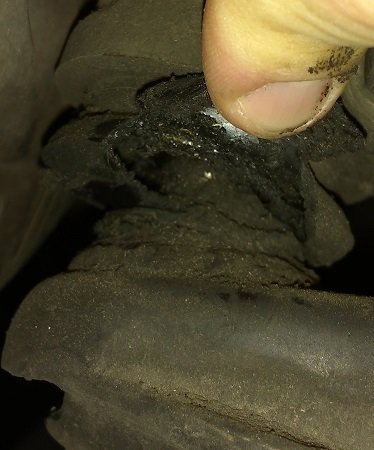
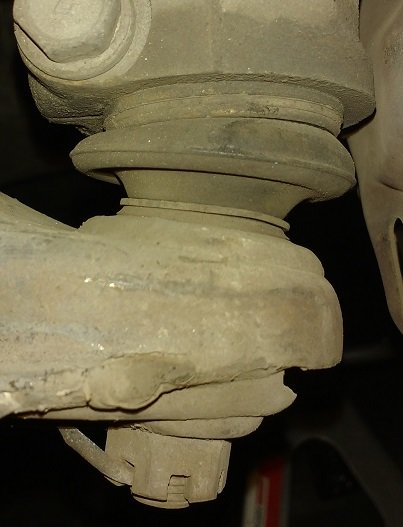
I did a more thorough inspection tonight and took off the wheels. In addition to the leaking rear control arm bushing, I found a bad ball joint and end link. Two pictures of the end link and three of the ball joint are below, plus a picture of my good ball joint. I also think all four of my rear link bushings are going bad in the rear suspension. I'll put pictures of that in a separate comment below. idosubaru, I have had the car aligned a couple times in the past few years. It drive straight. But I did do the clutch last winter, so I might've disconnected alignment parts when I disconnected the half shafts. I also haven't had an alignment since I changed the rear struts. The tires are 4.5 years old with 40k miles on them. I was hoping to get more use out of them, but would prefer to get alignment and tires done at the same time. I might settle for having the alignment done after I change the suspension parts, or get new tires at the same time. Haven't decided. I pulled and pushed both tie rod ends; zero play. Didn't need to do the lever test; I was able to visually identify the damaged parts. See the photos below. Thank you for your advice on the OEM Subaru parts; I won't change the good ball joint. numbchux you blew my mind, so those control arm bushings do have some greasy liquid in them! So that one is bad and needs to be changed as well. It is on my list. brus brother not likely, pretty sure I changed my strut top mounts when I did the struts. but I will keep it in mind if the noise persists after changing the parts which I can visually confirm have failed. nvu I will be replacing both end links in light of this most recent inspection. I am as surprised as you are about the control arm rear bushing; the smaller front ones looked okay. I fill my Subaru with crap and bomb up and down hills, so it doesn't surprise me that all these parts are going bad on my suspension. Thanks for all of your help. Hoping that my Hub Grappler kit will do for pressing in and out the bushings for the control arm and rear links. Now I must go buy parts. Any opinions on OEM vs RockAuto for suspension parts like bushings, end links, and ball joints?
-
Hi guys, 2000 Legacy L Wagon 201k miles MT. I've got a clunking noise when going over speed bumps, rough road, and sometimes when making tight turns and swerves. I generally only hear it at lower speeds, not highways. Replaced all four struts within the past 2 years. Haven't replaced ball joints, end links, or anything else. I've read past posts and found this one to be the closest to my symptoms: https://www.ultimatesubaru.org/forum/topic/109536-front-end-clunking-sound-over-small-bumps/?tab=comments#comment-919712 It seems the consensus is the most likely cause is bad ball joints or bad end links, or both. I've heard you should replace the end links when doing the struts, which I didn't do. I also have excessive wear on the inner edge of both front tires, which I heard is a symptom of bad ball joints. I am currently thinking that I should replace the balljoints and the stabilizer bar end links on the front end. I did a cursory inspection a few nights ago and noticed a greasy liquid on one of my control arm bushings. That is probably nothing, but how likely is it that a control arm bushing has gone bad? It looks like the only way to tell is to take the control arm off, as it's hard to inspect the bushings while installed... Does anyone recommend I check or replace any other parts besides ball joints and end links? Any tests I should do? Any strong feelings about RockAuto replacement ball joints and end links vs OEM dealer parts? Thanks for your help guys. Photos of my control arm bushings and end links are below.
-
I had the same problem recently. I thought it was my starter going bad at first. Turned out my battery was failing, and it would only manifest in the mornings if I had let the car sit for a good long time, 12 hours plus. Checked the voltage and it was at 12.4. Not a whole lot below 12.6, but a good battery will read at least that much if you drove the car yesterday. Batteries don't last long; mine was hardly 3 years old. Is your battery old? Have you checked it with a multimeter? Don't forget to check for loose connections at the battery and the starter. Could also be a clutch safety switch going bad. A battery slow drain due to an electrical fault is also possible, but I've never seen one.
-
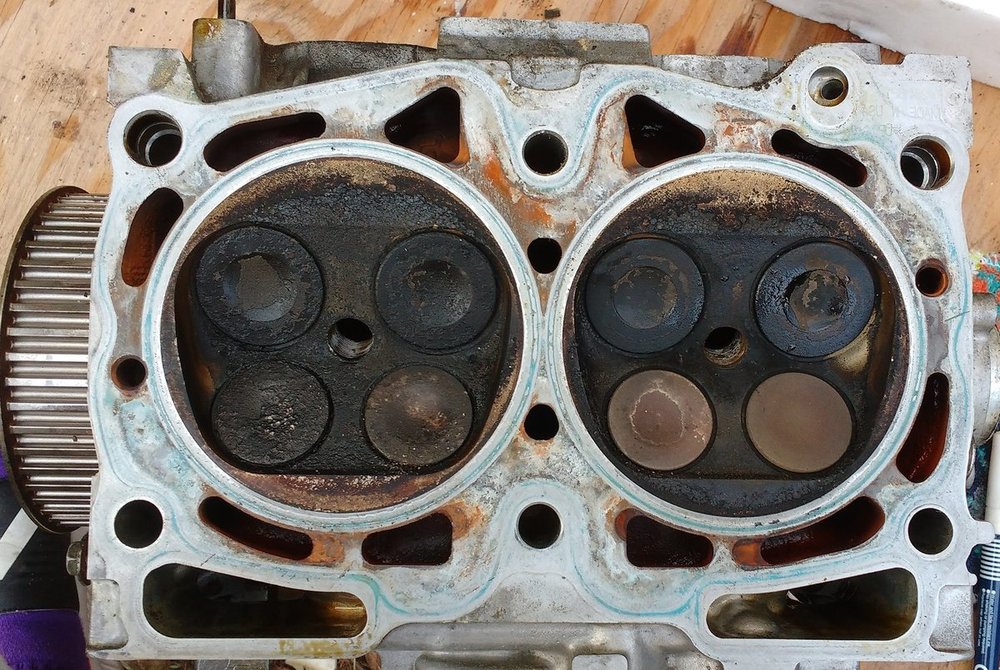
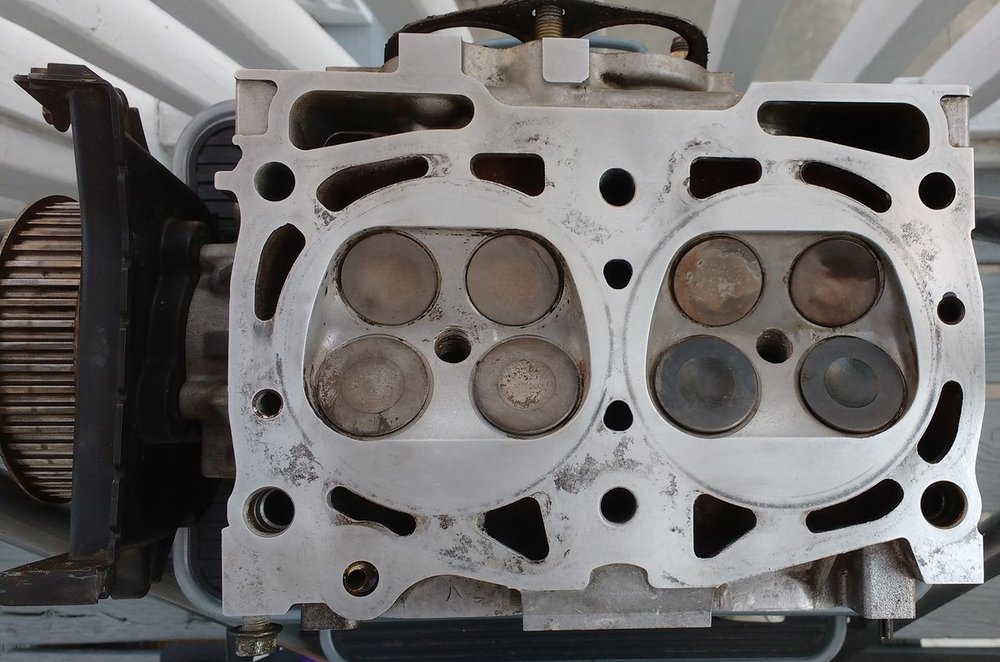
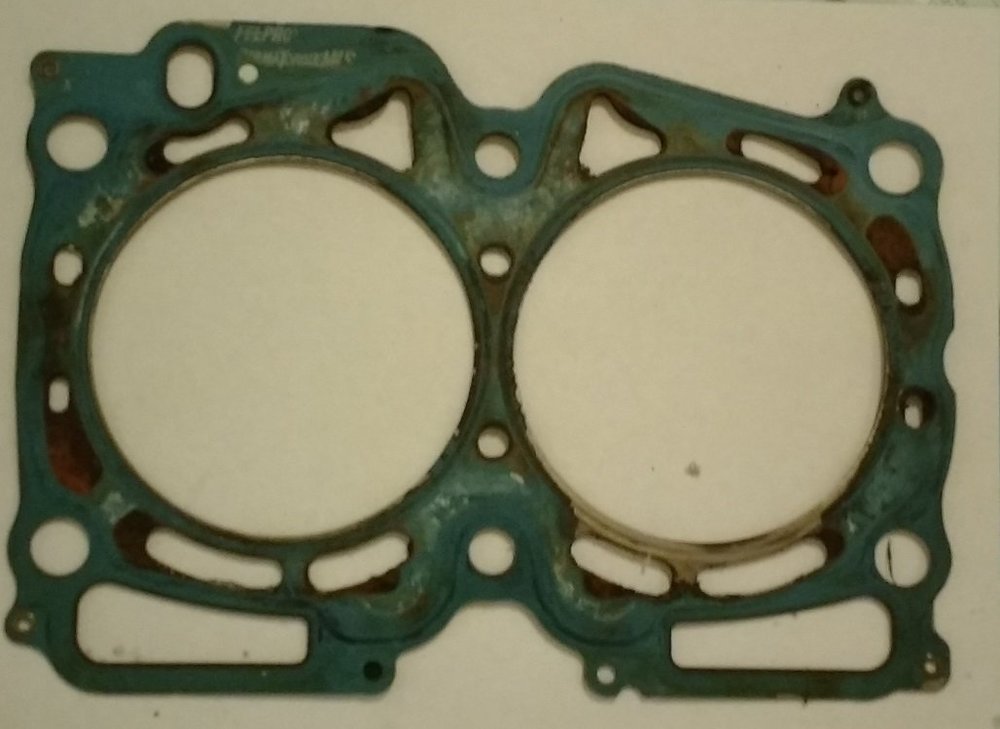
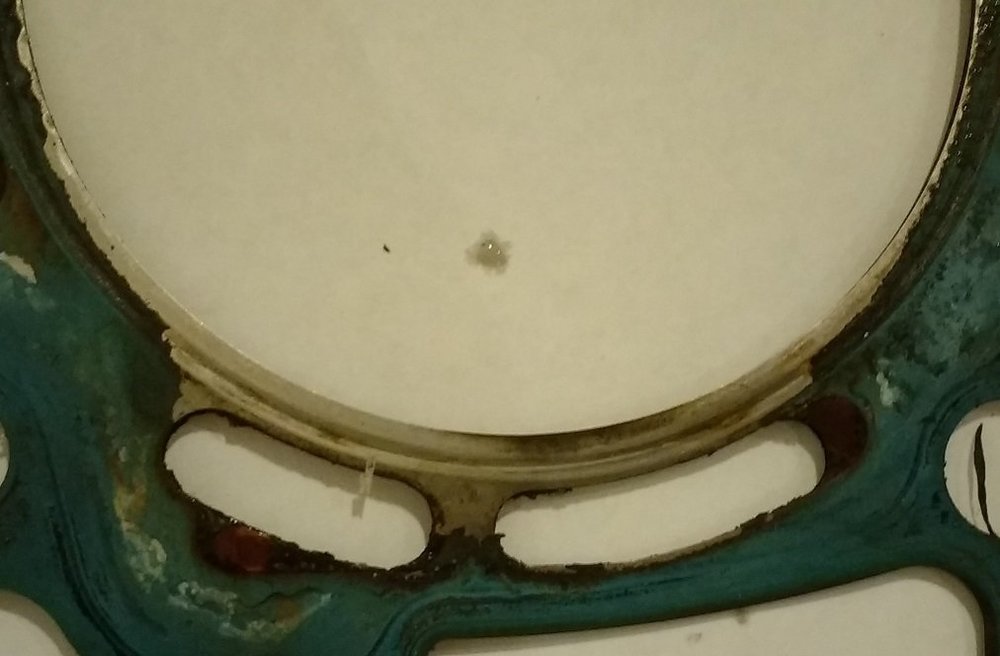
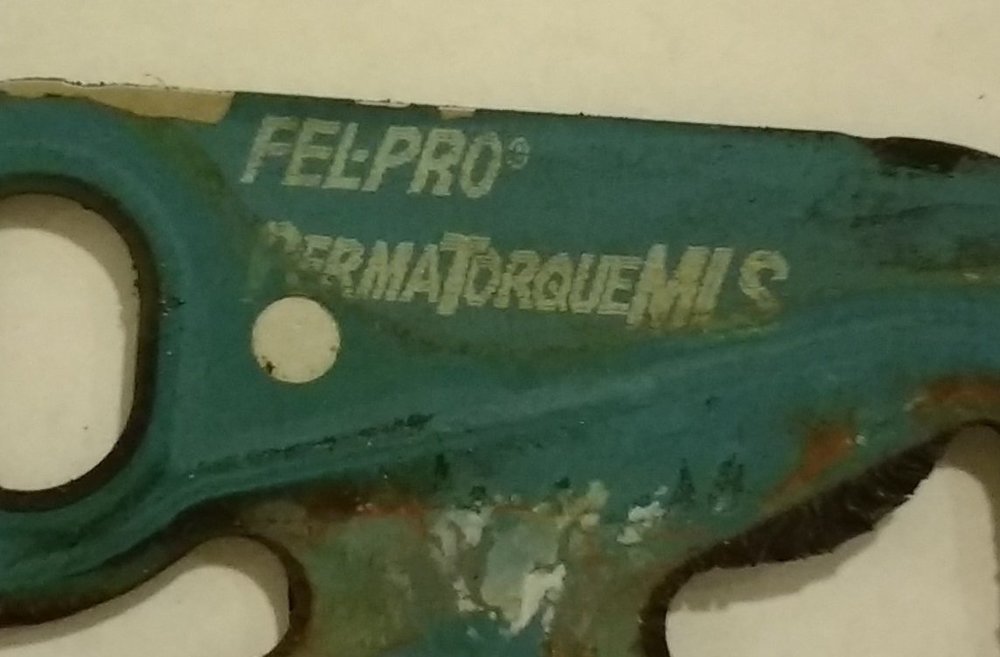
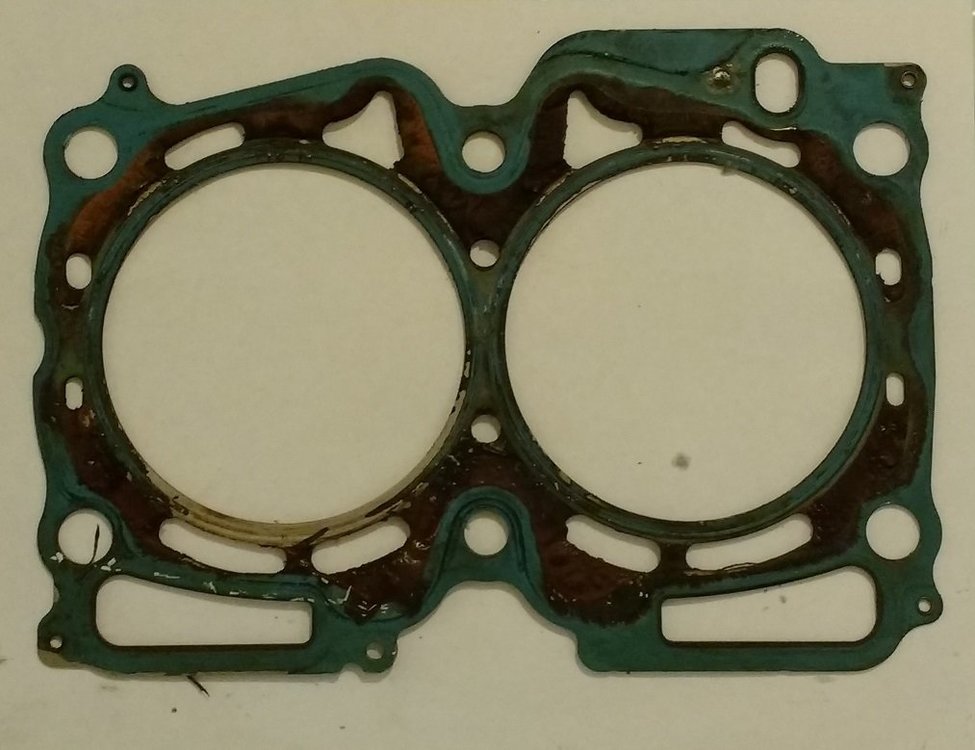
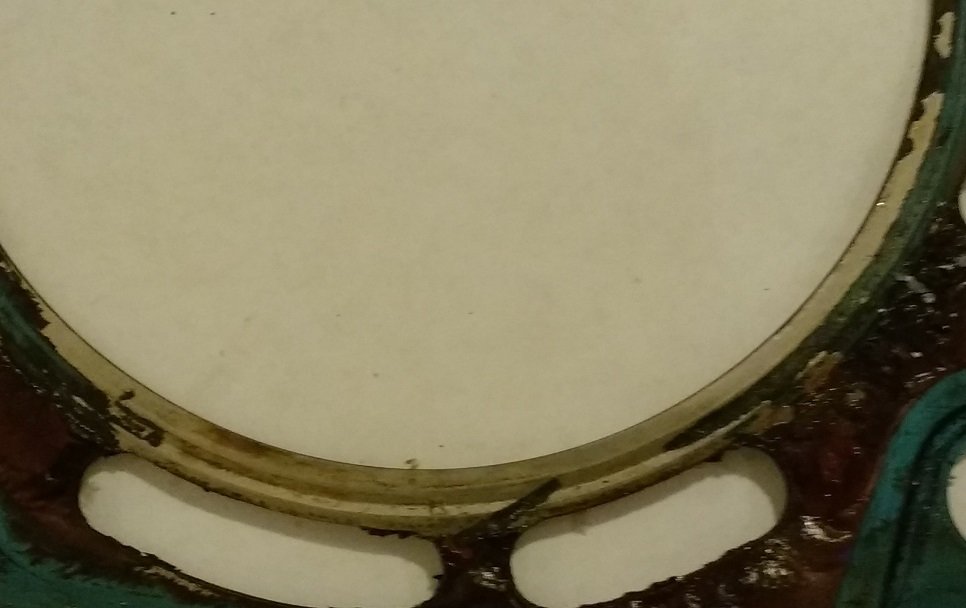
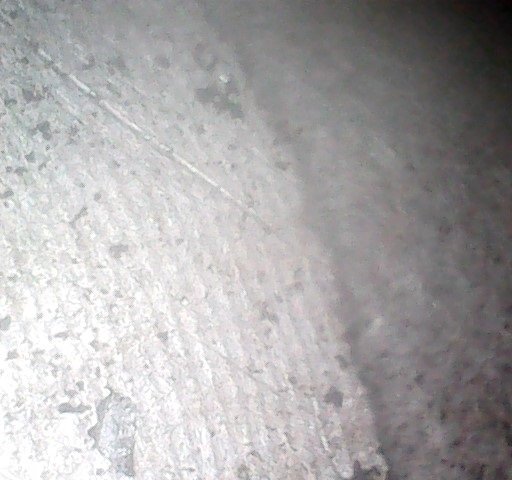
Alright guys. I actually got this vehicle fixed on the early hours of Sunday morning but haven't had time to write about it. The repair was a success and the engine is purring like a kitten after a couple hundred miles of mixed driving. Best of all, I DID NOT need to disconnect the motor and transmission mounts so that I could move it out of the way with a jack. You can replace EJ25 head gaskets with the block still bolted into the engine bay. The angle is awkward, frustrating, requires physical strength, and might give you a stiff back, but it is doable - and a good bit easier than unmounting the powertrain or even removing the engine. If you don't have the ability to remove the engine, or have to do this job in your driveway or on the side of the street, then this is a viable option. If you are the kind of mechanic that excels at removing parts from tight angles and awkward places, then this will be a breeze. In-Car Head Gasket Replacement Tips Be prepared to hold the weight of the cylinder head for a while to maneuver it out of the engine bay. Once you have fully unscrewed all 6 head bolts, the cylinder heads are best removed after taking out the top 3 bolts. This is because you are going to want clearance to raise and tilt the head forward towards the centerline of the engine to get the bottom bolts clear of their holes bottom holes. If you don't remove the top bolts, they will bang into the top of the engine when you tilt the head towards it. As the head face approaches a 45 degree angle, the bottom bolts clear their holes and you can slide it forward a bit before being clear to pull it out of the engine bay. The back bottom bolt on each head is the one that has the least clearance due to interference with the frame, so this is why you bring the head forward before lifting it out of the bay along with the bottom 3 bolts. Reinstalling the heads: I recommend you put the gasket on right before mating the head to the block. You first need to maneuver the block back into place with the bottom 3 bolts inside, then add the top 3 bolts once you have gotten the cylinder head close enough to the block. Do NOT put the head gasket on the block dowels beforehand. You are guaranteed to contact and mar it with the tips of the bolts, as well as knock it off the dowels and onto the ground. Instead, have it ready on the top of the block. Once you have all 6 bolts in and right before closing the gap between the bolt tips and the block, put the new head gasket in between the gap and slide it onto the cylinder head bolts. This is the only way to avoid marring the surface of the new gasket while installing the head. The gasket did not catch on the block dowels as the head was mated to the block, and tightening the bolts went smoothly thereafter. Review Very glad I replaced both gaskets; the other one was of course rusting and wearing down like the one that failed. With picking up parts, this job took me 3 days. That is 1 day longer than I expected because I didn't account for all the cleaning that needs to be done prior to reinstallation. The cylinder heads, block face, and piston heads all need to be cleaned. I very carefully scraped as much gasket material off with a high quality, sharpened and honed metal gasket scraper as I could, then used green scrub pads in combination with acetone and brake cleaner. Inside the heads on and around the valve faces, I used the same thing, along with a stiff plastic bristle brush and some Brasso, to remove carbon deposits. Around the perimeter of the valve seats, and on the piston heads, I also employed a pick to remove large flakes of carbon. A pick will definitely be needed to remove the carbon that builds up in the piston head depressions for the valves. I opted to spray clean the cylinder heads in a bath tub after cleaning the face and combustion chamber areas, to get rid of the Brasso paste and cleaning debris. I also replaced a lot of other parts; the timing belt, drive belts, spark plugs, and 5 cooling system hoses I could identify (2 radiator, 2 heater core, 1 bypass elbow). Timing belt was at 40k after 5 years. If it had been a bit less, I might have reused it. Fresh oil and coolant, of course. Coolant color is staying clean now. and best of all not "evaporating". I suspect my head gasket has been leaking for a while, but only got bad enough to cause engine failure recently, as I have been periodically having to refill it along with the oil that the engine eats. Replaced the intake gaskets but not the valve cover gaskets; just cleaned them and rubbed them down with AT-205 before reinstalling; no oil leaks from them. Turns out all that rust was from the head gaskets themselves, rusting away on the coated outer layer as seen in the pictures. The first head on the driver side with the misfiring cylinder was very clean on the piston head and cylinder head valve areas. This is because coolant was leaking into the cylinder, and it got a steam cleaning. You can see the cleanliness in a picture I posted above using an endoscope through the spark plug seat prior to disassembling the engine. If I had bothered to look inside a different cylinder, I would've seen how dirty the other piston heads were looking and known right away what was going on. The water pump was in good condition, so I reused it. However, one bolt hole at the top had been previously stripped5 years ago, to which I had added a bunch of silicone sealant as some insurance. When reinstalling the water pump bolts at the specified 108 inch-pounds, a second adjacent bolt began stripping. So now I have two partially stripped bolts on the top of the water pump. I slathered the affected area with Ultra Grey as insurance against a leak. Next time I take this engine apart, I will have to drill out, tap, and install repair inserts into those bolt holes. The engine seems to have more power and acceleration now. Glad I cleaned the combustion chamber areas prior to reassembly. The top reason I think this head gasket failed is because I didn't change my coolant, it became acidic, and ate away at the head gaskets. I also added water to the coolant reservoir rather than coolant, which diluted the coolant and facilitated rusting. It probably didn't help that I was trying to get away with 10k oil changes by using a top quality filter and full synthetic oil. It also probably didn't help that I was using platinum plugs rather than the OEM NGK plugs. I'm going to check my coolant more often and change it regularly now, perhaps even annually, and make more frequent oil changes and spark plug inspections/changes. I only took a couple pictures of the job because this is my only vehicle and I needed to fix it ASAP. I'll attach what I have, a couple before and after cleaning pictures of the heads, below. Thank you for all the responses and help guys.
-
Okay thank you for the input. I've picked up parts and am doing both sides, with a new timing belt. Replacing intake gaskets, have valve cover gaskets on hand if needed. Also going to replace all 5 cooling system hoses, belts, and spark plugs, later when they arrive via shipment. Already pulled the water pump; it actually looks great, and idosubaru in another thread posted a comment indicating that these things rarely fail: Therefore I"m not replacing it. Way easier to get to than the head gaskets anyways, if it does happen later. I'll post an update with my progress once the job is done.
-
Hi nvu. No I used Fel-Pro MLS gaskets. Exact kit was the Fel-Pro HS26170PT1, from Amazon here: https://www.amazon.com/gp/product/B000C2AISU/ Going to pull the water pump; gasket is $5 from the dealer so not bad. I am currently considering doing only the head gasket on the driver's side rather than doing both. I see some forum post saying DON'T DO IT. But I also see that doing the passenger side requires disconnecting the engine and transmission mounts while moving the drivetrain up 5 inches and over to the other side to make room, per this web page: https://www.subaruforester.org/threads/how-to-replace-ej25-head-gaskets-without-removing-engine.57335/ Any opinions on doing just ONE head gasket? I am going with OEM gaskets from the dealer, per advisement in other threads. I'm also considering reusing the valve cover and exhaust gaskets. I don't think reusing exhaust gaskets is controversial, but what about the valve cover gaskets? Probably going to wipe them off then wipe them down with AT-205. The intake gaskets are only like $12 for a pair from the dealer, so I will replace those, but the valve cover gaskets are $30 plus tax, which is why I am thinking to reuse them. Only 5 years old as well. If they end up leaking later, well they aren't too hard to access. Any opinions on that?
-
Started it up again this morning, and there is white smoke coming from the tailipipe (just not enough to see from inside while driving). The smoke is so moist that the concrete becomes visibly wet. There is also bubbling inside the coolant reservoir, even though the engine is completely cold. 100% a head gasket failure. I found this informational page about Subaru head gaskets in another post: https://allwheeldriveauto.com/subaru-head-gasket-problems-explained/ And I realized I checked almost all the boxes on stuff that causes a head gasket failure: - Used aftermarket head gaskets when I did this job 5 years ago - Not changing the oil often enough (was trying to do 10k interval changes with full synthetic and Wix XP filters) - Not changing the coolant often enough (might've been 5 years ago that I did it). - Possibly not using OEM style spark plugs Sigh... Now what I need to know is this: Can I do the head gaskets without removing the EJ25 engine from the car? I think I've read that it's possible but much more difficult. I just don't have an option at this point. Going to pull and inspect the water pump as well, given the rust in my cooling system. Any further advice is much appreciated.
-
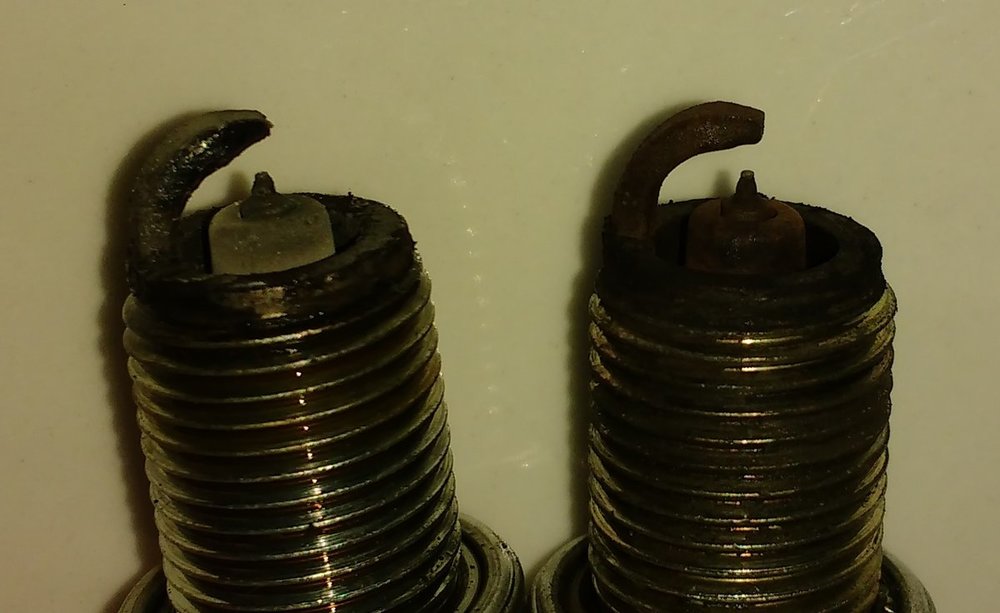
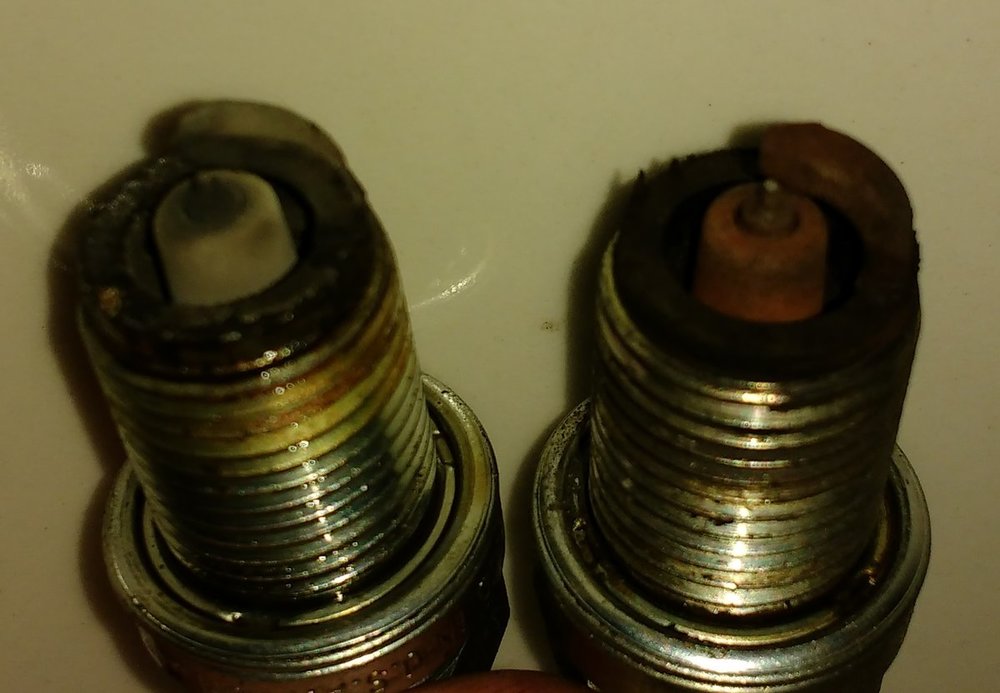
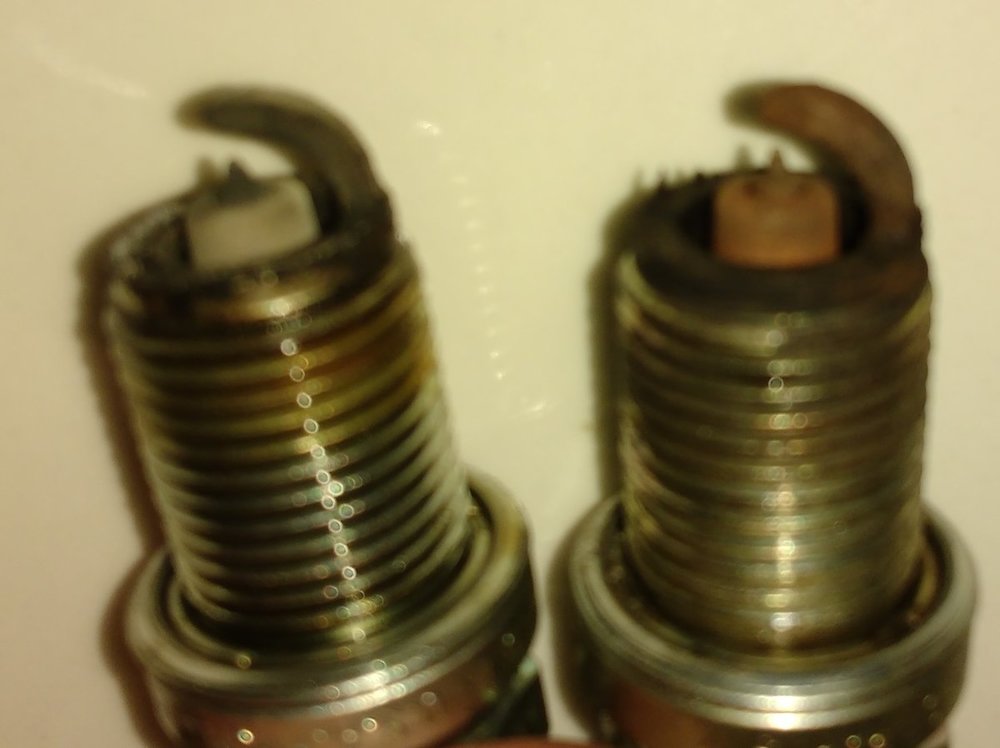
Hi all, This is a 2000 Subaru Legacy L Wagon EJ25, just recently cracked 200k miles. Replaced the valves, head gaskets, and timing belt about 5 years back when the belt snapped and crunched the valves. Replaced the spark plugs, wires, fuel pump and filter less than 2 years ago. Last week, I realized my overflow reservior was empty and that there was tons of rust colored water in my cooling system. I knew that I at LEAST needed to flush it and replace the coolant. Pretty concerned as to the source of the rust; could be the water pump impeller, lower radiator hose spring, etc. Considered just replacing the water pump out of an abundance of caution, but decided I would let it ride as long as the cooling system is working, and just flush it. Noticed rust colored residue at one side of my lower radiator hose and realized that it was leaking, but so very slowly that it didn't leave a puddle as it did so. Probably just evaporating off the hose as the car ran. Cause was a worm drive hose clamp that had come slightly loose. I think I might need to get a more reliable type of hose clamp, but just tightened it up for now. First I removed the thermostat (not rusted), then did a couple water flushes, then a 50/50 vinegar/water flush for a day, then ran water through the radiator and engine with a garden hose. That was all this last weekend. On Sunday, after flushing with the garden hose, I put a bottle of Prestone Flush + Cleaner in the system plus water. Instructions say you can drive with the cleaner in the system for up to 6 hours over the course of a few days for "heavy duty cleaning". I planned to drain and flush the system again today, when my new thermostat was scheduled to arrive, then fill up with coolant. However, this afternoon the engine started idling rough and the CEL started flashing, which I've never seen before. The engine also starts to overheat. I check the radiator and find it's missing a good half gallon, which is confusing as hell because there is no leaking under the car and no white smoke has been coming out of my tailpipe. The overflow reservoir is also completely full and bubbling when I check it. Removed the timing belt cover; no rust colored splattering as you might expect from a weeping water pump. I could see the water pump too; no signs of problems. No problems in the engine oil either as checked via the dipstick. I refilled the radiator and emptied the overflow reservoir, but the overflow reservoir keeps filling up, bubbles and all, and then I overheat again. The engine also idles rough. The CEL will flash when I am idling at a stop, but then cease to flash when I'm driving and just stay on instead. Code is P0304 - Cylinder 4 misfire. I have a sinking feeling that I may have damaged my head gaskets with this Prestone cleaner, and now have a damaged head gasket leaking coolant into cylinder 4. I've drained and flushed my cooling system again and refilled it with just water. After watching the level at the filler neck, it seems it may be very slowly draining drop by drop, with no external leakage visible, which could mean coolant is going into the engine. I am going to investigate further tomorrow morning. I used an otoscope to peer into cylinder 4 and didn't see any water or rust stains. I even tried lightly pressurizing the engine with the garden hose when I was flushing it and still didn't see any water inside. However, the cylinder 4 spark plug is reddish with black, while the cylinder 1 spark plug is white with some black deposits. I've attached 3 photos of the spark plugs as well as 1 of the inside of the cylinder 4 using the otoscope. If this problem sounds familiar, or anyone has any advice on what more tests I can do to diagnose this issue, I would much appreciate it!
-
One of the four bulbs in the high-mount brake light of my 2000 Legacy wagon went out, and I lost cruise control. There are four bulbs, so you really got to take the cover off to check and be sure; one might be easy to miss. I also found one of my side brake lights was intermittently going out because of a loose connection (compressed socket contact tab), which could be manifested by lightly wiggling the bulb while on its socket. This could explain why cruise control would only work for me intermittently in recent months. Replaced bulb, tightened loose connection, and cruise control returned immediately. High-mount bulb type was a 912. Side brake bulbs are an 1157.
-
Hey guys, I'm grabbing a sensor from RockAuto to swap with AZ since they charge over $30 more for the part (they are actually cheaper on the fuel pump though), and I saw this part https://www.rockauto.com/en/moreinfo.php?pk=10353284&cc=1358210 There's your replacement surge filter cap, complete with O-ring and even a fresh gasket, for 30 bucks. The part description on Amazon even says it has a stronger cap due to the original ones breaking: https://www.amazon.com/Dorman-902-438-Housing-Repair-Select/dp/B07KG7K8GB Think I'll scoop that part with the sensor as well.
-
tldr; It was the oxygen sensor. The car started losing power again on the freeway, I pulled off and it died. Did it three times in warm weather street traffic. I tested the spark plug wires' resistance in ohms at piping hot temperature while waiting for the vehicle to cool down a bit so it would become driveable. I later tested their resistance while cold, and also tested the resistance of a new set. Since I couldn't find the information online, perhaps someone will find this a good reference. Here were the numbers on a set of NGK 8691s: # Old Hot Old Cold New Cold 1 4,150 4,120 3,820 3 4,210 4,180 4,080 2 4,990 4,950 4,790 4 5,280 5,210 5,120 The spark plug wires' average increase in resistance due to high temperature was close to 1% of total ohms. Once the car was driveable, I made it to AZ and picked up my Russian parts roulette set of NGK spark plug wires, Delphi fuel pump, AZ brand ignition coil, and a Denso oxygen sensor. Got a wally world code reader after that; no pending codes. Couple more sputters on the street. Pick N Pull was next, which wasted my time for used parts. The catalytic converters all get snipped out of the cars, along with the oxygen sensor that screws into it. Also, at the end of the day, they apparently no longer send the tractor around with a horn to call closing time. Instead, they just close the register. I was waiting to hear the closing horn and never heard it. I got there three or four minutes after the hour, and was told leave the part and come back tomorrow to pay. Maybe that's what they need to do thanks to some tweaky agro locals who ignore the horn, but FFS at least play one for the people who won't. Well I got lucky when I played parts roulette. I was hoping to install one part at a time and test for resolution of the problem, but at this point I was really tired and it was late. I opted to install two parts at a time and then test. I went with the spark plugs and oxygen sensor together for my first attempt. The old plugs didn't seem bad, but they didn't make a great solid connection on the ignition coil, either, and I didn't want to install expensive parts before cheap ones. The oxygen sensor I decided to install after first searching how often to change them, since it's not listed in the maintenance section of the Chilton. Most said 100k miles or so. I read deeper and came across this gem of a sentence: Boom. That's basically all my symptoms, with the caveat that they happen when the car is hot and go away when it is cool. Loss of power was followed by rough idle, then sputtering and stalling. Misfires happened while attempting to restart the engine. This cycle would most often happen under engine load at full temperature, or at low RPMs, and especially when trying to accelerate hard under engine load at low RPMs. Also I can't say that I noticed it being crazy with the gas. It was doing 25 mpg highway and almost 20 in urban traffic, which I figured was good for an old 2.5, but maybe it's improved a lot now. I'll keep an eye on it. The sensor went in, and I test drove the car last night and today. No sign of the problem. I swear I've heard before that the oxygen sensor doesn't work reliably until it is at operating temperature, and thus doesn't factor into ECU engine management until the car is warmed up. Maybe that would explain why it performed better when cool. Or perhaps the failure is due to the repeated heating and extra resistance present when hot. The sensor pigtail was covered in greasy engine crud as well. I have no clue how old it was at the time. The inside of the connector was bright orange; perhaps factory? I did a resistance test on the old and new oxygen sensors before installing them. Looking inside the electrical connector for the sensors, with the side with two plastic grooves facing up, I numbered the terminals as follows: ___|_|___ __| 1 2 |__ | 3 4 | They had identical readings; only 1.5 ohms of resistance could be detected between terminals 1 and 3. No other resistance measurement registered on my meter's maximum reading range of 2 million ohms. Perhaps it would have been different had I read the old one while it was hot instead of cold. The only visible difference between them was the old one had grime on the wire lead and old one looked frosty white too: I don't know how to test these oxygen sensors any better than I tested the spark plug wires. Nothing in the Chilton about how to test them. Couldn't find a guide online for free; Subaru wants you to pay a $35 subscription to access their service manual. All said and done I got lucky. This could have just as easily have been the fuel pump like you guys were saying. I am guessing the differentiating factor was how it happened only when the vehicle was hot. I will probably do the fuel pump and that strainer cap's O-ring while I'm at it too, just to avoid another problem. Cheapest I can find a Viton 928 ring for is $8 for a ten pack on eBay; maybe there's a place I could find just one but I'm not sure. Well that's my report. Thanks again for all the help guys.
-
Hello everyone! Thank you for your input. Here are individual responses: el_freddo: I will inspect the Idle Air Control valve and keep it in mind and on the lower half of my list for if the bigger suspects don't shake out. I looked it up and can't find it for cheaper than $150 for a new one on a manual transmission; ouch! Might have to get a junk yard valve in that case; they are $31 themselves at Pick N Pull which is pricey for a junk yard part. I will get a coil pack from my junk yard for sure; $13 instead of 70. On RockAuto it looks like they are calling ignitors an Ignition Control Module (ICM). I looked up my 2000 and a 1994 Legacy's ignition parts section, and see that is an additional part only on the '94. So that is off my list! I'll also replace the fuel pump as well, with a Delphi unit, because replacing it is relatively cheap but also a big project. The gas tank needs to be cleaned prior to a fresh install. I can't do that job properly on the side of the road, and so don't want to risk it failing. I wish I could swap packs with a mate's but I've got no mate and I've broken down twice on a ten-lane bridge. Private companies aren't even allowed to tow in that situation, and I've heard it's like a $500 charge from the state transit agency to get you off the bridge. I'm better off just buying a bunch of parts, hoping one of them is the issue, and chalk up the rest to preventative maintenance. But I do love the idea of swapping parts on an identical vehicle to identify the problem; that's bloody brilliant. Makes me want to buy a second Legacy. 1 Lucky Texan: I haven't scanned it for pending codes. I hadn't heard much about pending codes until recently. I need to get a new reader, and might run out to wally world for a replacement tonight since you mention it. Mine has been stolen twice after leaving it in the glove box all the time. Unless you live in a very high trust area then be sure to leave your code readers at home, folks. mikec03: Correct, it has the MAP sensor, not a MAF sensor. Is a MAP sensor failure not likely to cause this type of behavior? I will absolutely make sure to install new wires and make sure they are tight. The vehicle behavior only started a little over a week ago, and I've been super busy, so haven't had a chance to address the issue. I will also replace the upstream O2 sensor, but only if the other issues fail to resolve the problem, and even then with a used junk yard sensor. A new one for me is $100 before shipping. I'm guessing you didn't include the downstream O2 sensor because it is not an engine-killer when it fails, and is only for emissions purposes? Thank you all again for your input. I will update you once I've inspected the IAC valve, scanned for pending codes, replaced the plugs and fuel pump, have the spare oxygen sensor and ignition coil in hand, and have tested the vehicle again. Cheers!
-
Hi guys, My 2000 EJ251 Legacy L Wagon has been losing power and dying in heavy stop-and-go traffic. The engine losing power and dying has happened to me four times. The car seems to stop behaving this way if it is allowed to cool and heavy traffic is avoided. The engine power loss has never tripped an engine code. I suspected the spark plugs first; they have been replaced. They were at least 4 years old, and one had melted to the point that it must've been triple the gap. I also replaced the fuel filter for good measure, and ensured the air filter was clean. At first, this seemed to solve the problem. However, it happened again in heavy traffic today, and in a much more sudden manner compared to previous two failures which were preceded by a gradual loss of power. After five minutes of rest and several starting attempts, I was able to get the engine running. It had so little power and RPMs, until I somehow got it into higher RPMs, which seemed to correlate with a momentary return to power. I was able to limp it off the freeway before it failed again on a side street. I took out the new plugs and checked them; they seemed dirtier than when I put them in a few days ago but not damaged or out of gap. My next suspect is the blue and black spark plug wires. They could be as old as the car; I've never replaced them. I also noticed that after replacing the plugs, I forgot to put the run of the battery cables into the plastic hook on the left, engine-facing side of the wiper fluid reservoir. This left them touching and pressing up against a couple of spark plug wires, which I am guessing could exacerbate spark leak. If that doesn't solve the issue, I might also guess that the ignition coil could be bad. Since this problem is intermittent, it might be difficult to pin down the offending part. My only other guess after that would be the ECM or wiring harness, or possibly and intermittent failure in the fuel pump. The car runs fine the vast majority of the time, so this doesn't seem to be an engine mechanical issue. It seems like it must be an intermittent ignition, electronic, or fuel delivery failure. If you have any ideas, please let me know! I don't want to have this car randomly die on me again in heavy traffic for a fifth time.
-
After researching further, I'm inclined to use some Gumout Multi-System PEA cleaner in a couple tanks of gas per this Scotty Kilmer video: http://y2u.be/gg9ppeUMpK4 I may even use an endoscope I have lying around as a borescope to check the pistons before and after the treatment. If so, I'll post the pics here afterwards.
-
I already got the plugs and filter swapped. It's running good again. Now that the breakdown is resolved, I'm inclined to agree with you; if it's not broken, don't fix it. By premium fuel, do you mean brand-name fuel? Or higher octane? Because everything I looked up on high octane gas suggests it leaves additional carbon deposits in engines that aren't designed to run high octane gas. For example, this discussion: https://forum.miata.net/vb/archive/index.php/t-235435.html I've read other places talking about using water or chemicals at the intake, but I'm inclined to just throw some PEA based detergent in the gas tank prior to a highway-intensive road trip.
-
My 2000 Legacy EJ25 wagon recently started sputtering at low RPMs in slow traffic. It finally gave out on me just off a freeway exit. Pulled one of the 5+ year old platinum plugs and sure enough one was melted down like a used candle; the rest were fairly fouled as well. I will get fresh plugs and replace the fuel filter while I'm at it because it is past the maintenance period in age. Questions: 1. I would like to try and clean a bit of extra carbon off the valves and combustion chamber before installing quality plugs. I plan to use a spray can of Mopar combustion chamber cleaner directly into the intake with the car running as per this video: http://y2u.be/NDI6v8QeWVE 2. I want to install fresh O-rings either way, but what is better: Clean or replace the fuel injectors? I see they are about $25-30 each plus a core on RockAuto, and that's remanufactured. Would it make more sense to replace the injectors with remanufactured units, or to clean them with one of those inline PEA chemical cleaning kits? Or does it not really make sense to clean injectors if I'm going to run a PEA fuel additive through the system anyway? Searched through posts and couldn't find much that was relevant or conclusive on these issues. Hoping someone might have a clue. Thanks!
-
Thank you all for the great advice! I will definitely buy a hardware kit for the parking brakes and probably just remove the glazing with light sandpaper from the current rotors, and also get some high quality brake grease. Back when I was a dumb kid I tried to "turn" a friends rotors by removing grooving with the side of a 7 1/4" circular saw metal blade. The rotors must've come out uneven as his new brake pads wore down to the plates after a few hundred miles. Wish I had known that grooving wasn't such a big deal; I would've left them as-is and avoided a big headache! EDIT: I ended up buying: CENTRIC 11847005 (118.47005) Parking Brake Hardware Kit POWER STOP 17770 (17-770) Brake Pad WAGNER Z794 Parking Brake Shoe Shelled out an extra $7 to get the Wagner parking brake shoe set over the Centric brand. Not sure if it was worth it or not, but the company behind Wagner is about 15 times older and the warranty was 4 times longer (12 vs 3 months) so I decided to play it safe.
-
I've got a 2000 Legacy wagon. I'm about to replace the rear brake pads (and parking brake shoes while I'm at it) which are down to about 25% thickness. The brakes make no noise and no grooving is visible. Given this, is it really necessary to turn the rotors? I've read a site on another thread where most people thought it would be unnecessary: https://mechanics.stackexchange.com/questions/73/should-i-resurface-or-replace-my-rotors-everytime-i-replace-brake-pads What is your opinion?
-
UPDATE: I've got bad and good news. Bad: I've made all my best attacks using the advice in this thread and was not able to get the bolt to move. It appears it will be necessary to remove the rotors and backing plate to attack the bolt with a rattle gun and/or breaker bar. The rear brakes appear to be the drum-in-rotor type for the parking brake too, so it will be a nice pain in the butt to disassemble everything. Good: The rear brakes appear to be around the 25% mark so I need to replace the brake pads anyway, and I might as well remove the rotors and replace the parking brake pads while I'm at it. Those things probably haven't been replaced since the car was new. Reading on this, I'm trying to decide if I should turn/replace the rotors or not as there appears to be no grooving. I've read the back posts and am going to start a separate thread on this topic as none address it directly (or even indirectly very much).
-
Thanks for the info! I've never heard of the ATF-acetone penetrant; will try when I next get a chance. For now I'll try using the B'laster after I've hit the nut with propane flame for 30 secs and then hammer it in both directions. This will be my last attempt before removing the rotors for breaker bar access.
-
Yeah I think I'm just going to have to bite the bullet and pull off the rotors to do a double breaker-bar method on it. One on the back to prevent rotation, one on the front to break it. I'll use solid 1/2" drives to do it. Going to Harbor Freight soon so I'll pick up a pair to replace the one I have that's bent up like a macaroni elbow. A fact I learned about breaker bars on the job; you can generate more torque by putting yourself between the ground and the bar and pushing up on them rather than pushing down or putting your weight on them. An old mech taught me that one when I was having trouble cracking some wheel hub nuts. Good stuff.


.jpg.12bd3fafb0c6bd9e9ee703ef525b9f91.jpg)
.jpg.e863a8300c0fb9149b7b13a7b163b914.jpg)
.jpg.b2cecb3770af2535be0e49fc7ae4ff38.jpg)
.jpg.24a293cf059c840bdaf269cc06f584c1.jpg)
.jpg.2ce64c937e18beb0e76a3d82ebfcb27e.jpg)
.jpg.dc4d2366d6f8f33153650d93eb4b1773.jpg)
.jpg.6fc3be2e326a850ad6b34a82252d93f6.jpg)
.jpg.b0fda1c99d5af699a04b3695b24d7e2a.jpg)
