

pressingonward
-
Posts
107 -
Joined
-
Last visited
Content Type
Profiles
Forums
Gallery
Store
Everything posted by pressingonward
-
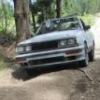
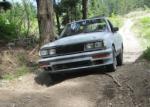
Totaled my wagon yesterday.
pressingonward replied to Corvid's topic in Old Gen.: 80's GL/DL/XT/Loyales...
When you get the hood open look for places where the body contacted the engine and check for damage. Bent/broken crank pulleys, water pumps, etc. are common. If the motor has been moved around at all, check the aluminum case VERY carefully for partially stripped out motor mount holes, cracks, etc. -
The Awesome Older Generation Picture Thread
pressingonward replied to 6 Star's topic in Old Gen.: 80's GL/DL/XT/Loyales...
The tires on the blue wagon look huge. Any info on this car? (Lift height, tire size, build thread?) -
Help me pass emissions with my weber
pressingonward replied to Lachlan's topic in Old Gen.: 80's GL/DL/XT/Loyales...
Those numbers are insanely high. Your car is running pig rich. I would suspect the Weber is tuned for sea level, and at your elevation there just isn't a whole lot of air, so the jets need to be smaller to reduce the amount of gas. It does not matter what carb you are running, a Weber will pass just as well as any other carb that is tuned right (with the possible exception of a carb that is way too big for the motor or something, but that is not the case here). Unfortunately I have no experience jetting the Weber, but you should be able to find data online for which circuit in the carb controls fuel at 1/4 throttle (I would guess that's about where you'll be at 2,200 rpm), then get jets for that circuit and replace them a step at a time until you find the sweet spot. You'll probably need to play with all of the jetting to get it to really run smooth at all throttle/load conditions, not just that circuit. Your cats are probably dead, they cannot handle extremely rich mixtures without melting down. The black soot coming from your exhaust is carbon from partially burned fuel mixed with water. Again an indication of your rich condition. Let me know if you have any other emissions questions, I've been a Washington State Certified Emissions Tech in the past (doing mechanical engineering now), and I strongly support tuning your car up right vs. faking it through the emissions test. -
Just put the first 100 miles on my new 86 GL
pressingonward replied to ubtripn's topic in Old Gen.: 80's GL/DL/XT/Loyales...
1. Head gaskets can leak coolant straight onto the ground. This is fairly common with newer EJ motors, but I don't know about the EA82 like you have. Does your car have a coolant reservoir? If not it will leak a little coolant out the radiator overflow until it gets to the optimal level. You might also check your hose connections, they tend to get crusty and start leaking in cars this old. 3. The noise you heard is probably one of your front axle CV joints. They'll make a loud rattling noise when you turn corners once they start to wear out. Check and see if the CV boots are ripped open, that's a sure sign that you need new axles. They can wear out without the boots ripping open, but it's not as common. -
Thanks! I figured I could probably find the parts at the stealership, but this will last forever and like you said, anyone can do it this way once the factory parts dry up
-
Ok, cool. After looking at it a little more I see that that bolt holds the mount to the body, with the attached rubber bushing connected to the top of the torsion beam. The beam tries to twist when the suspension is loaded, so they put the bushings on opposite sides to counteract that twist. Thanks for checking!
-
Hey everyone, I noticed when I was crawling under my car today that there seems to be a metal plate and rubber bushing piece missing from my rear suspension torsion bar mount on both sides. Here's a picture, could someone crawl under their car and confirm that there should be a metal piece and rubber bushing material under the rear bolt, similar to what is under the front bolt in this pic? The bolt currently looks like it is bottomed out against the unibody and is not holding the suspension on at all. I couldn't find a picture online or a parts explosion on AllData that showed this mount. If it is missing pieces does anyone have these pieces they could sell me at a reasonable price? Thanks!
-
Hey everyone, I'm new to the board having just bought my first Subaru, a 1985 Brat GL. When I bought it it had 10-12 inches of play in the shifter, making it a true Wondershift- "Hmm, am I in a gear? What gear am I in? I wonder..." I crawled under the Brat and found that I had play in every possible location: where the linkage mounts to the trans rod with a roll pin, where the linkage mounts to the shifter with a bushing, and where the base of the shifter sits in the pivot attached to the transmission case. I came up with a cheap and easy solution to the rather common issue of shifter slop that I'd like to share with everyone. First you need to pull the shifter assembly out of the car. I don't have any pics, but here is how I did it: 1. Remove shift knob and lock nut from shifter 2. Jack up car 3. Use a pair of side cutters to grab and pry the cotter pin out of the roll pin holding the shift linkage to the tranny rod. 4. Use a suitably sized punch and a 3 lb mini-sledge hammer (The best hammer for working on cars, makes it MUCH easier than using a 32 oz ball peen or any other hammer) to knock the roll pin out. 5. Slide the linkage backwards off of the trans rod , then pick bottom of the shifter up out of its pivot cup and pull the whole assembly down out of the shift boot and out of the car. You could take the bolt that holds the linkage piece to the shifter out and then take the parts out separately, but this way was quick and easy, so I didn't bother fighting with the bolt in the confines of the car. Now that it's out of the car, remove the bolt holding the linkage piece to the shifter, and pull them apart. I found mine was missing several parts, and the remaining parts were badly chewed (I had one plastic bushing and two rubber isolator bushings. I assume there should have been a steel sleeve to ride inside the plastic bushing and a second plastic bushing). Rather than wasting my time and money trying to get replacement parts from Subaru I went to the local Grange (Hardware store) and bought the following parts: 1. 3/8" Inner diameter X 1/2" OD X 1" length Steel Spacer - $0.75 2. 1/2" ID X 11/16" OD X 3/4"+ (Longer ok) length Bronze Sleeve Bushing - $2.25 3. 3/8" diameter grade 5 bolt. Must have a shoulder (no threads) the same width as the OUTER width of the shift adapter (about 1 1/8"). The total length (with threads) doesn't matter since you can cut it off. - $0.33 4. 3/8" Nyloc or similar locknut with same thread pitch as bolt (recommend coarse thread) - $0.50? 5. Two 1" OD X 3/8"-1/2" ID X 1/16" thickness Nylon washers/spacers. They need to be about an inch OD, ID doesn't matter too much, thickness is important but can be sanded thinner or shimmed thicker with stainless steel washers as needed. The 3/8" ones my hardware store had were the correct OD and thickness.- $1.00? 6. A couple 3/8 washers to space things as necessary Note: if you have a better hardware store you might be able to find a 17mm OD bronze bushing. If you can find one I would recommend using that instead of what I used as it will slide into the shifter hole perfectly with no modification. You will then need to replace the steel spacer, bolt, nut, etc with similar metric hardware that will fit together correctly (steel spacer OD=Bronze bushing ID, steel spacer ID=bolt OD). This would save a little time and effort. Regardless, here is what you are making: Here's how you do it: 1. Remove plastic and rubber bushings from shifter 2. Cut the brass bushing to the exact width of the shifter hole. I used a hacksaw. I was a little impatient and measured it wrong so that the bushing was slightly narrower than the shifter hole. It worked out just fine, though I'm annoyed at myself for making such a stupid mistake. 3. If you are using the 11/16" OD brass bushing you need to thin it down to fit in the 17mm shifter hole. You need to remove 0.009" from the entire circumference. You can 75-100 grit sandpaper, a file, or a Dremel. Just take a little off at a time evenly around the entire bushing and continue to try to slide it into the hole. I used a sanding drum on my Dremel with the bushing in a vise and slowly went around the outside as evenly as possible. Once it was small enough to start to slide in I heated the shifter with a butane torch to expand it slightly and tapped the bushing in gently with a hammer for a slight interference fit: 4. Grab the shift linkage piece and drill the bolt hole in the "U" bracket out to 3/8" to fit the new larger bolt. 5. Carefully clean up any burrs on the ID of the brass bushing and clean all metal filings out of the center. Make sure the bushing does not protrude past the sides of the shifter hole. If the sides of the shifter hole are rusty or rough clean them up with some 150 grit sand paper so that they are flat and smooth. Do the same for the insides of the "U" on the linkage piece. 6. If you have 3/8" Nylon washers, you need to enlarge the center hole to 1/2" to fit over the steel spacer. I used a Dremel, but you could clamp them against a piece of wood and drill them out, or use a round file. The fit doesn't need to be perfect: 7. Dry fit everything and check your clearances. The steel spacer should fit inside the "U" of the linkage piece perfectly with no modification (You may have to tweak the sides of the "U" with a pair of pliers if it has been bent inwards or something). The steel spacer should also slide inside the bronze bushing and rotate easily with no play. The shift lever with the bronze bushing installed, the steel spacer inside the bronze bushing, and the two nylon washers sitting on either side over the ends of the steel spacer should slide into the "U" of the linkage piece with no free play or excessive force: 8. Once everything fits and is clean of all metal shavings or rust, coat everything with a light layer of waterproof grease. Bronze bushings are oil-impregnated, so technically they shouldn't need additional lubrication, but after cutting down the bushing and cleaning out the metal shavings some of that oil has been removed, so I felt that a little grease would be a good idea. 9. Assemble all of the parts and install the bolt so that the head of the bolt will face the passenger side of the car once the shifter is reinstalled. If you put it in with the nut on the passenger side it will hit the transmission case and you will not be able to shift into reverse. (Ask me how I know The bolt and possibly the linkage piece are installed backwards in my pictures. Yes I did that too. Easy to take it apart and flip it around though.) Add washers as necessary if the bolt shoulder sticks out past the "U", then install the locknut. Tighten it down decently tight (11-15 ft-lb), the steel sleeve should sit against the sides of the "U" and prevent the shifter from binding when the bolt is torqued. If it does bind the nylon washers may be slightly too thick; you can sand them down easily with 150 grit, but don't go too far, you want there to be zero play: That's all there is to the bushing upgrade. $6 in parts and a little time. I also cut a slit in both sides of the linkage piece where it slides over the tranny rod and put an 8mm through bolt in place of the roll pin (found that tip in a post here on the forum). I should note that that is the only part that I am not satisfied with. I was unable to put enough torque on the bolt to crush down the linkage piece over the trans rod and eliminate play at that location. I stopped torquing when I felt the bolt (8.8 grade) begin to deform. It works, but there is still very slight play since the hole in the shift rod is slightly oblonged. I plan to try tapping the hole for a 3/8 bolt as outlined in this post sometime in the future: http://www.ultimatesubaru.org/forum/showthread.php?t=86901
