BirdMobile
-
Posts
201 -
Joined
-
Last visited
-
Days Won
1
Content Type
Profiles
Forums
Gallery
Store
Everything posted by BirdMobile
-
I just finished a deal with a friend where I ended up wirh a EA82T Turbo engine (216K milrs), with ECU - pulled from a running vehicle. I have another friend who wants to trade me a partly disassembled pre-'96 EJ22 (194K miles, wirh ECU) for the EA82T. The engine is in good shape, just needs the disassembly/rebuild finished (by me). Should I do this trade? Is the EJ22 really "All That"? My long term plan would be to put the EJ22 into one of my pre-1987 GL wagons.
-
Going up a typicsl hill, I can accelerate to over 55 in 4th gear... so I'm sure there is a problem with your car. Could be a blown out or plugged catalytic converter, or a carburator problem. Could also be a timing belt problem (mine was out by one tooth on the passenger side belt, and it ran HORRIBLY - no power like what you're describing). . .
-
Tough Decision to turbo or not to turbo?
BirdMobile replied to Thirtytwo69's topic in Old Gen.: 80's GL/DL/XT/Loyales...
See if he'll take 3K for both out the door! -
EA-82 Weber Conversion - How I Did Mine
BirdMobile replied to BirdMobile's topic in Old Gen.: 80's GL/DL/XT/Loyales...
Thanks, man! Note that the Permatex in question is NOT the usual silicone RTV type, but the gas impervious sealant (Type 2, Non-hardening) that has been used extensively for years on gasoline exposed gasket surfaces. It's designed for that application. . . -
EA-82 Weber Conversion - How I Did Mine
BirdMobile replied to BirdMobile's topic in Old Gen.: 80's GL/DL/XT/Loyales...
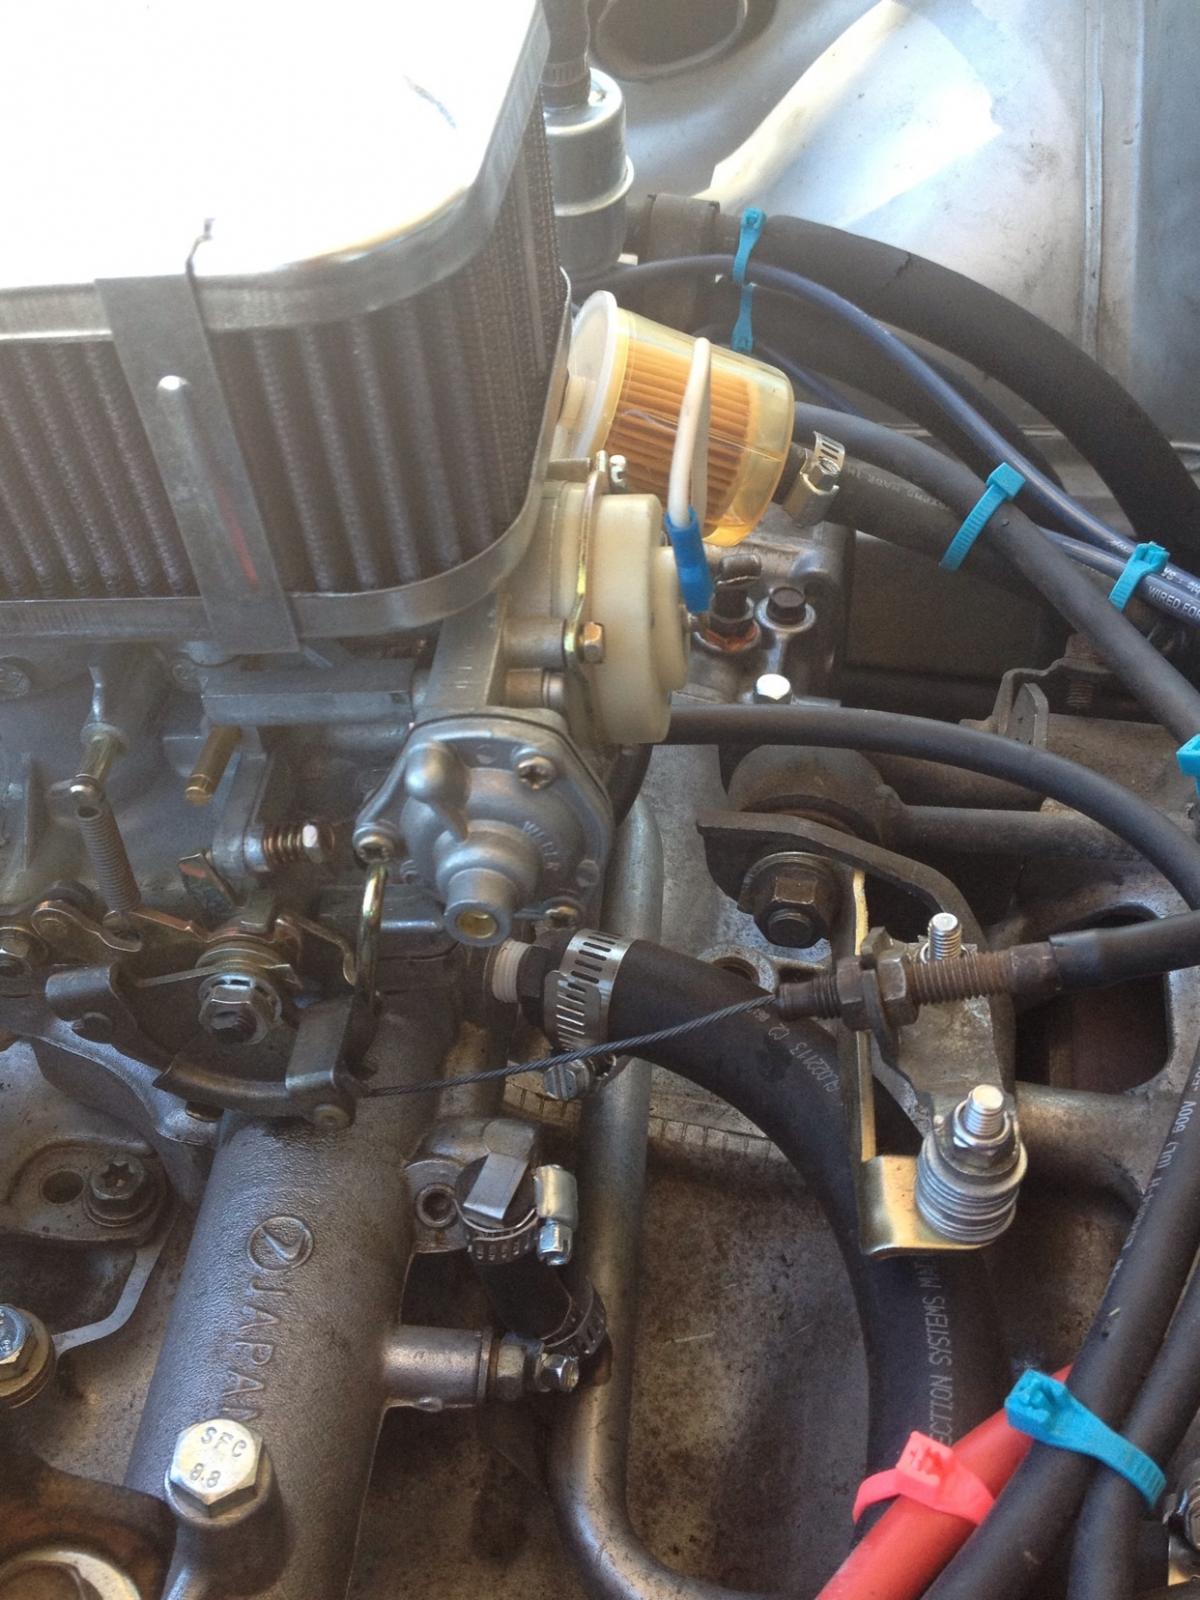
Throttle Cable Linkage: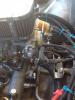
-
EA-82 Weber Conversion - How I Did Mine
BirdMobile replied to BirdMobile's topic in Old Gen.: 80's GL/DL/XT/Loyales...
Updide down photo of Adapter Plate and Gasket Stack, Original Hitachi rubber gasket at top, actually the bottom of the stack in reality: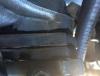
-
EA-82 Weber Conversion - How I Did Mine
BirdMobile replied to BirdMobile's topic in Old Gen.: 80's GL/DL/XT/Loyales...
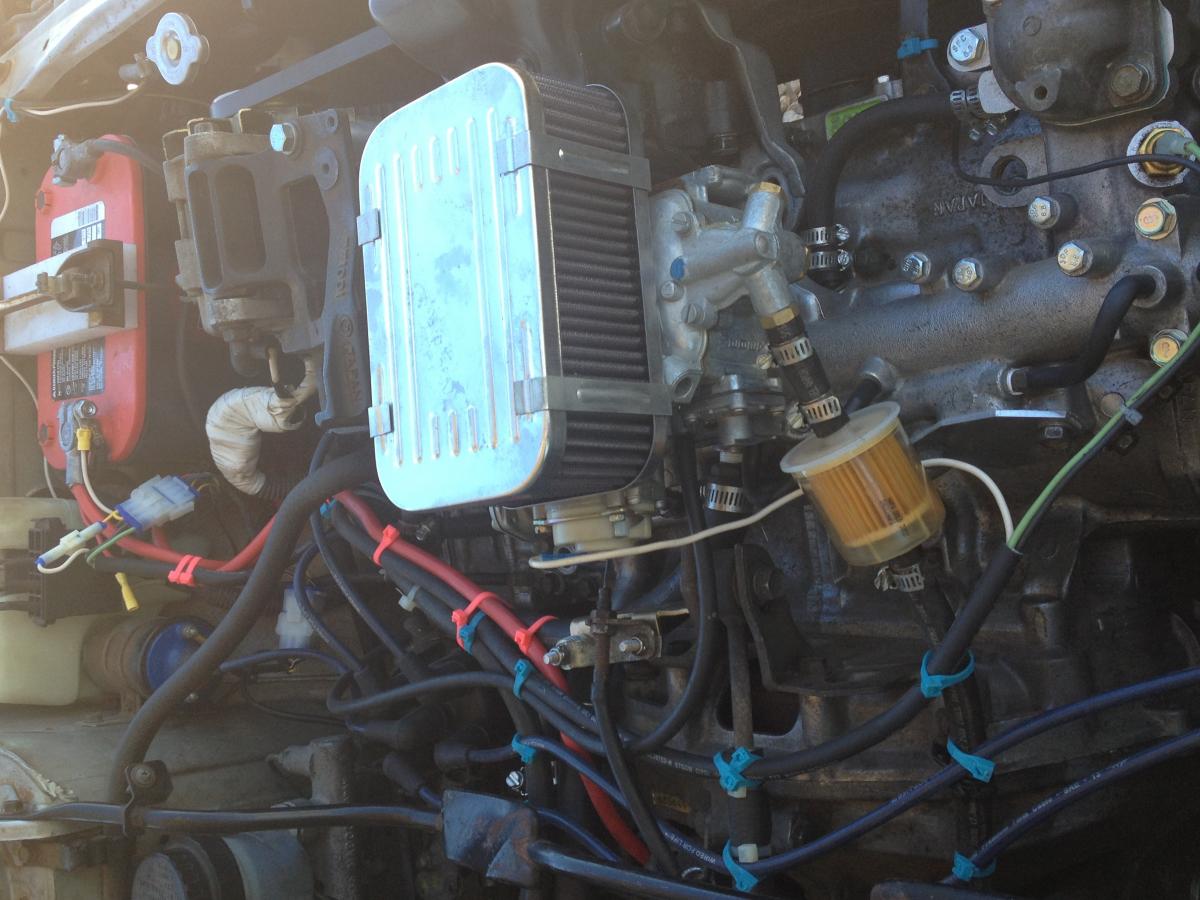
Overall View: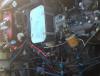
-
EA-82 Weber Conversion - How I Did Mine
BirdMobile replied to BirdMobile's topic in Old Gen.: 80's GL/DL/XT/Loyales...
The three photos below are of my installed and functioning Weber. Hopefully they illustrate the setup clearly enough to duplicate. -
Thought I'd drop in and describe how I did my Weber carburator conversion, and how I avoided many of the power steering pump clearance issues other users have had doing these conversions. Disclaimer: I'm not responsible for what you do. Make your own decisions and live by them... don't blame me or anyone else. Assume I'm completely full of crap, and act accordingly. OK... here's what I did. First off, I saved the throttle cable linkage (curved piece with the wire channel) and the thick rubber gasket for the manifold from my $hi7achi carburator. I then mounted the Weber adapter plates, on TOP of the thick rubber gasket, using Permatex #2 (stays gooey) sealant between layers. Then, I mounted the Weber BACKWARDS with the electric choke toward the rear of the vehicle. This is the key. The throttle cable linkage piece is then mounted UPSIDE DOWN between the carburator throttle shaft and the intake manifold. However... it won't fit,,, just a bit too wide in radius. This is solved with about 45 minutes of careful work with a dremel tool and files... you basically take about 3/16" off the "radius" off the "wire holding channel" on the edge of the linkage piece, until it clears the intake manifold by about 1/32". Make sure it clears the manifold for its entire length of travel. I then fabbed up a throttle cable end-holder from the sheet metal parts supplied in the Weber kit, to mount next to the clutch cable assembly off the drivers side end of the cross bolt. Bent the throttle cable into an "S" shape, and zip tied it down. Connected cable end to carburator cable linkage. I blocked my fuel return lines, and drilled a hole through my gas cap to provide pressure ventimg. I also reversed the plug and fitting on the Weber so the gas comes in from the rear instead of the front side. My electric choke just BARELY clears the spare tire, with the tire just touching the spade lugged wire from keyed +12V. That's it... no more interference with the power steering pump, and it all works perfectly! Hope this is of some use to someone... I'll post photos if I can figure out how.
-
There should be one fuel filter next to the fuel pump, in front of the fuel tsnk near the center of the car underneath on a "shelf". The other filter is under the hood, drivers side, where the fuel line comes through the firewall.
-
Maybe... but no promises, I might have to cannibalize it for the connectors if the wiring harness to my non-digi dash is too difficult to swap outright.
-
I had a similar problem witt my GL just before my rebuild. Turned out to be a head gasket leak, compression blowby into the coolant. Cool your car. Open radiator cap. Add enough coolant that you can see the surface of your coolant about halfway down the radiator cap "pipe" you add coolant to. Start engine. Watch the surface of the coolant. Steady stream of small bubbles = head gasket compression leak into coolant channels. This builds up pressure in the coolant system, blowing the coolant into the overflow reservoir. No coolant = no cooling... engine temp rises rapidly. . .
-
How to Cook Your Cam Sprockets
BirdMobile replied to MR_Loyale's topic in Old Gen.: 80's GL/DL/XT/Loyales...
Will the thickness of the paint layer cause any timing differences with the cams? -
How to Cook Your Cam Sprockets
BirdMobile replied to MR_Loyale's topic in Old Gen.: 80's GL/DL/XT/Loyales...
Yum. Good eatin' -
1987 GL CV/DOJ Boot Replacement
BirdMobile replied to BirdMobile's topic in Old Gen.: 80's GL/DL/XT/Loyales...
OK... Still recovering from that nonsense... but here goes. This is what I did. VERY painful axle re-installation: I decided to swap the axles left-right, in order to give the bearings a relatively new surface to ride on in their "channels". The drivers side axle went into the hub so smooth and easy it was like butter... took less than 1 min. of wiggling and it slid right through. The passenger side fought me like an enraged demon... NOTHING I could do for over an hour would make even the slightest progress. I noticed the brake rotor seemed a little loose during all of this, and realized my dumb @$$ had not set the E-Brake very strongly. Finally gave up, undid and hung the brake calipers from the strut spring (with zip ties), and tried to get the shaft through the wheel bearings with the brake rotor out of the picture. Bloody impossible. I finally ended up using the castle nut and a bunch of redneck-rigged nut and washer stacks as an improvised puller... finally got the shaft through then re-installed the brake rotor and calipers. Good times! The 3 control arm bolts gave me JUST BARELY enough play in the system to get the DOJ splined sockets over the transaxle shafts... but made it EXTREMELY difficult to get them back off. So what does genius do? Get the rollpin holes mis-aligned by one tooth on BOTH half axles, insuring a prolonged, painful bit of rework on them both. The final bit of fun was losing one of the control arm "slant" nuts inside of the control arm sheet metal cavities, where it naturally had to wedge in and defy all attempts to retrieve. Half a cursing, yelling, banging hour later an exhausted moron finally pulled it out, with the help of an amused friend who stopped by in the middle of the whole screaming fiasco. Tightened the control arm "cross" bolts very tight, then tightened the slanted support arm bolts as tight as I possibly could by hand without using a cheater bar. Put on tires snd dropped the car. Tightened the castle nuts to 145 ft-lb, then a little extra on both to line up the retainer wire holes. Holy he11... that is the most painful bit of mechanic-ing I've EVER done... so glad it's over! I'd rather pull the engine again than go through another half-shaft repair. Seriously. Test drive went fine, though I anticipate a full recovery for the driver will take many days. Whatever they pay mechanics who do this crap all the time, it's just not enough! . . -
EA82 NA at 7.7:1 ever been tried ?
BirdMobile replied to jono's topic in Old Gen.: 80's GL/DL/XT/Loyales...
I might try it. A friend has a EA-82T turbo motor he'll let go of for $100, he says fuel injection system has a problem and he also doesn't have an ECU for it. Thought of buying it for parts, but a non-turbo NA build with a custom homemade intake manifold and carb might be fun. Anyone have an opinion? . . -
Bump. Nobody here ever done a GL to GL-10 engine/drivetrain swap?
-
Which relay switch? Photo.
BirdMobile replied to Suba_GL_87's topic in Old Gen.: 80's GL/DL/XT/Loyales...
Here's my thread about the fuel pump control module: http://www.ultimatesubaru.org/forum/topic/147752-ea-82-distributorcoil-voltage-question/?do=findComment&comment=1240253 It is about the distributor, coil, fuel pump, and module wiring. -
Which relay switch? Photo.
BirdMobile replied to Suba_GL_87's topic in Old Gen.: 80's GL/DL/XT/Loyales...
The tachometer (in the dash) uses the yellow wire off the ignition coil to get its pulses. The fuel pump control module also looks for the pulses on the yellow ignition coil wire in order to see if the engine is running, to cut power to the fuel pump if it's not. . . -
Which relay switch? Photo.
BirdMobile replied to Suba_GL_87's topic in Old Gen.: 80's GL/DL/XT/Loyales...
#2 photo is definitely the fuel pump control module. I have a thread going about its wiring. . . -
1987 GL CV/DOJ Boot Replacement
BirdMobile replied to BirdMobile's topic in Old Gen.: 80's GL/DL/XT/Loyales...
Finished. Really, really, REALLY glad that's over! Half axles suck. -
radiator fan thermoswitch replacement options
BirdMobile replied to joe5's topic in Old Gen.: 80's GL/DL/XT/Loyales...
Read about the guy with the "Bumblebeast" wagon who posts on this forum using the same switch in his setup. Looked like a good option with no downside... I was replacing my radiator anyway in my rebuild, so figured I had nothing to lose by experimenting. So far, it keeps my electric fans running properly to the point I've NEVER seen my temp gauge go above the halfway point since the rebuild. Totally happy with the Hyundai switch so far. -
radiator fan thermoswitch replacement options
BirdMobile replied to joe5's topic in Old Gen.: 80's GL/DL/XT/Loyales...
I paid $28 for mine... totally worth it to splice 2 wires, especially considering that it turns on 10 Deg. C cooler. -
I just did a Fel-Pro on both sides, and torqued it an extra 5 ft-lb on the final tightening sequence. Didn't want to deal with a re-torque.
-
OK then... My '87 GL sat in the yard for 8 years before my recent (approx. 3 months ago) engine rebuild and general purpose resurrection. During this time, the CV and DOJ rubber boots all developed cracks due to age and heat. The CV and DOJ joints themselves are all in magnificent condition, as I replaced both front half-axles with new factory parts just before the extended "storage" of the car. I had a different mechanic replace them, I was too busy with work at the time to do it myself. I began the job last night, plan to finish it today. Bunch of dumb new-b questions, as I've never done a subaru half-axle myself before The lowest sheet metal piece with the ball joint (I think this is the "control arm") is what I loosened on both sides of the car. I did NOT undo the ball joint, just the 2 bolts at a "slant" that hold the arm to the support rod, and the "upper" cross bolt at the opposite end from the ball joint. This gave me enough play in the system to remove the half axle from the transmission, then hammer out the splined wheel end of it with a sledge hammer (with wood block in between). I set the Emergency brake to keep the brake rotors in place during all of this. I've disassembled the axles, re-greased with CV grease, and re-assembled with the new boots. I then cleaned and ran a bead of Ultra Gray around the boot edges to insure I never lose any grease if the bands fail. I used only DOJ boots (OEM from Subaru) on all 4 joints - the extra length on the CV end will most likely help with boot life due to more rubber length to handle the flexing. My questions: Once I re-assemble, how tight do I re-torque the 3 control arm bolts, and the wheel hub castle nut? The manual says 145ftlb plus 1/3 turn on the hub castle bolt, is this right? That seems like a whole lot... can it take it? Also, on the control arm bolts, do I need thread locker or something other than just tightening them? If just tightening, what is the ft-lb spec for the 2 diagonal bolts and upper "cross" bolt and nut? Finally, what should I do with the wheel bearings in terms of lube while thiey are open? Thanks for any input!