Craigar
-
Posts
205 -
Joined
-
Last visited
-
Days Won
5
Content Type
Profiles
Forums
Gallery
Store
Everything posted by Craigar
-
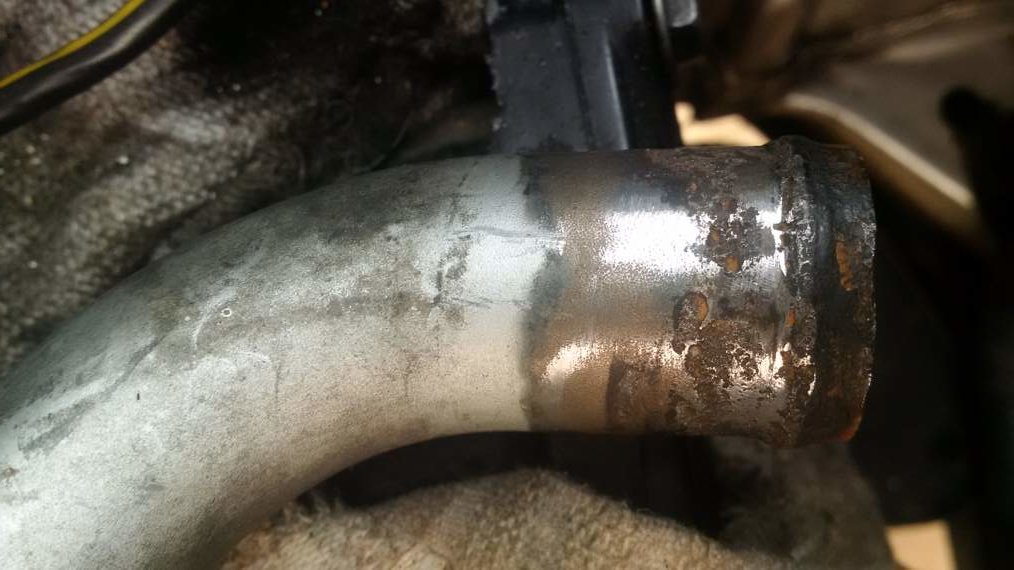
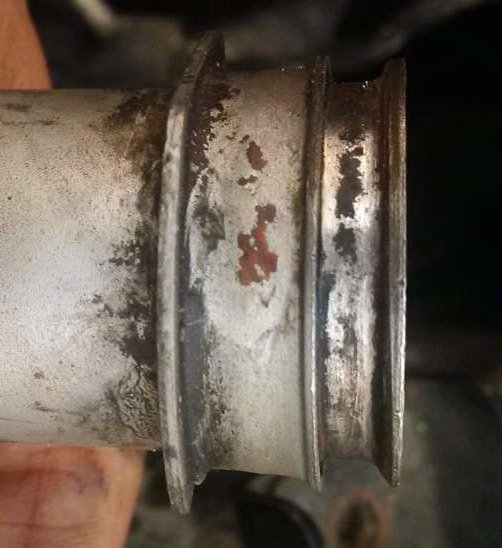
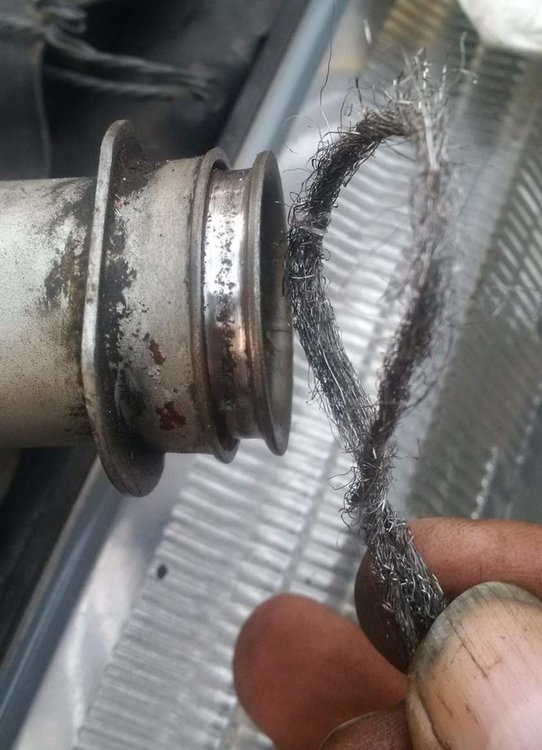
 The new one I fished out of and Autozone assortment ended up feeling tighter than what probably was the stock replacement that czny sent me,which measures .115 in thickness with a micrometer . The old flat one was just slightly tight. I figured the thicker one might be safer with my old metal pipe cause it took a fair amount of filing to get it to where it was half clean metal again. I probably really ought to get a new pipe! filed.. steel wool lassoed, back & forth about 30 times here's the other end (rubber hose from bottom of radiator goes over it) - I think I REALLY ought to get a new pipe - (or maybe a new car)
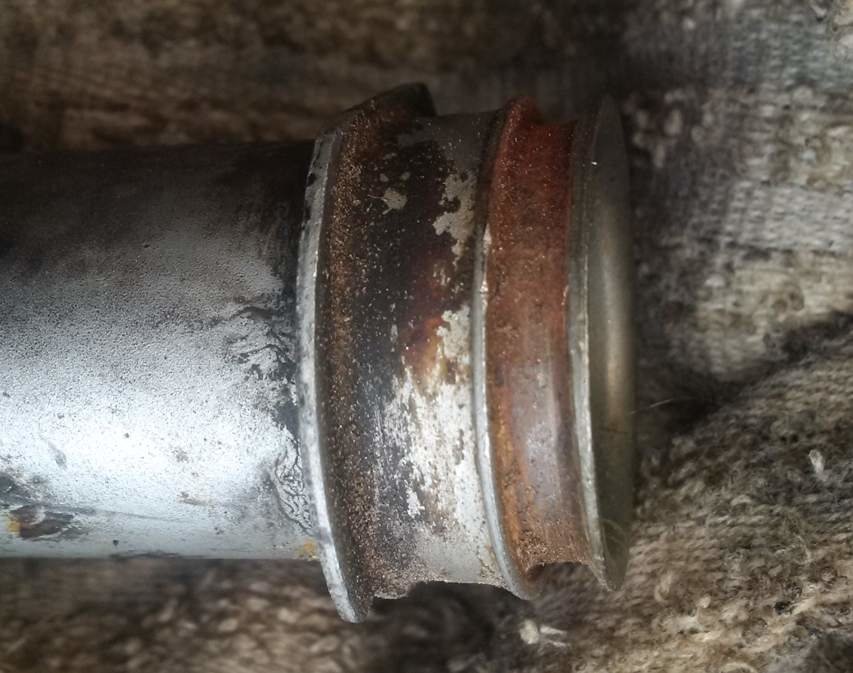

-
Man you guys are the BomB!! In the back of my mind I think I found it on the sidewalk over by "mecanics row" where I borrowed cam sprocket torquing plate. THANKS AGAIN!!
-
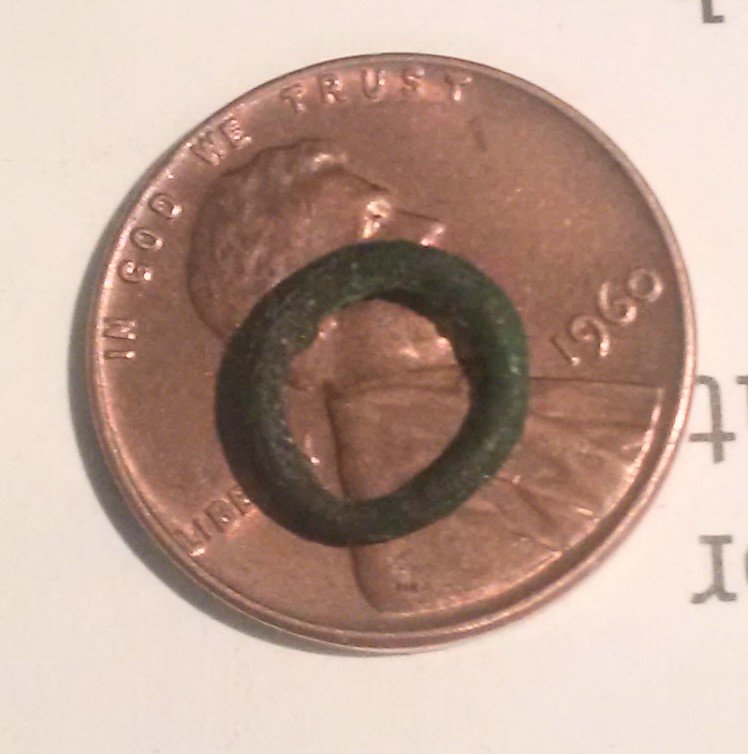
So I'm walking in & out my front door for the 10,000th time to try to move forward on my snail paced Loyale timing belt, water pump & front end re-seal job front end and I look down on my front door threshold and see this - but it may not be related at all to this project at all (I could have foraged it walking down the road & forgot) - does it look familiar to any of you Old Gen: guys? Thanks again (all I want fro Christmas is a properly rebuilt memory gland (and maybe another Loyale Wagon) )

-
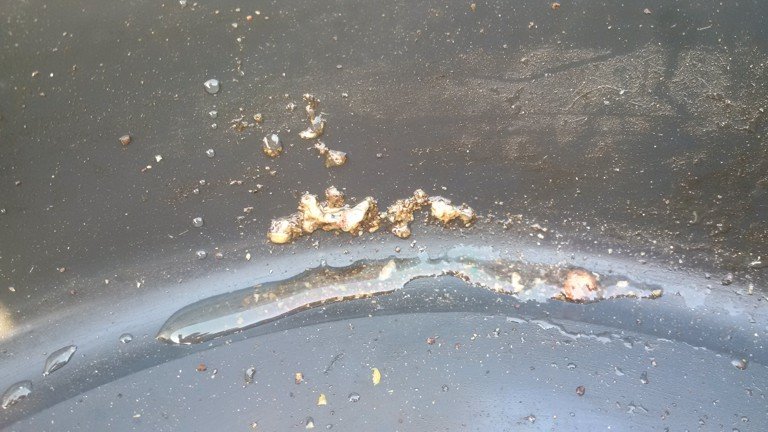
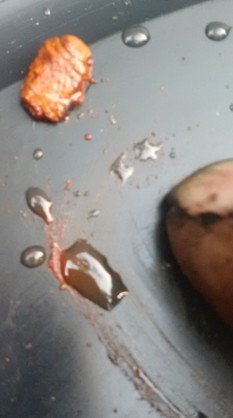
Thanks again Dave, that makes sense and I'll give that a try also. Hindsight "is always 20/20" and you told me right from the start - "replace ALL 7 hose and this Oring.." When I woke up today I thought about how hard it is to physically measure something that has angles, distortions and curves and is rubber like - using a micrometer. So I weighed them on a digital gram scale and AT FIRST the old one weighed a little more (1.4 vs 1.3) - because I had just washed it with soap & water and dried it quickly with my T shirt... Well I figured maybe water is still deep in the "micro cracks" so I "roll snapped" it between my thumb finger a few times and then it weighed 1.3, same as my new candidate. Then I remembered I didn't throw out the old pump (it was working fine..., but replaced) and I thought I'd look into that hole WOW! That is probably why no matter what I did I could always hear bubbles in my water system when driving - REALLY AMAZING to me THAT this old motor kept "humping along" this long! Also glad overall that I had used Barr's Stop Leak (and almost 2 years earlier "Prestone AS663 Head Gasket Stop Leak with Kevlar" which had been completely flushed out a year ago ) and I seem to leave a white powder build up wherever there was a leak. Stupid joke of the day -- "Do ya think this was sucking air and leaking?"


-
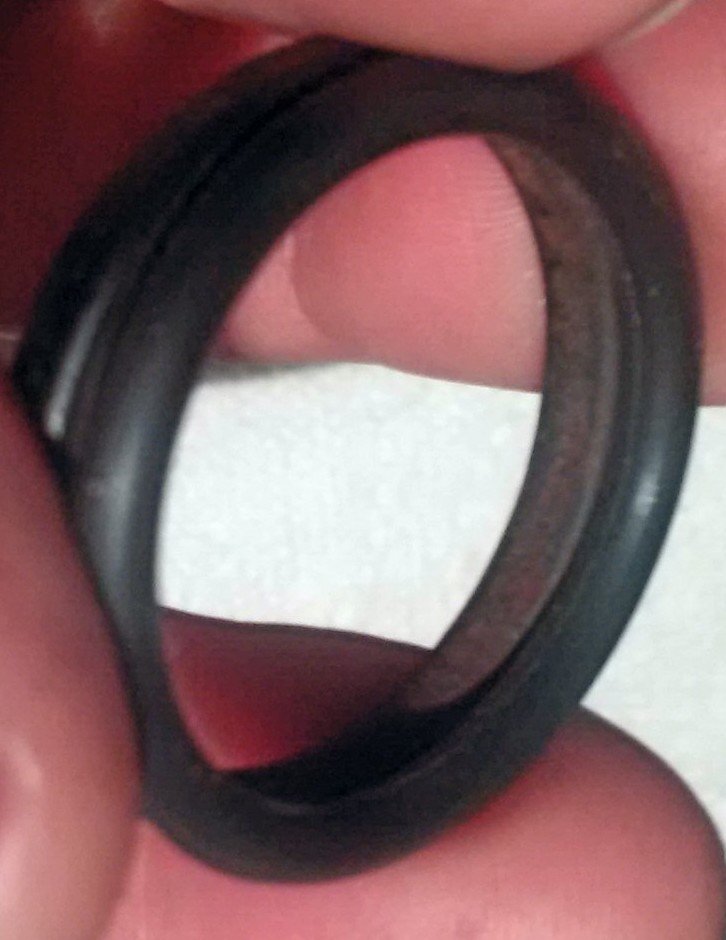
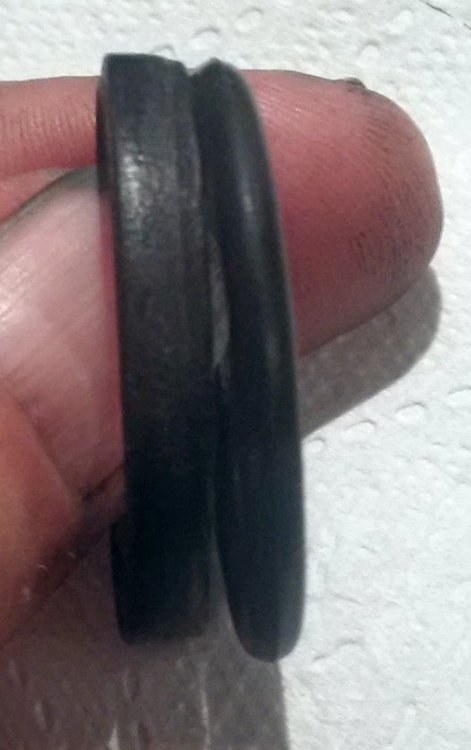
the old one is about.110 average tall by .180 wide, the new candidate is .135 - seems maybe too thin? Got it out of oring assortment at Autozone.. Thanks

-
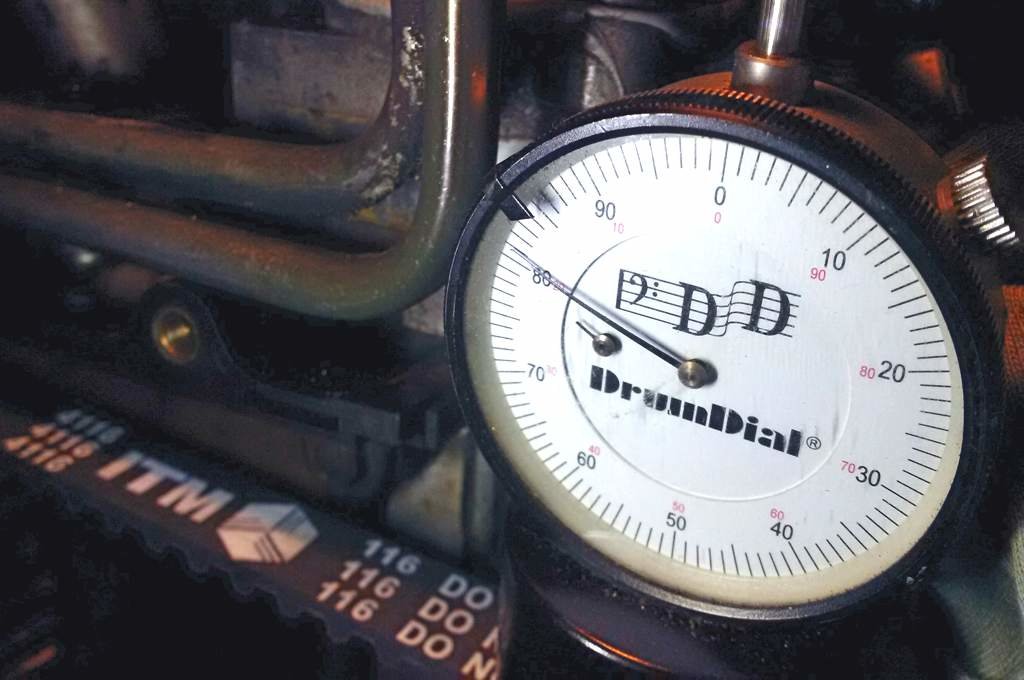
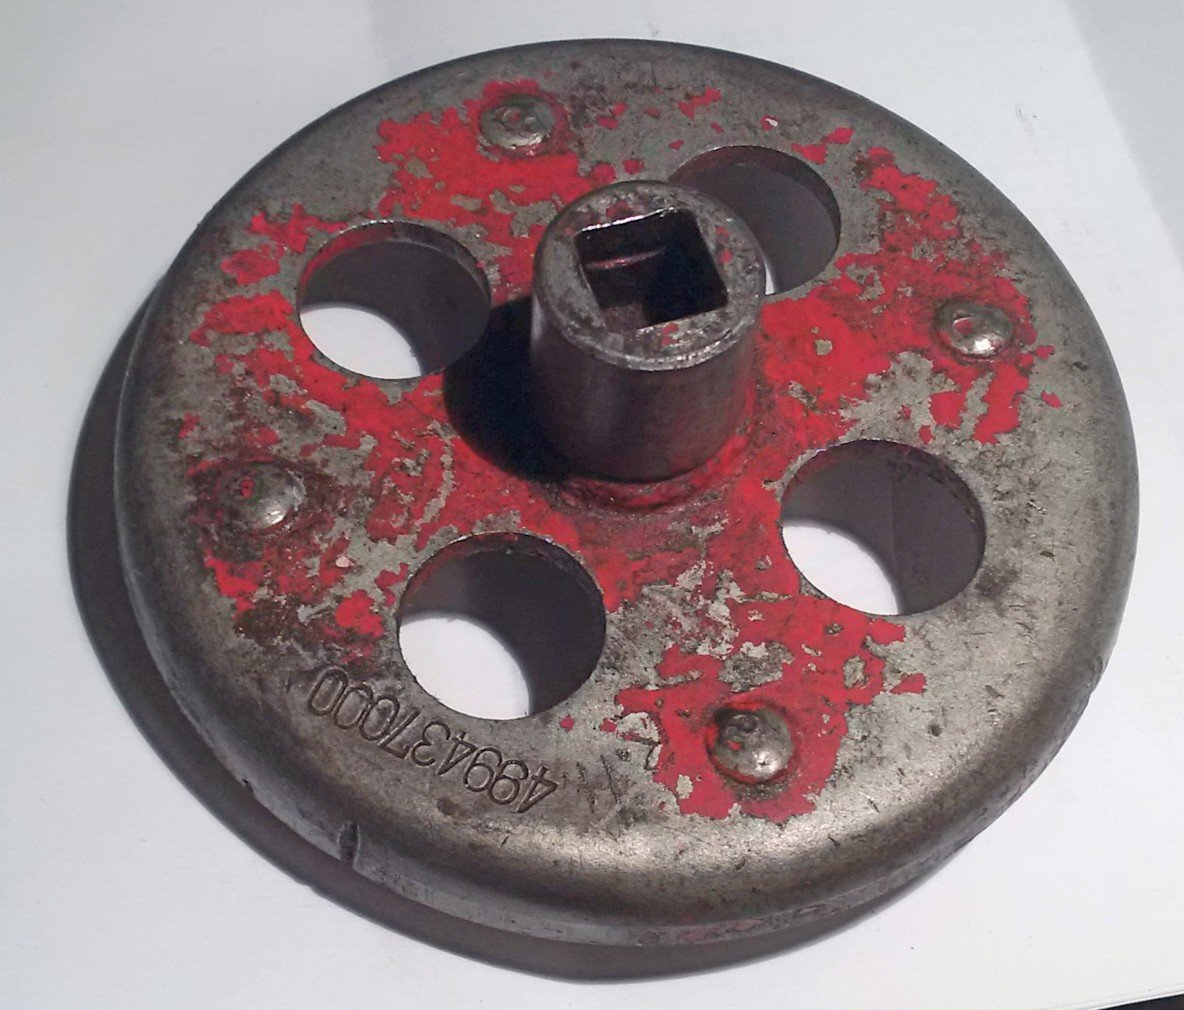
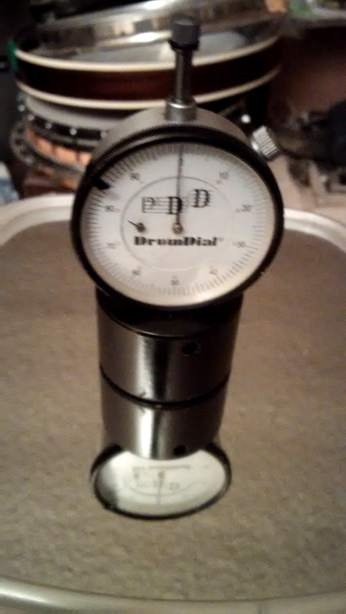
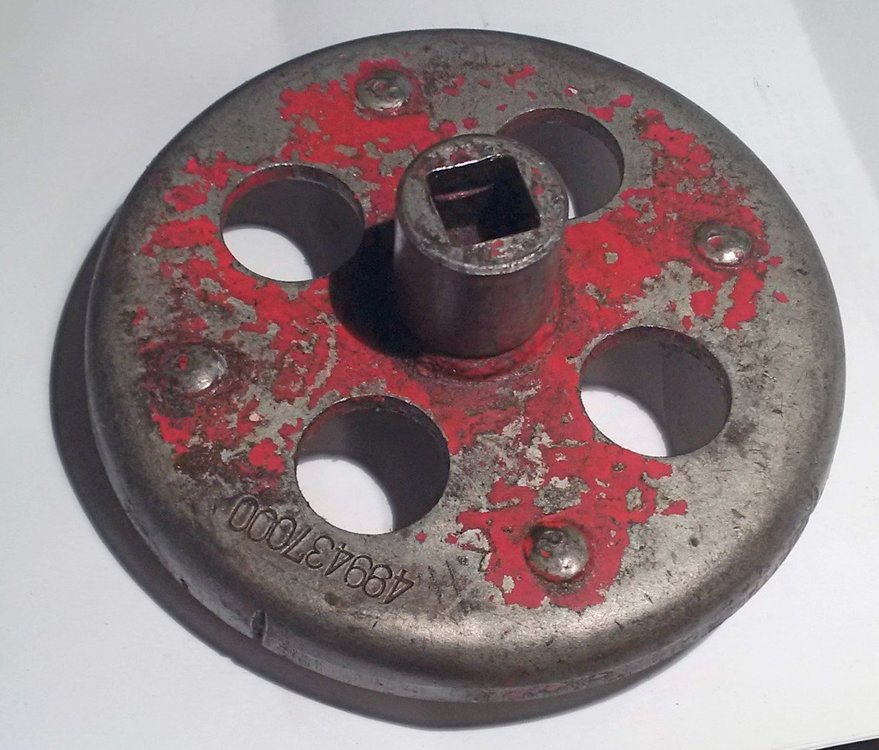
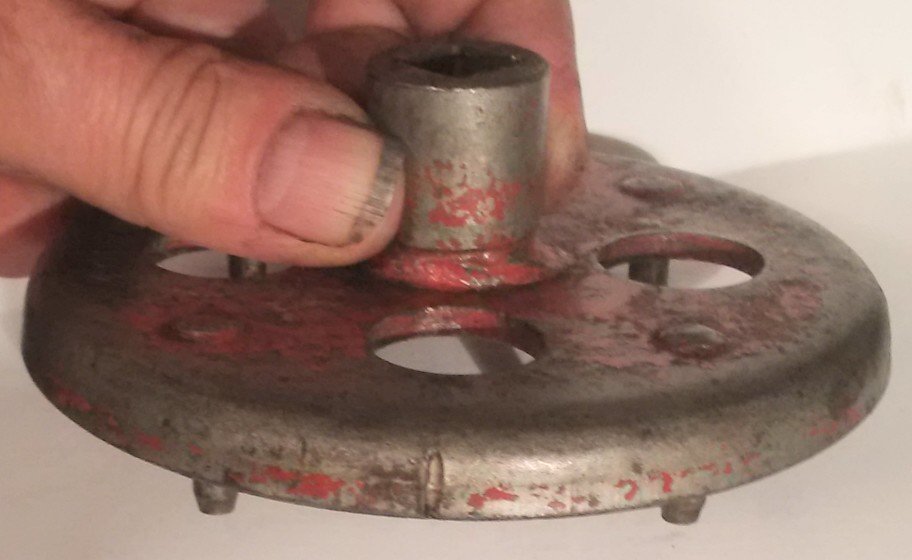
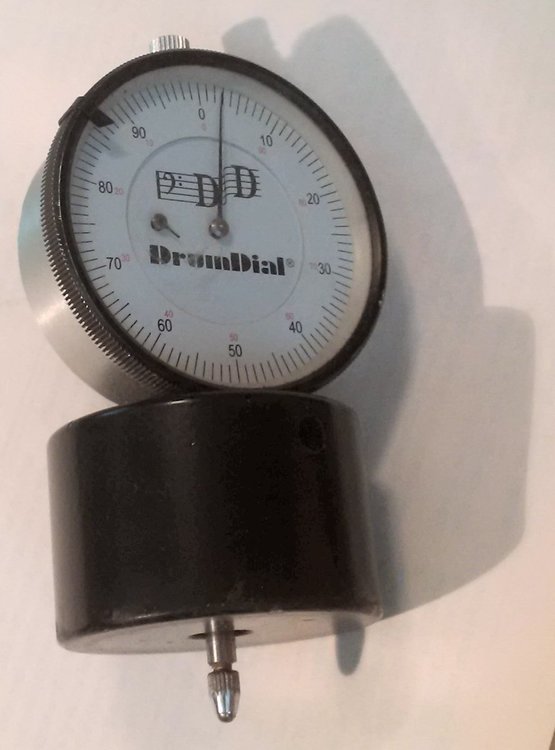
well I tested the belts "deflection" with the drum dial and it really responded to the tension on the belt that remained after the tensioner is locked down - my "guesstimate" by pushing pretty hard with my hand on the tensioner before I tightened showed 78 on the drum dial , without tensioning the belt and only letting the spring in the tensoiner apply the force , it showed 75 - measuring after following the FSM manual it was at 81(all on the passenger belt) here's the tool (red plate on the left) with the torque wrench on it - the torque wrench on the right is for the tensioner bolt. if the drum dial is sitting on a flat surface like a mirror, it should be at zero, here it is on a mirror

-
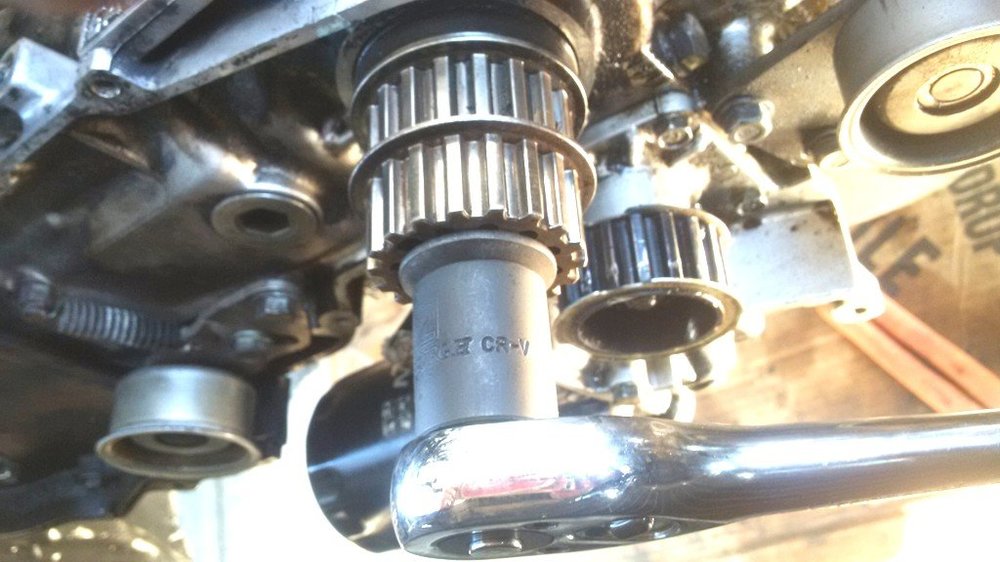
Ya all will never guess what THIS is ?? My local "independent Subaru Repair" guy, Chris Raffi LENT IT TO ME! What a nice guy and he keeps up a nice looking shop too, so if anyone is close to 90260 and they need pro service give him a call 310-674-5226 Raffi Motors. I'll also still see if my "DrumDial" shows differences in deflection. Now the only problem I have is I only have 3/8" torque wrenches - why they used a 1/2" female for just 25 ft/lbs. max is serious overkill IMHO.
-
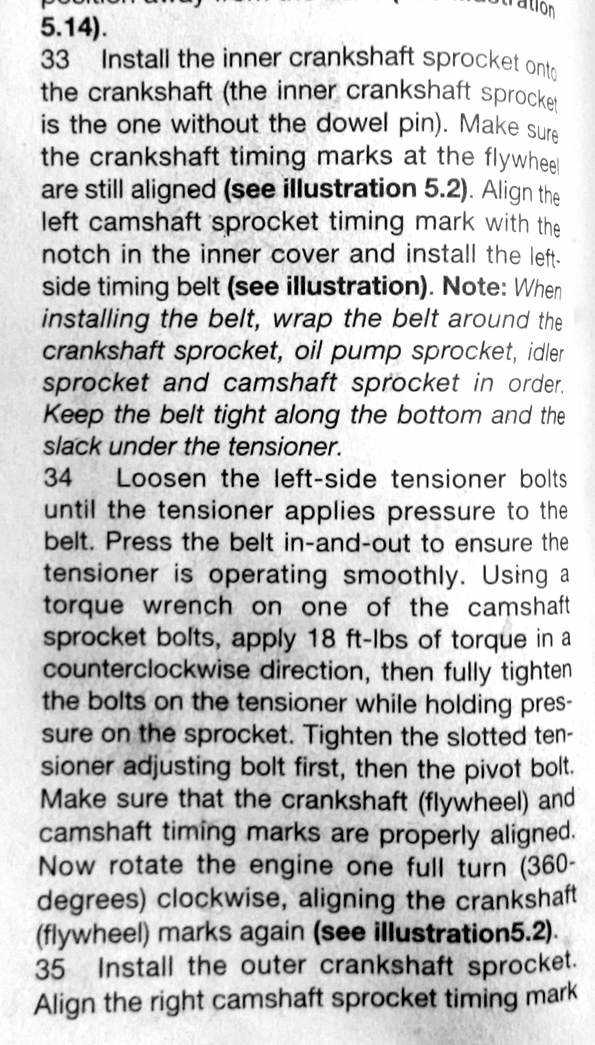
I agree with everything you guys said - including throwing away the Haynes manual - AND FOUND ANOTHER ERROR (wrong distributor firing order) , but that will be a new topic..and I actually (embarrassingly misplaced) have a printed FSM manual set I bought off fleabay about 2 years ago - I am so grateful we have the old online FSM manual for this car (nad Ej22 &EJ25) at http://jdfinley.com/file-downloads/subaru-manuals/ , I downloaded the .pdf and can flog myself with them at my leisure, even view them in my cellphone I *think* Subaru is probably trying to reproduce the spring tension of the valve springs pushing against the cam at the point of highest spring pressure (for either cylinder 1&2 passenger side, or 3&4 driver driver side at) if examining passenger side cylinders, it would happen at the instance that the intake stroke of valve of cylinder 1 is lifting, while the exhaust stroke valve of cylinder 2 is lifting - and about the same time cylinder 3 will be starting it's power stroke. So *if I thought this out right* now that I already have the belts on in the proper position cam timing wise I can rotate the crankshaft pulley bolt with a socket (clockwise to get tension on correct side of belt, opposite of the side with the tensioner) and feel this resistance (of course got to pull the spark plugs so the compression doesn't get involved.. and take cap off rotor to roughly calculate where the valves are)and I really don't want to pull them or the cap, cause I'm so lazy ) and it should even show on a "deflection" torque wrench.... I may even be able to show a "reproducible" deflection of the belt itself using a musician's tool for determining tension on a drum head/skin - or a banjo (which is my current obsession) it's called a "drumdial" it's just a dial gauge (with a heavier spring on the plunger) mounted through a hole in the center of a 2" circular base that has a flat bottom. -=- I want you guys to know this is more focused thinking that I have done since I can remember -=- so I'm gonna go and try it and maybe even shoot one of my infamous "technical vids.." if it shows on the torque wrench - then I'll hold it there & tighten the tensioner bolts. I'm sure Abraham Lincoln got much more profit and satisfaction out of splitting logs, than I will ever get out of ending up looking like I'm working on "splitting hairs"..
-
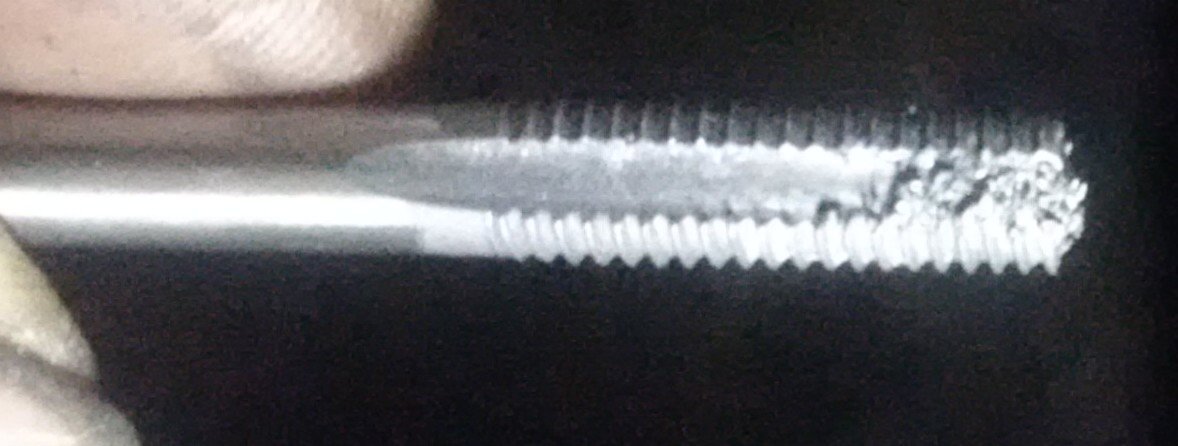
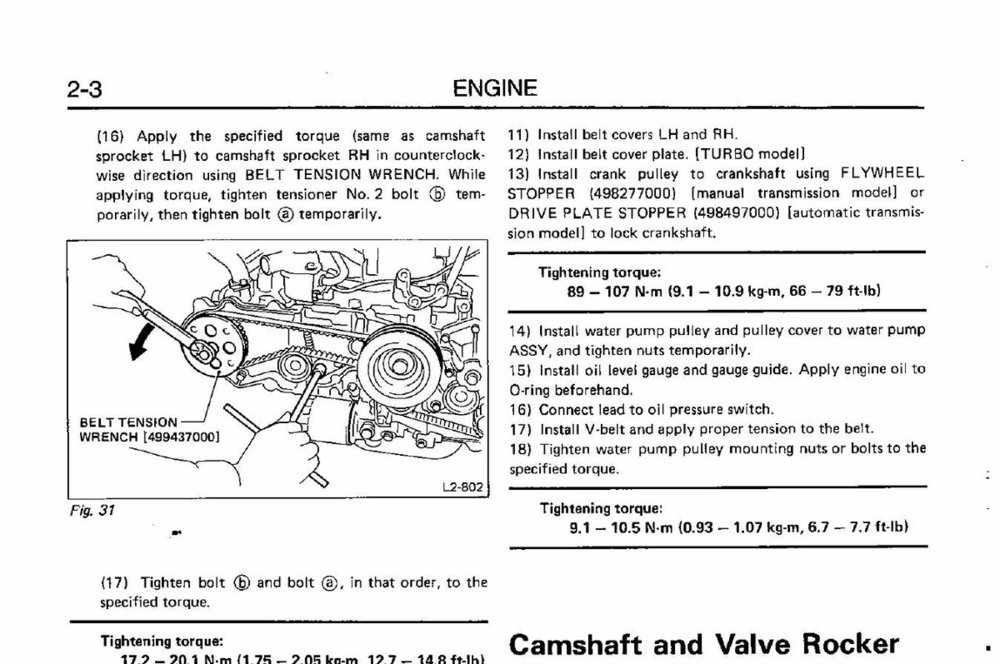
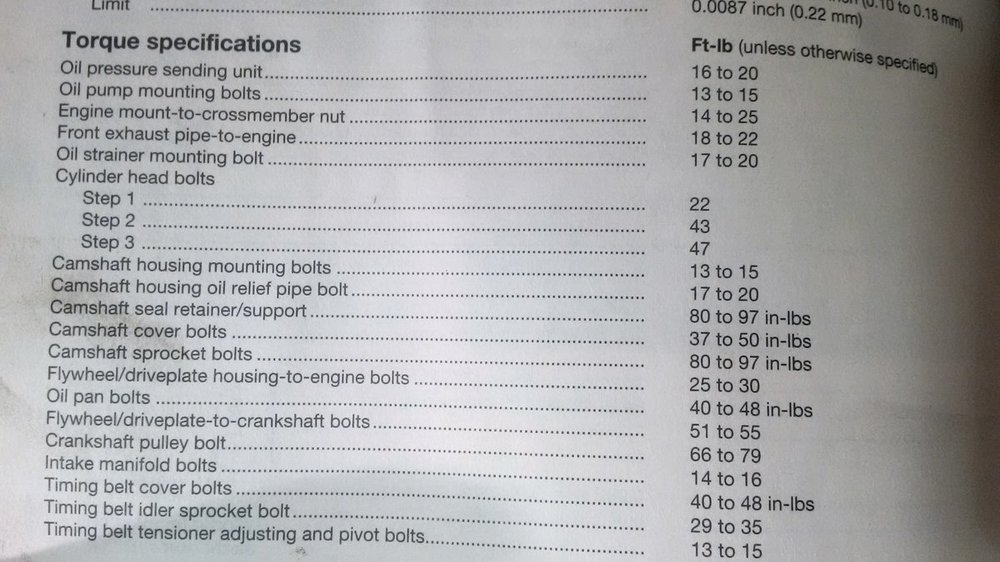
These camshaft sprocket bolts only get 7ft-lbs torque! how can you "un-torque or torque it counterclockwise " to 18 ft-lbs? it will unscrew! It's in section 34 from page 2B-6 - Haynes manual 89003 Subaru FSM says use a "belt tension wrench" that spans the sprocket (I assume?) & torque on it to 18 ft-lbs counter clockwise, then tighten tensioner.. so how do you guys get the tension right? Thanks again

-
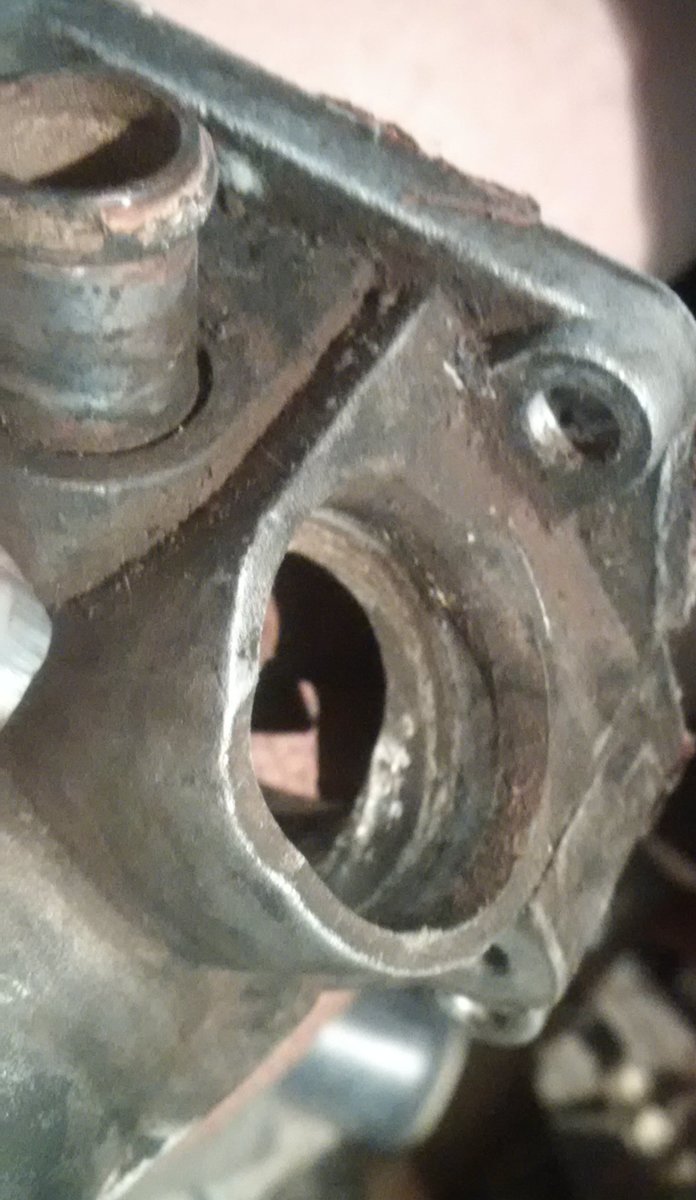
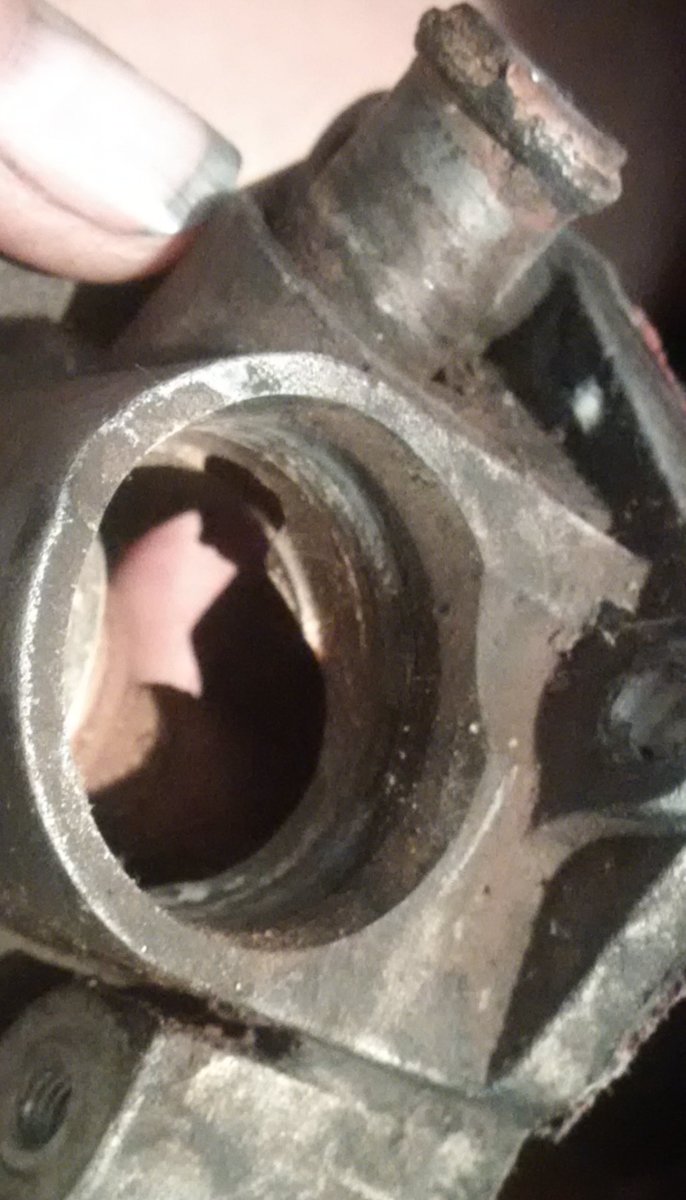
cam seal retainer bolt hole stripped
Craigar replied to dltrial's topic in Old Gen.: 80's GL/DL/XT/Loyales...
No, this was MY FAULT, I saw "Cam Housing.." which is probably what we call "cam tower" and I half a** let my brain jump to the fabled land of conclusions thinking "of course it's the "housing" that supports the cam on the end where the sprocket is .. if only I had looked at the next line - which starts with "cam.." - and the next 3 lines also... then I would have seen "cam seal retainer" for sure. Being 62 years old & feeling kinda spacey & tired at least half the time don't help either. For Christmas I'd really like a brand new brain! (at least a good rebuild -
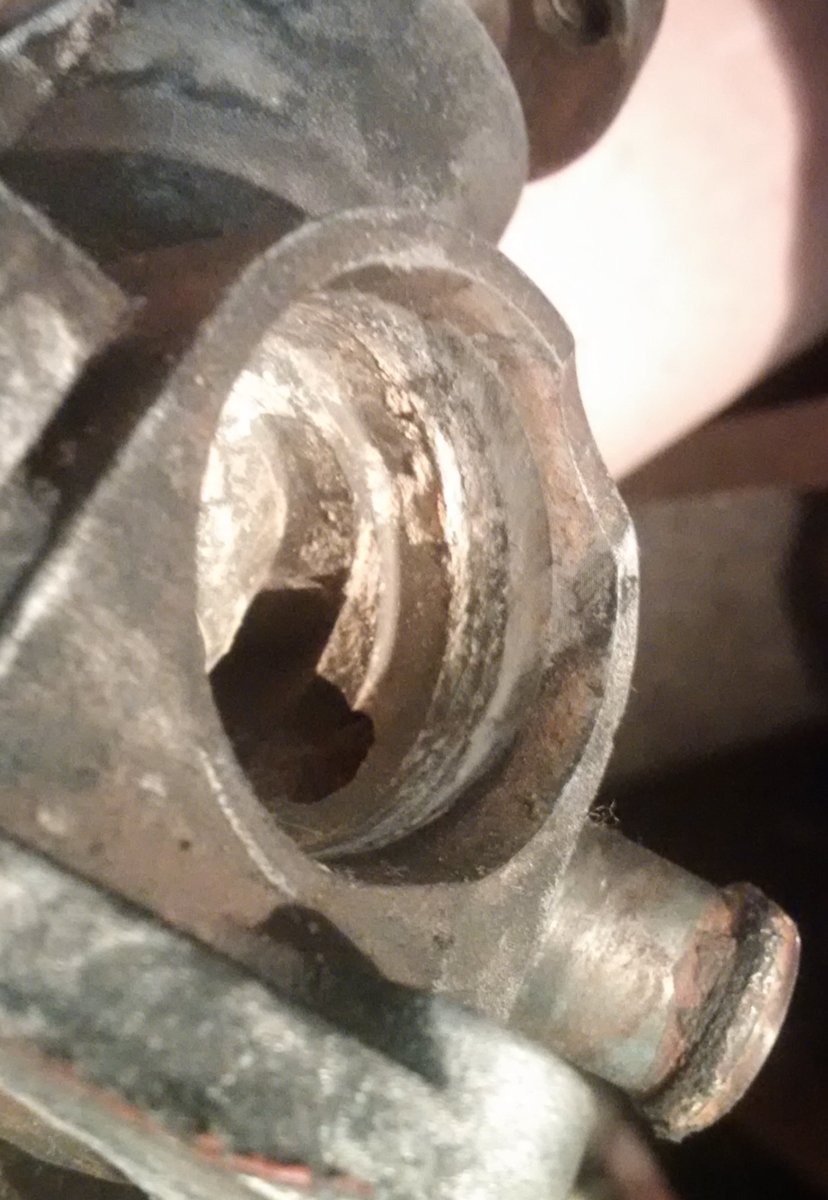
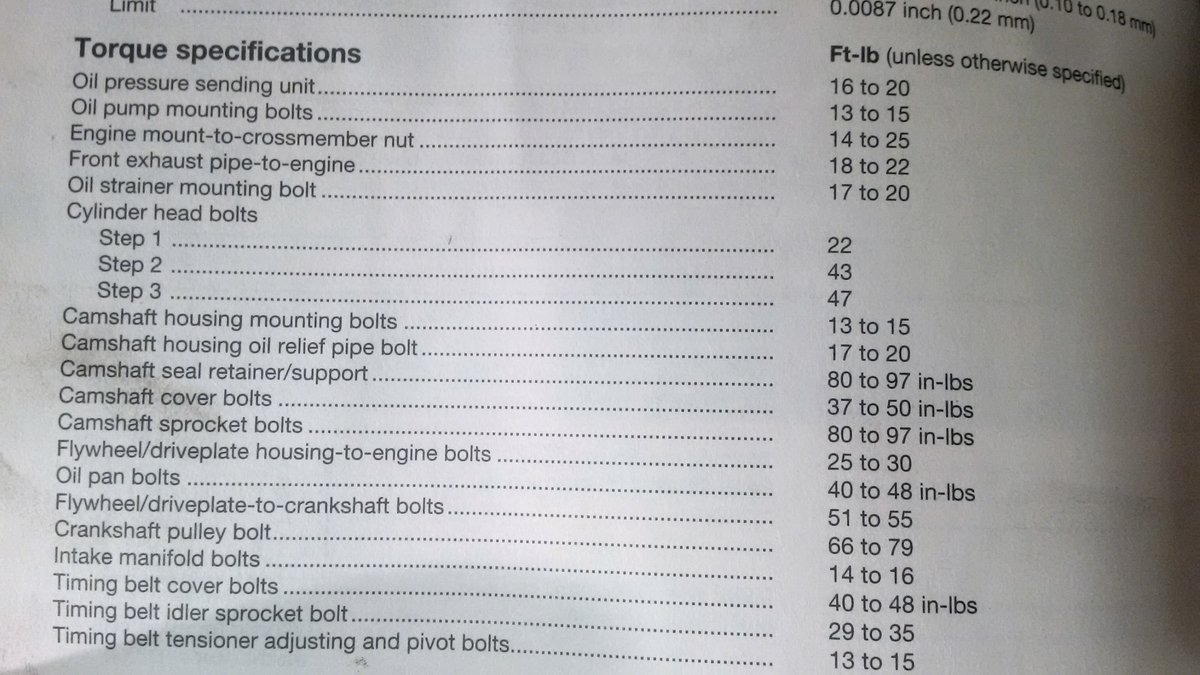
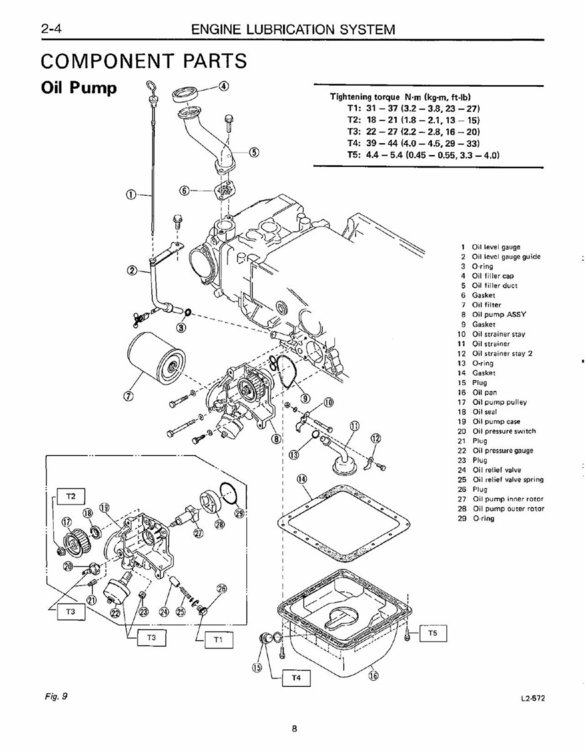
Thanks Dee2, got me thinking - and "to top it off.. pun intended" the Haynes DOESN'T mention the torque at all for that oil pump drive sprocket nut! Here's the page from the "SubaruEA82-ServiceManualPart1" that does.. They refer to that nut as "T2"
-
So I backed em off about 1/4 turn CCW and torqued them to 7 ft-lbs. (about 1/8 turn CW) and it felt slightly tighter than I think is optimal but they don't feel/act stripped so I'm going to go with it.
-
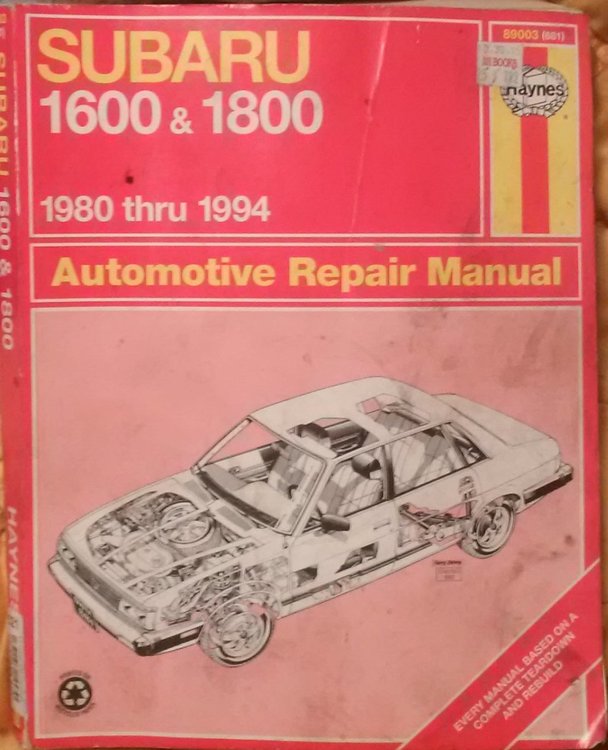
Thanks Everybody! Thank You GeneralDisorder for the "low down" - it does NOT appear to be stated in the online Subaru manual ( or the 1990 FSM that BEECHBM69 looked through) so I'll say this "Haynes Manual (890003 (681) " is flat out INCORRECT about this (IMHO) . I would say 95% of all DIY's that follow that Haynes manual torque spec here will strip those holes! Love their line "Every manual is based on a complete teardown and rebuild.."Here's the cover of the manual. Thanks again, maybe I didn't go too far already (those holes would be really fun to repair with the motor still in the car)
-
cam seal retainer bolt hole stripped
Craigar replied to dltrial's topic in Old Gen.: 80's GL/DL/XT/Loyales...
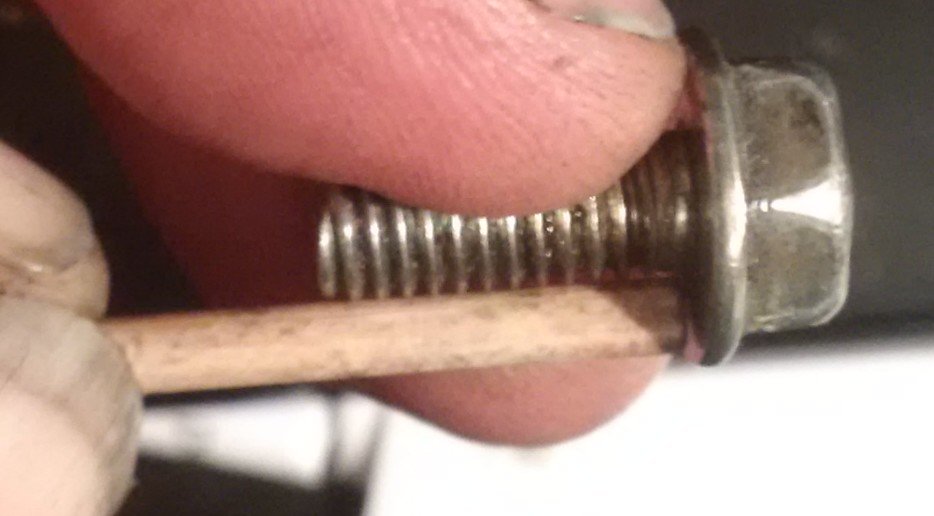
Good advice about longer bolt - I also ground off the tapered tip of a tap and went down into the bottom of the hole cause the correct length of longer bolt wouldn't go all the way (without forcing it) - and it cut the threads deeper in the bottom of the hole (I think..) here's the first time I backed it out, got a littl more on 2nd pass and bolt went in smooth & torqued properly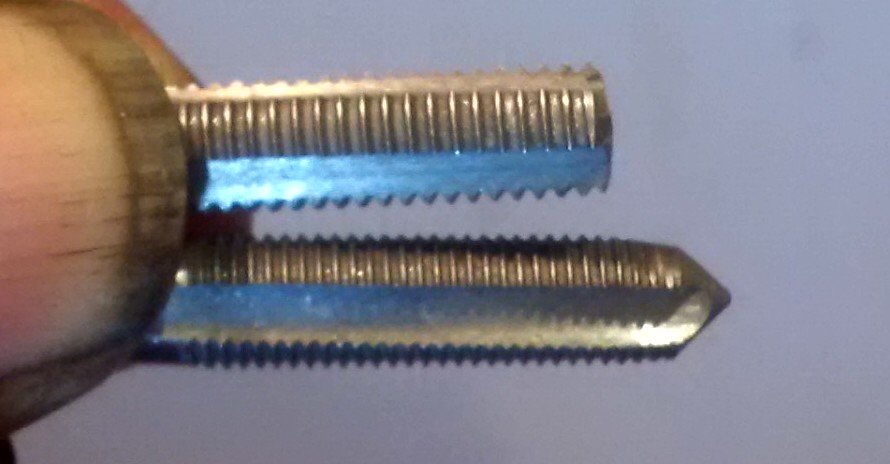

-
It's brand new ( 3/8" although from HF) and I have a pretty good sense of when a smaller bolt going into aluminum is too tight. Did a 7lb. bolt with it and it felt right (a pair of 10mm M6 holding on the cam seals). Have you torqued down the oil pump on an EA82 to this amount of torque? I think this Haynes manual has a bad typo (or braino) and tried to verify this torque setting in the online manual mentioned above - IT'S NOT In there? very weird! Do you have a manual beside a Haynes that has this info? I even dug through the vids on youtube (including milesfox) nothing definitive - or even anybody putting the pump back into the block Thanks.
-
that's what this "Haynes Manual 890003 (681) pg 2B-2 ©1998" says and I'm probably up to 10~11 and it feels tooo tight - should I go all the way? These are 10mm bolts with M6 thread going into the aluminum block? Here's the page out of a Haynes manual I'm going from also VERY LEARY that I couldn't find the torque specs for these bolts in either part 1 or 2 of the online 1986 Subaru Subaru EA-82 Service Manuals at http://jdfinley.com/file-downloads/subaru-manuals/ all the engine specs are in 1st manual "Engine section 2-3" page 11-16 and oil pump details are in section 2-4 page 8 has torque specs and the ONLY THING that gets 13-15 foot pounds is the nut the holds on the sprocket - and I think it's a 12 or 13mm nut going onto a steel shaft - no reference to the oil pump housing bolts (except verbal saying assembly is reverse of dis-assembly)? I've also really searched through the topics & posts in this forum. Thanks!
-
torque specifications foe ea82
Craigar replied to StephenJ101's topic in Old Gen.: 80's GL/DL/XT/Loyales...
Here's for EA82, from a "Haynes Manual 890003 (681) pg 2B-2 ©1998" - I think the "Oil pump mounting bolts" are WRONG, feels like they should be only 7 foot pounds max. See topic
-
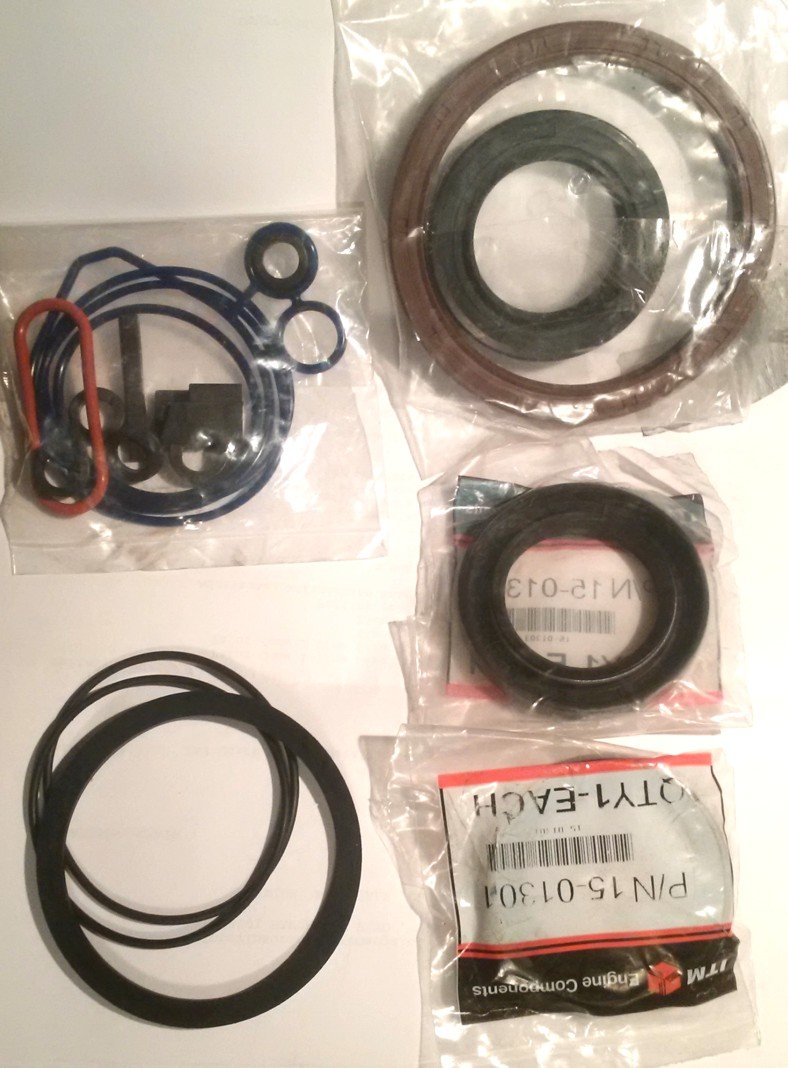
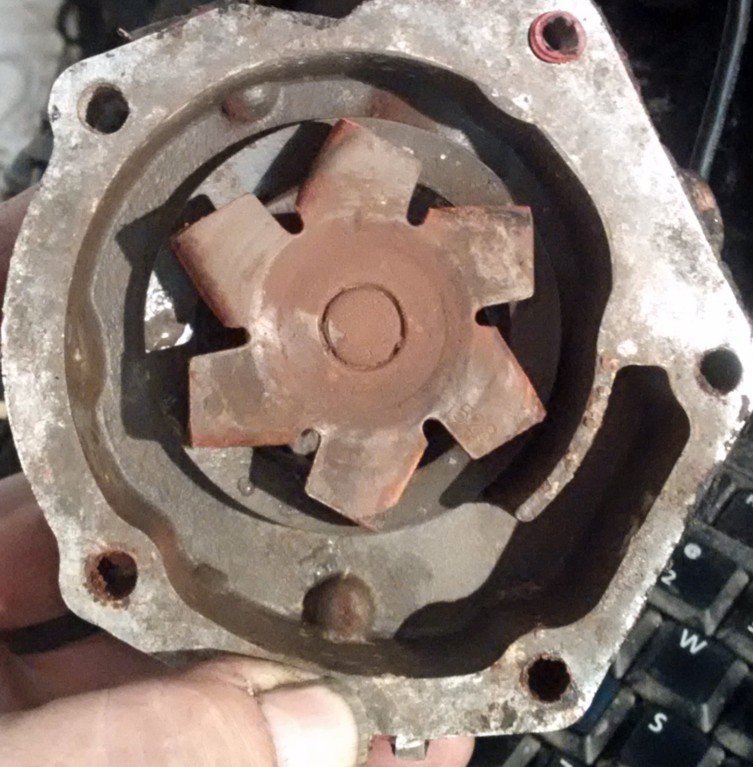
Didn't get one marked NOK - but got one that looks like NOS from czny , otherwise the seal looks identical to the stock one - and everything looks right including the little angled "oil deflection ridges" going towards the lip, which I assume "pushes" oil back towards the motor? (I - was NOT impressed with O'riely's "National" generic with no "deflection ridges" . The crankshaft seal from czny looks just like the cam seals I got out the 20 year old "last gen" box of seals a reputable full time "Subaru only" mechanic I was considering for this job (Raffi Motors ), he's the one offered to do it all for $1000, and said that's more than the cars worth.. probably true - but if I get another 100k (or more without major problems) I'll be real happy! Here's how I seated the seal.. got it level and flush with the case - used the old seal as a spacer while I very slowly turned the ratchet with my other thumbnail in the gap (at the edge) between the pair of seals and double thick reader glasses watching it move. and I KNOW it's level!
-
cam seal retainer bolt hole stripped
Craigar replied to dltrial's topic in Old Gen.: 80's GL/DL/XT/Loyales...
Well I JUST DID THE SAME THING! I didn't realize I was reading the torque for a different bolt having to do with the cam.. Man - kinda like "measure twice cut once"... = in my case "read trice and maybe I'll really understand.." and my new HF click torque wrench was set at 13 and it really felt too tight to me as I was turning them (each one a 1/2 turn towards the end) and the bottom one one busted loose - of course the wrench never clicked - should be at 8~9lbs. well I'm GLAD I READ THIS TOPIC THREAD? cause I was thinking about how a M7 is just barely bigger than a M6 , so went back to Harbor Freight and looked at their deluxe $15 tap set and it has M7 - just about the thickness of a set of threads bigger than M6! - so I bought it - But Autozone DOES NOT have any M7 bolts! Neither does HF. SO I WAS thinking about tapping at and using M7, but I guess it looks like there is enough good thread left beyond the original bolt, so that should be a good way to go. Here's a stick that I stuck in the threaded hole (up to my thumbnail) - much longer than the bolt! Man talk about a "second chance.."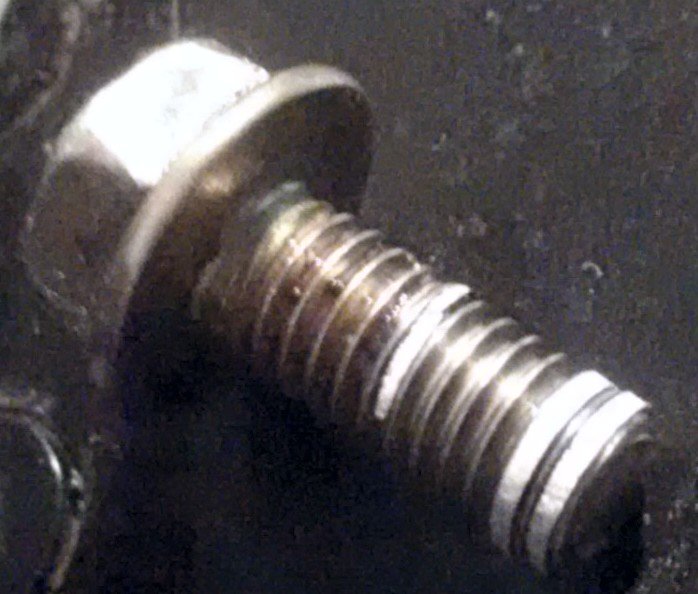
-
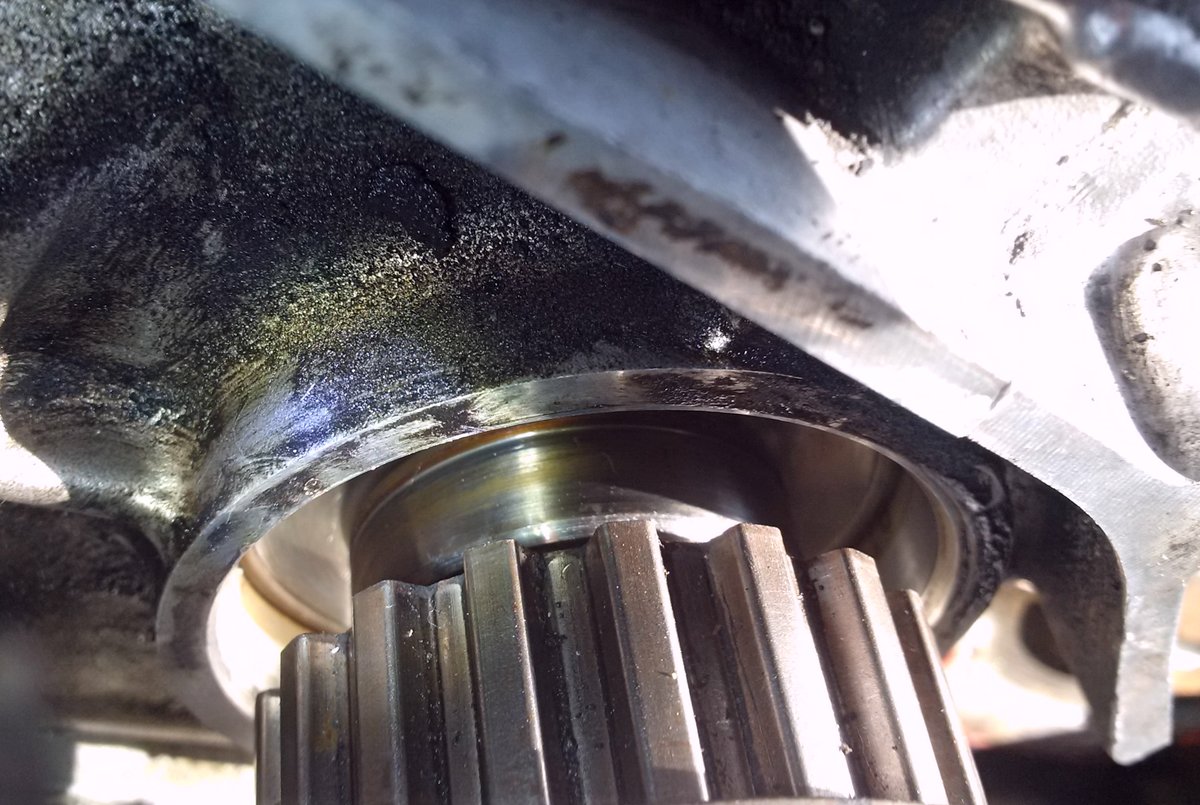
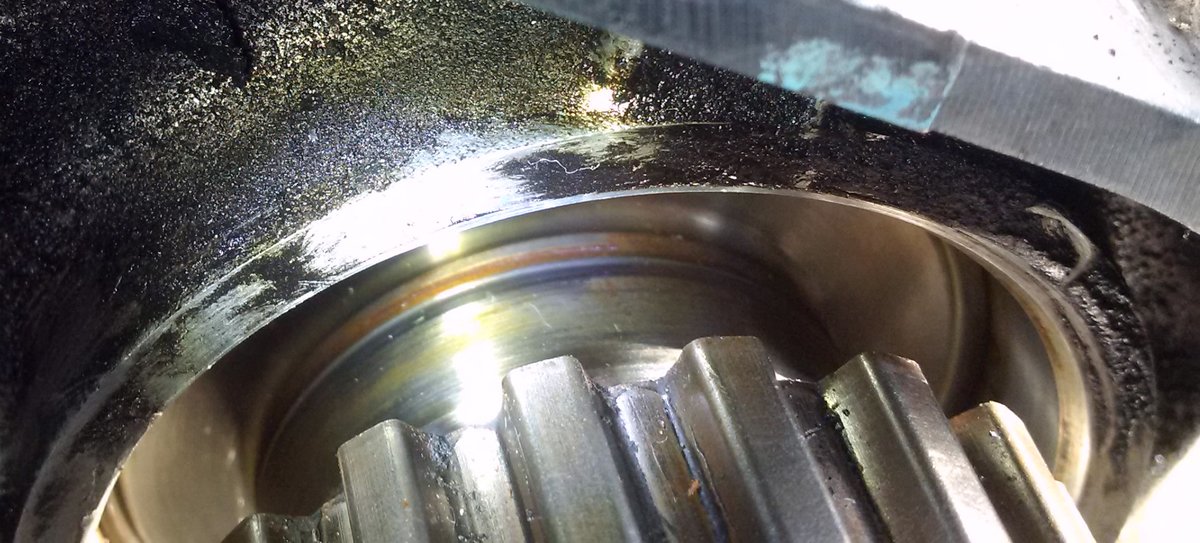
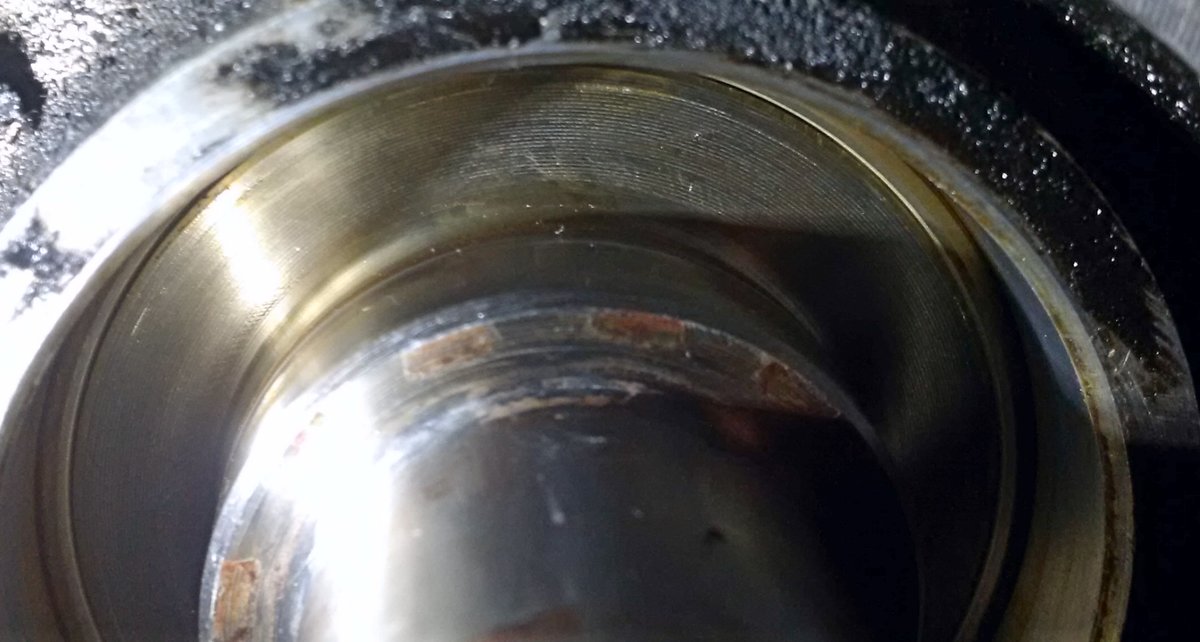
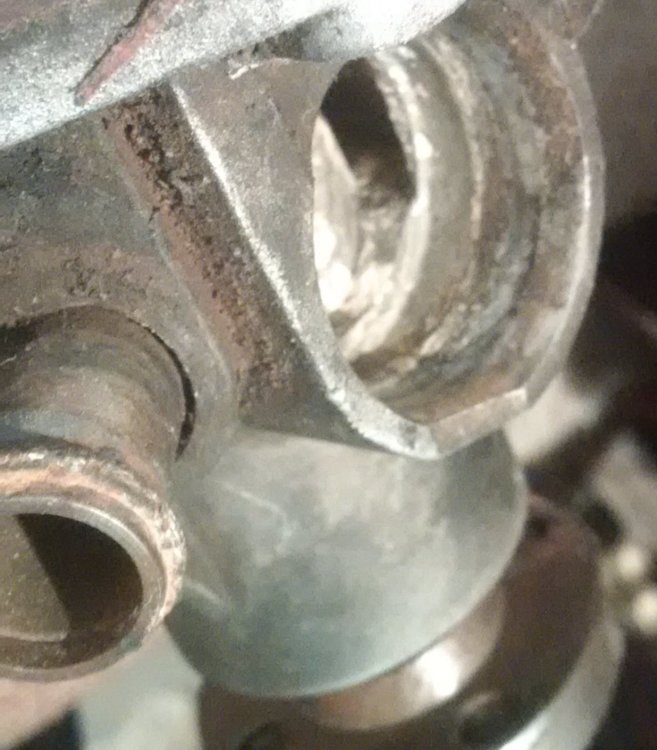
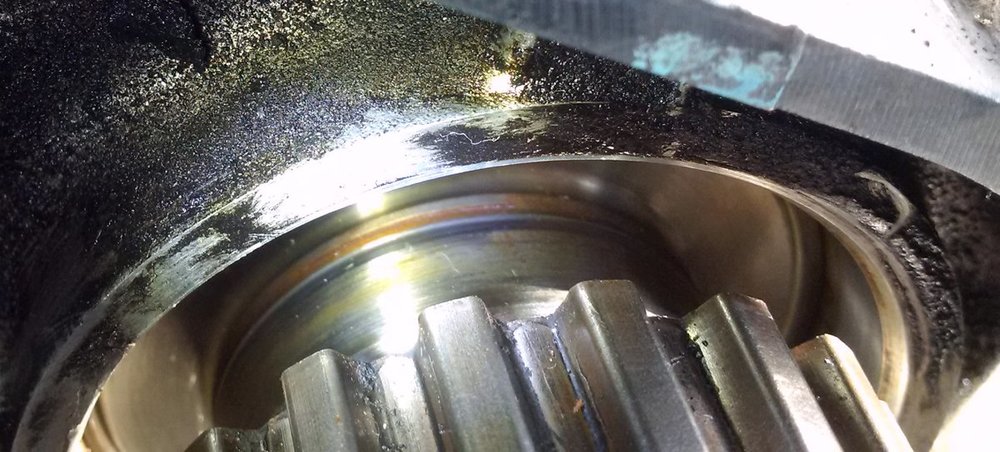
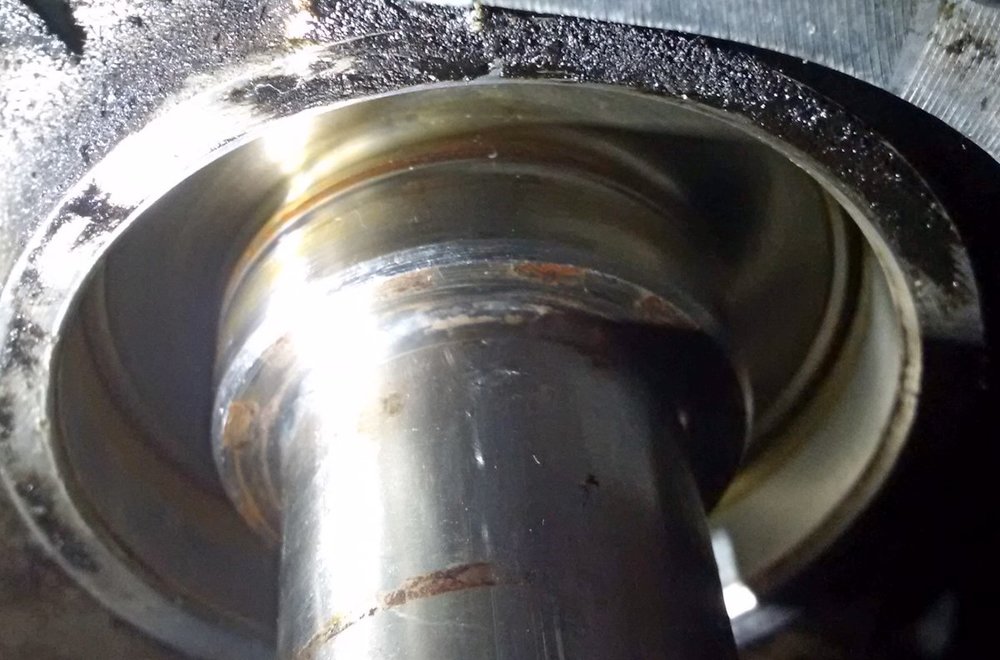
The square markings are were the backside of the sprocket butts against the crank, it's the "teeth" of the sprocket. The seal rides at least 3/16 inch further back (or more towards the top of this image). Here I slid the sprocket back on so it visually makes more sense. I think this groove is a max of .005 " at the deepest - which is towards the back (closest to top of image) right before the brownish "varnish" band. Now that I am seeing it in the day I realize it's probably not a problem . Thank You

-
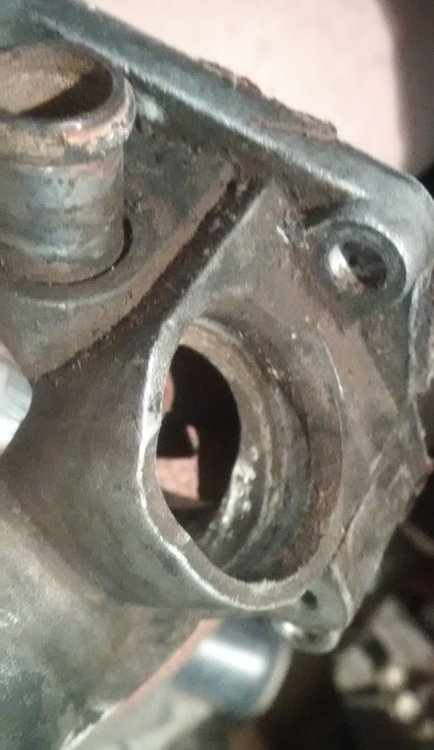
The seal (as well as cam seals) appears to be original, (with "NOK" marking/label) and I don't know if this is a groove or maybe a stock ridge/shelf (about 1/8 inch away from radius) ? motor has 137K miles, wasn't leaking too severe and probably also leaking from cam seals and oil pump as well, resealing all of them

-
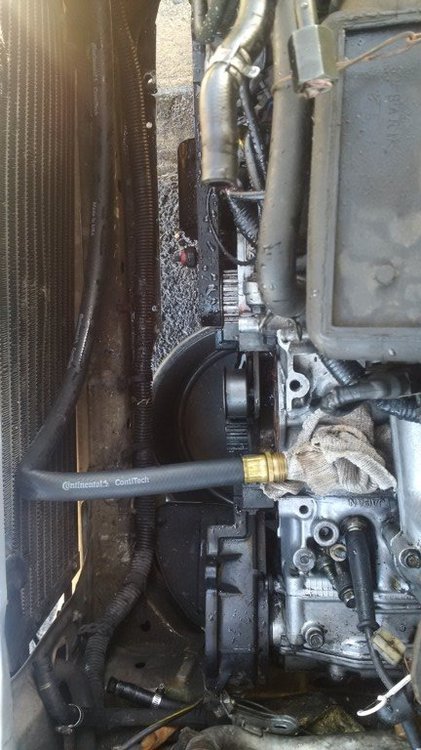
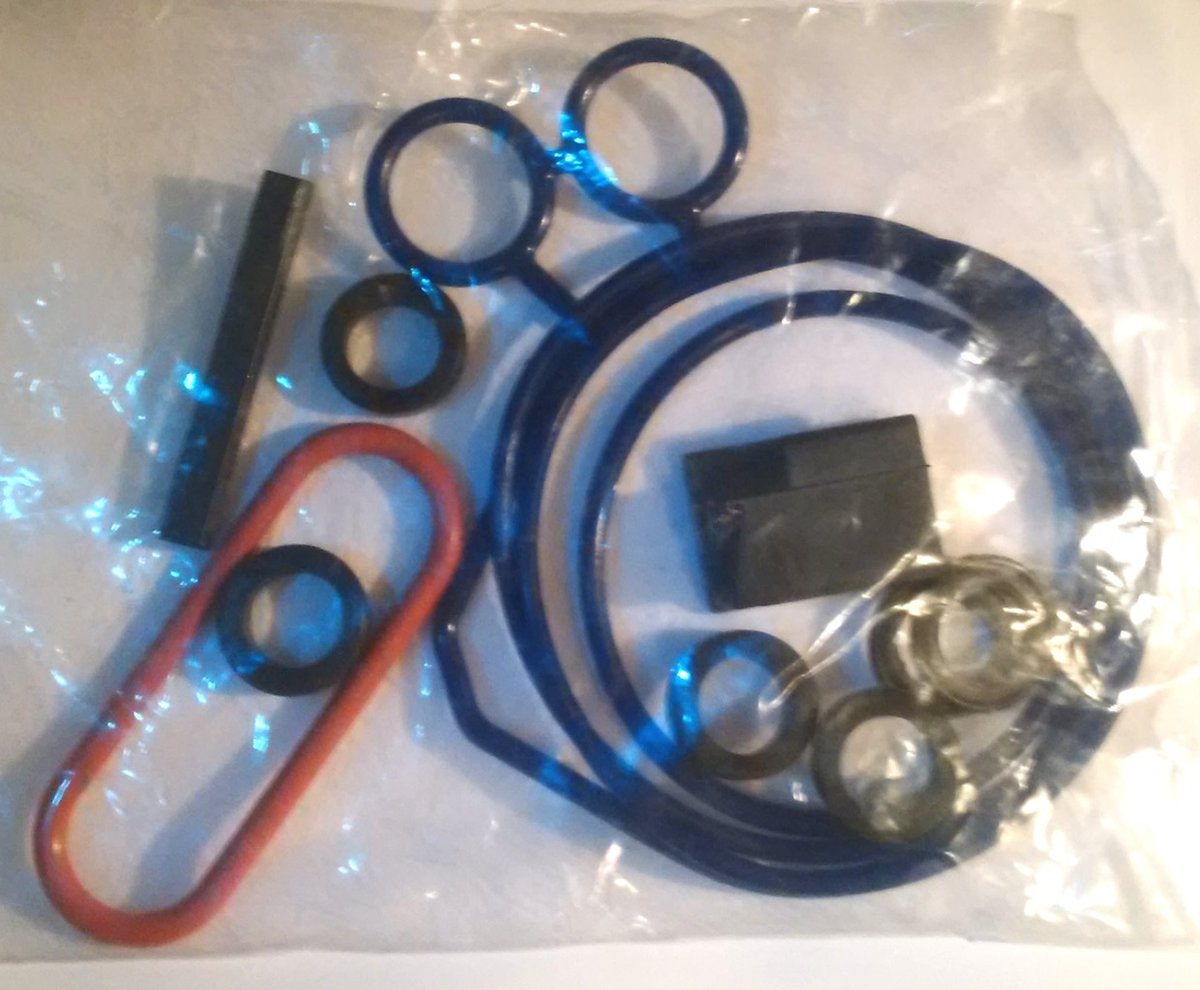
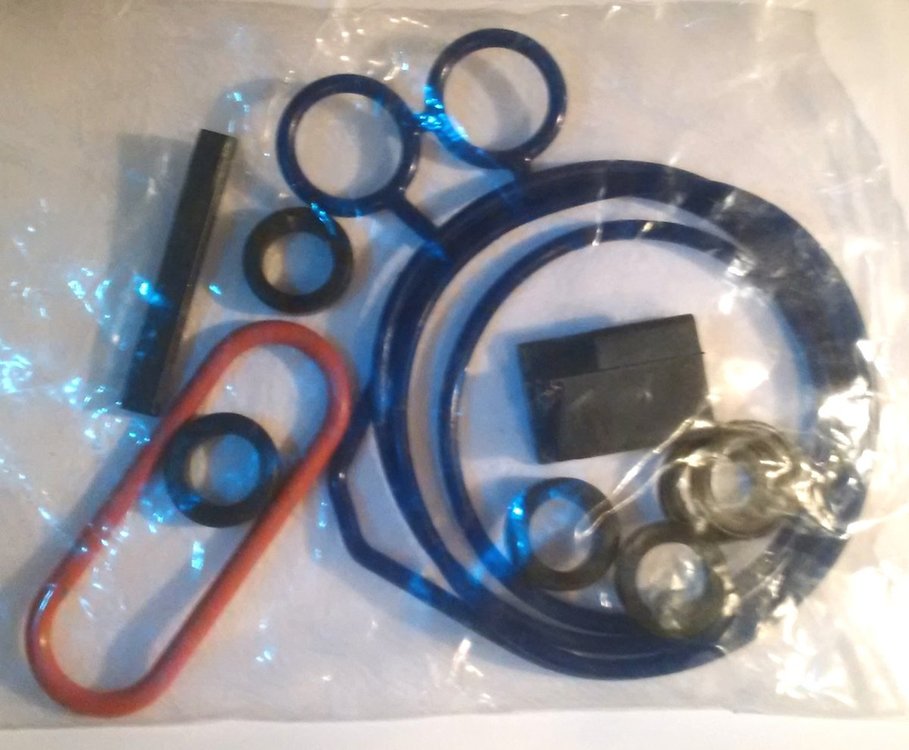
I finally am starting to feel "initiated.." to the "EA82 club", started just by getting the oil pump out.. got to fight with my first really stuck bottom timing cover bolt - actually just stuck in the plastic with it's slightly rusted sleeve = few good squirts of liquid wrench and wiggling back in forth with some constant outward pull (and some cussing, which didn't really help) took about 5 ~ 10 minutes - almost seemed forever with my carcass cocked sideways underneath the car. Sooo I left the top one in and weaseled the ear around the oil pump rather than completely take off that back section of TB cover , that blocks the oil pump from coming out - I'll probably have to take out the top one tomorrow (to remove that section of TB cover or have a terrible fight getting the pump to go back in.. OK now that I got the pump out, found out how important it's going to be to buy/borrow/beg or steal a extra big pair of chanellock pliers (after trying with the wrong tools - at least didn't nick it up worse than it is) to crack the 12mm nut holding the sprocket on - but it ain't gonna happen in the middle of the night, so I wrapped up the rotor side with cling wrap plastic and here's how I protected the open cavity & galley for now(cap off seasoning, parked in kitchen drawer, got SO lucky fits perfect, often wonder why I save crap like this) and the Mickey Mouse gasket is pretty flat, so I imagine all the rest of the seals are worn too. I notice in this "gasket kit" the Mickey Mouse, and the 3 big O rings are actually a real dark cobalt blue color, rather than black like all the rest (except the orange/red one) is that a special compound? Also I don't know what the other gaskets are for? I got a Haynes manual but it's "sketches" are pretty "sketchy" and strain my brain. Thanks in advance
-
Oh ya! I already had all those parts (i hope..) on hand and knew when the day came (belt snapped) I (or some good mechanic) would do everything that I could on the engine/cooling system in that area of the motor - and I'm planning on putting my timing belt covers back on, unless you talk me out of it (yea I know it saves time doing the job in the future. I'm located in the beach area of L.A. and we have very mild weather over all and I plan on only using it on the street, but my luck a rock or nail will get in that perfect position ;). And my lifters are starting to click a little AND I'm leaking a lot of oil all over the front end (add about 1/2 quart every 2~3 weeks) I may even go out in little while (after wind dies down) and pull the pump tonight + reseal + re-install - don't want to leave the oil galleys exposed any longer than I have to. Maybe put a piece of masking tape over the hole while it's out & I'm messing around

-
.. replace just the oil pump shaft seal (and mickey mouse, etc. if it all looks good) or are you suggesting replacing the entire oem original pump? I thought that oil pumps usually last for at least 4~500K miles? Thanks
-
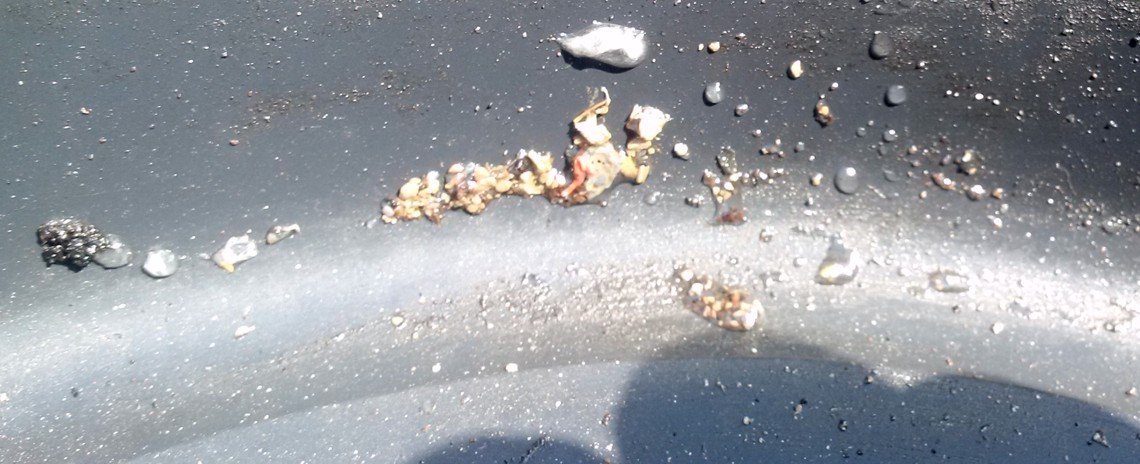
Pulled off good passenger timing belt and it's a Gates T300 U.S.A. - but the snapped driver side belt has no markings at all - maybe they didn't EVER replace it - and if it was stock original I'd think it would have "Subaru" markings? All the old idler pulleys are fine and spin smooth, but going to replace anyways. OK here's my setup for back flush starting at the the heater core, after I opened house water spigot all the way & ran back over to car, let kink out of hose and let water run through while holding hose nipple tight against heater core's return pipe - and exiting through the block via water pump opening .. probably would be "best" to seperate core from block & do both separately, but seems like so little junk overall that it's unnecessary for this around town commuter car. Junk from first back flush of heater core via block drain hole.. Junk from SECOND back flush of heater core and block via block drain hole.. "Raisin" looking junk (probably orange/red hi temp silicone - pretty soft) from SECOND back flush of heater core and block via water pump opening.. backside of old water pump - more surface rust on impeller then when pulled yesterday, lots of humidity right now)