Bratastick
-
Posts
108 -
Joined
-
Last visited
Content Type
Profiles
Forums
Gallery
Store
Everything posted by Bratastick
-
anybody ever cut open their fuel tank?
Bratastick replied to Bratastick's topic in Old Gen.: 80's GL/DL/XT/Loyales...
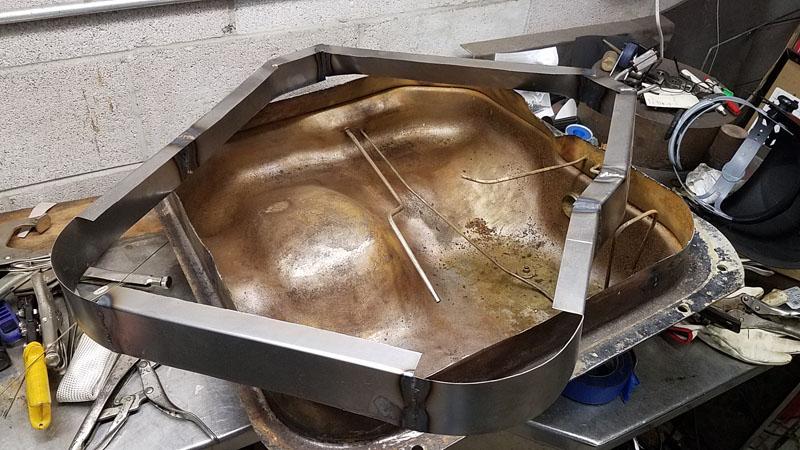
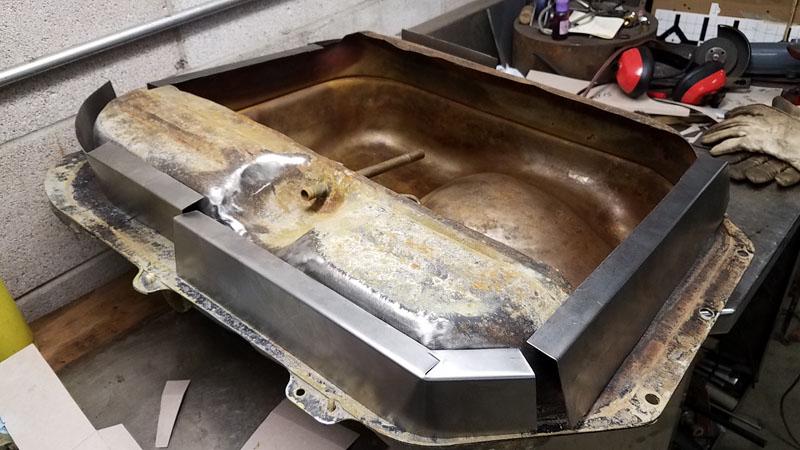
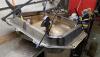
Making progress. Clamped up for welding the collar. Collar complete, mostly. Still need to add the curved corners on the back side. First baffle Top trimmed completely off. Clamped up for brazing the collar to the lower half. This took quite a while. I had to do a little planashing around the edges to get it to fit. Probably cut the lid off a little short in a couple of places. Worked out ok. Also did just a little at a time then switched to a different location to keep the heat down. I suck pretty good most of the time at running a good bead. As much as I tried to clean the old metal I still had some trouble. I plan to coat the inside with fuel tank epoxy so some weld porosity is not a big deal. I used an 8mm tube nut as a fitting and silver soldered the fuel line back together. I also pulled it off the floor of the tank in order to get good coverage of the epoxy. Next is cutting out a lid and getting the baffles brazed in place. This has really taken a lot longer than I anticipated. Hope to finish soon so I can move on to something else.

-
I've looked through a number of threads concerning fitment of larger tires. I've about decided that redrilling my hubs is going to be necessary for a decent selection of wheels. I just about pulled the trigger on some 175/70-13 tires to go in the original rims, but smaller tires and their "look" are just not in today like they might have been in 1982. Fitment is an issue, but more importantly to me is how will the little engine run with a larger tire? The stock engine, which I plan to keep, doesn't have all that much power to start with and a larger diameter tire isn't going to help. The ones on there now, which are 25 years old and not safe to run, are about 22.5 inches in diameter. How much bigger can I go up and still feel like the engine pulls? Mine has the dual speed transfer case and I guess the larger size would also affect the usability of the low range. Any comments on what max diameter is and still be usable with the original engine/trans?
-
anybody ever cut open their fuel tank?
Bratastick replied to Bratastick's topic in Old Gen.: 80's GL/DL/XT/Loyales...
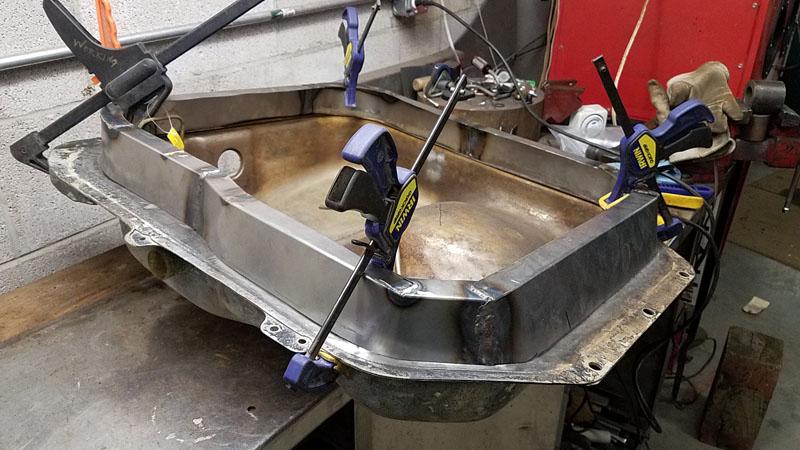
This tank does have baffling. Or at least what's left of it. It appears that most of the rust particles in the bottom of the tank were from the deterioration of the baffles. I'm going to work on fabricating a replacement for those today. Last night I finished up brazing the collar together. I simplified one little section on the right side where the vent line was located. I'm going to put it back under and make sure it bolts up before going any further. -
anybody ever cut open their fuel tank?
Bratastick replied to Bratastick's topic in Old Gen.: 80's GL/DL/XT/Loyales...
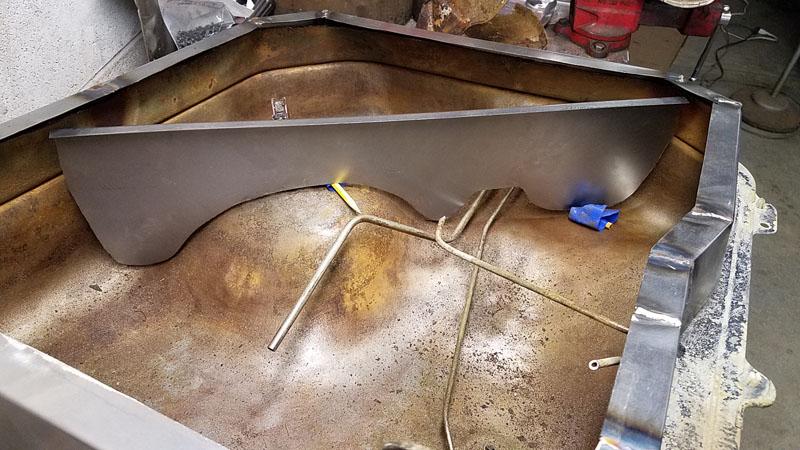
making some progress. I've got all the side pieces cut and bent just need to get them jigged up. I've decided to forget trying to salvage any of the upper half of the tank, it's just too thin and rusty. Also going to rework the vent line so it's a little easier to fabricate.
-
FYI, new 4x140 wheels are available
Bratastick replied to Bratastick's topic in Old Gen.: 80's GL/DL/XT/Loyales...
I don't know what specs they can create. I would guess it's wide open as the wheels are made to order. They were very responsive to my initial inquiry. A friend ordered some wheels from them a year or so ago for an old Volvo and he was pleased with what he got. I don't remember his specs but I'm guessing they were a goofy offset considering what he was trying to do. The only thing he mentioned was that they were a bit on the heavy side being steelies. -
Have been checking on some wheels and discovered Diamond Racing Wheels offer 4x140 bolt pattern on their Pro Series wheels. All their wheels are custom made so you can get most any offset or color. I received this from their customer support: We can do a 4x140 in the Pro Series: 15x6 15x7 15x8 15x10 16x6 16x7 16x8 16x10 The price is $90 each. Not cheap, but compared to other custom made wheels not all that bad. Was going to order some, but decided with the stock engine with bigger wheels/tires would not be a good combination. http://www.diamondracingwheels.com/index.php/racing-wheels/pro-series
-
anybody ever cut open their fuel tank?
Bratastick replied to Bratastick's topic in Old Gen.: 80's GL/DL/XT/Loyales...
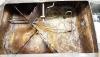
Moving along on this at what seems a snails pace. Have had some work projects getting in the way. Hopefully they are just about competed. Soaked the lower half in some oxalic acid to clean off some of the rust thae wire brushed it. Seems pretty clean now. Depending on how I end up doing the top I probably wouldn't have to actually coat the inside. I'll wait and see how that comes out before deciding. The fuel supply line and the return line were completely impacted with something. Could not get either to free up. The fuel supply has a couple of 90 degree bends and a 180 so trying to unstop it is nearly impossible. Decided the best was was to cut out the section that I thought was likely the problem. Figured I could either get it unstopped or just replace it and solder back in. I believe I will be able to reuse the filter once it's cleaned. Finally made some progress on the stopped up section and have it soaking in carb cleaner. That should get in nice and slick. Next step make some cardboard templates for the top section. -
anybody ever cut open their fuel tank?
Bratastick replied to Bratastick's topic in Old Gen.: 80's GL/DL/XT/Loyales...
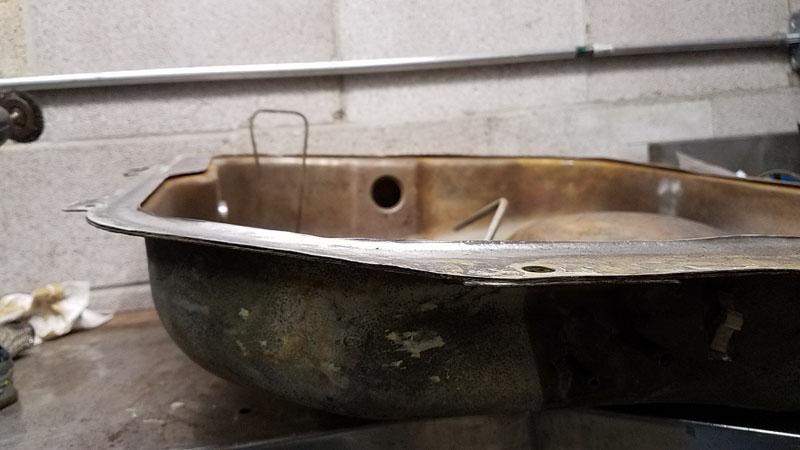
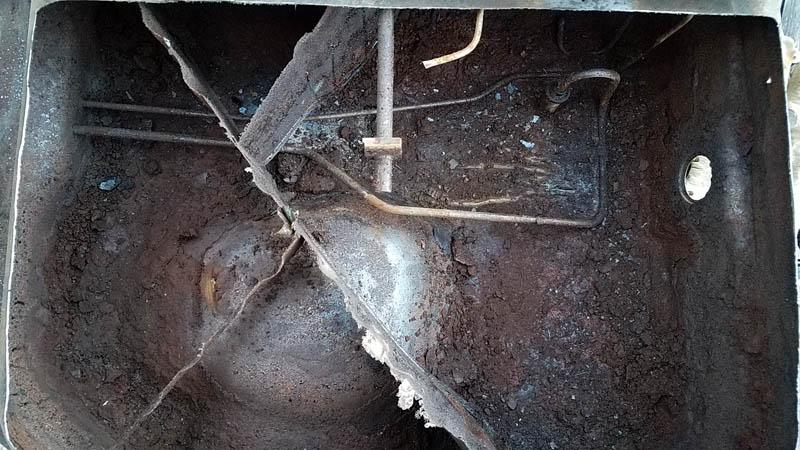
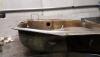
Here it is open. I'm going to have to fabricate a whole new top. The old one is just way too rotted to work on. I plan to cut it back to good metal and make a new piece to rivet in. Called every place around here looking for some raw sheet metal, no luck. They had plenty of zinc plated or galvanized, but didn't really think that would be a good idea considering I want to coat the inside with epoxy. Turns out Amazon sells sheet metal, who knew! It's on the way. I've got to make some measurements and check the area where the tank mounts to make sure it will fit back once completed. I'm probably going to go for some 90 degree corners rather than the curves just to make it easier.
-
anybody ever cut open their fuel tank?
Bratastick replied to Bratastick's topic in Old Gen.: 80's GL/DL/XT/Loyales...
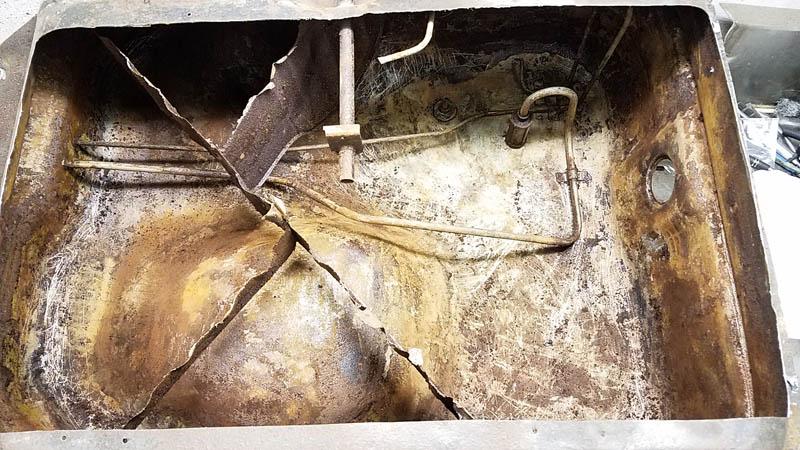
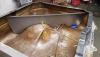
It's open! Good news and bad news. The top part is worse than expected. Metal is pretty thin in some spots. I had planned to pop rivet some tabs to hold it together for the epoxy to do it's thing, but the rivets pull right through. May just have to fabricate a whole new lid. Good news is it looks like Subaru poured some sort of tar like coating along the bottom of the tank. In some places it was 3/8 inch thick or better. It covered pretty much the whole bottom, any where water would have collected and caused rust. The sealer was flaking along the surface and some chunks along the edge were just loose inside. Really messy looking. The good part is that it's fairly easy to chip out and underneath the metal looks new! The baffles are in shambles. I'll need to figure out something to do about that. Overall I'm pretty optimistic about getting it back in service. -
Brat fuel tank baffle, important?
Bratastick replied to Bratastick's topic in Old Gen.: 80's GL/DL/XT/Loyales...
I'm converting to a Weber so I really should only need the supply, return and air vent. The air vent is pretty good size and connects up to the filler neck. The other small ones I'm guessing have something to do with the emissions and the plastic tank in the back. -
Brat fuel tank baffle, important?
Bratastick replied to Bratastick's topic in Old Gen.: 80's GL/DL/XT/Loyales...
There are two poking out of the side next to the filler neck. -
anybody ever cut open their fuel tank?
Bratastick replied to Bratastick's topic in Old Gen.: 80's GL/DL/XT/Loyales...
Doing a little outside clean up and planning where to cut and how to put back together. As expected, after hitting it with a wire brush a number of new holes appeared and some existing ones got larger. The metal that seems to not have pin holes is kinda thin. Once open I may be better off fabricating a whole new top, we'll see.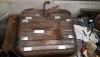
-
I can tell even before cutting open the tank that the baffle inside is only partially attached and is loose. Looks like it's missing a good bit of it's original heft, it has just rusted away. Guess that's what was on the bottom of the tank! Is it worth trying to re-make this once I get the tank open. May not be that difficult to do once I get it open. I'm going to cap off or remove all the misc. hoses going into the tank other than the supply, return and vent.
-
anybody ever cut open their fuel tank?
Bratastick replied to Bratastick's topic in Old Gen.: 80's GL/DL/XT/Loyales...
On the old tanks I've seen you get holes in the upper part, like on this one, then you'll have an area low in the tank with additional holes where the water was sitting. I'm hoping since this one had a layer of "protective" crap on the bottom it might not be tooooo bad-- ha. I think it's going to be worth cutting open to make a better assessment. If it didn't have the rubber coating on the bottom I think I could probably tell from the outside if it was going to be worth the effort. -
anybody ever cut open their fuel tank?
Bratastick replied to Bratastick's topic in Old Gen.: 80's GL/DL/XT/Loyales...
I'm going to look at the will fit fuel cells and see if there's one that I can hook up to use the existing filler setup. Don't really want to change that, and would need a decently accurate fuel gauge. -
anybody ever cut open their fuel tank?
Bratastick replied to Bratastick's topic in Old Gen.: 80's GL/DL/XT/Loyales...
Dee2 you are correct. They can be dangerous. I thought I'd fill it with water while cutting. After it's open and fixed it should be clean enough to weld back together without concern for explosion issues. I'd jump on a new tank but don't think there are any. -
After pulling the tank out of my Brat I thought I'd try and pressure wash it inside and out to see what condition it's in. Didn't look too bad from the outside. Peering through the sender and filler holes it looked like the lunar surface on the bottom. Pressure washed it best I could and a lot of nasty rust looking stuff came out. After spraying the outside some holes in the top appeared. Looking back inside the bottom is really rough. Can't really tell if there are pin holes or not because the outside is covered in a rubberized coating. Fuel supply line is still stopped up. So, I'm thinking I may saw off the top half, make repairs then braze or weld it back together. Anyone else tried this? I fixed a 1964 Rambler fuel tank by tumbling stones inside then coating it with an epoxy resin, but it was basically just a huge box with little in the way of cut outs like this Brat tank has. I was able to fix it just using the sender and filler holes. There was also not a half rusted off baffle hanging around inside to get in the way. And the other issue is the pickup screen would be impossible to cover up to keep the epoxy from coating it.
-
Is there any difference between the intake manifold on an 81 GL wagon and an 82 Brat? Looking to scavenge a 2bbl manifold. Does A/C make any difference? In searching back through various threads they look to be a good swap out.
-
Brat barn find... now what to do first?
Bratastick replied to Bratastick's topic in Old Gen.: 80's GL/DL/XT/Loyales...
When I cleaned the tank on my 1964 Rambler I used the gravel method. I strapped the tank onto the side of my riding lawnmower, jacked up the back and let it run a while. Did a pretty good job. I ended up having to coat the inside of that tank with epoxy. It was a really open tank, no baffles and no real recesses. The Brat tank is more complicated with tubes running through it and the section in the front is somewhat difficult, you certainly can't see anything up there. I still can believe there is this much crud sitting on the bottom. I may try to run a pressure washer in there first before the gravel. -
Brat barn find... now what to do first?
Bratastick replied to Bratastick's topic in Old Gen.: 80's GL/DL/XT/Loyales...
I got the tank out. Had to drop the rear cross member a bit. It's one ugly on the inside---YUCK! Looks like there's an inch of sand in the bottom. I noticed when removing it, it sounded pretty solid and was heavier than I thought it should be. I'm not sure the best way to clean this thing out; you're really only working through two small holes. It also appears there's a baffle inside that has rusted and partially loose. Is there anyway to service the tank pickup? It's buried in the "sand". I'm guessing that once the crud it out it will uncover some pin holes. Any suggestions? -
Brat fuel tank removal?
Bratastick replied to Bratastick's topic in Old Gen.: 80's GL/DL/XT/Loyales...
Thanks. It looked like that to me but the manual didn't say anything about it, but couldn't tell if the instructions included the 4WD models or not. With all the hoses loose this thing is stinking up my whole house with bad gas smell. -
Do you have to remove the cross member in order to remove the fuel tank. I've got it all loose but there's just not much room to wiggle it out.
-
Brat barn find... now what to do first?
Bratastick replied to Bratastick's topic in Old Gen.: 80's GL/DL/XT/Loyales...
Pump is back in place with mostly new fuel lines. Looks like the tank line is pretty well stopped up. I've disconnected all the hoses going to the tank including the filler hose, but I can't seem to get it out. Service manual does not say anything about removing additional items to get the tank out. Does it just come out after removing all the bolts do I need to remove the crossmember? -
Brat barn find... now what to do first?
Bratastick replied to Bratastick's topic in Old Gen.: 80's GL/DL/XT/Loyales...
Well that makes sense and the sound seems appropriate. I expect it's the original fuel pump. Sort of square. I'm going to put new lines to it and put it back in place and see if it will work. I don't have much hope for the original carb. but would be nice if the fuel delivery system was usable.