Rampage
Members-
Posts
683 -
Joined
-
Last visited
-
Days Won
25
Content Type
Profiles
Forums
Gallery
Store
Everything posted by Rampage
-
All I can say is keep pumping the pedal and bleeding. They want you to do the rear first because when you push the pedal the rear engages before the front. The required amount of brake fluid is approximately 500 m2 (16.9 US fl oz, 17.6 Imp fl oz) for the entire brake system. That is a lot of fluid to pump through the system.
-
1987 gl wagon headlight issues
Rampage replied to cornbreadfed's topic in Old Gen.: 80's GL/DL/XT/Loyales...
I can not find the wiring diagram for your car, so I don't know if it uses relays for the headlights or just the light switch. From your description it sounds like the switch is not making good contact. If you want to try and clean and lube the contacts inside the switch, copy and paste the following into Google - 401B - Nu-trol Control Cleaner - . There are a lot of places that sell it. For many years I used a product called Lube-a-Trol by Tech Spray but several years ago it went No Longer Available, so I am on my last can. The 401B is almost the same thing so it should do a good job. This cleaner-lube is for electronics, potentiometers and switches and the old TV rotary Tuners. When it is sprayed it will foam up. The cleaner loosens the crud and the foam moves it away from the contacts leaving a film of oil to protect the contact from moisture. Working the switch speeds up the process. You will have to find or make a hole to spray it into the switch. How good does it work? A couple years ago I wired (from scratch) a 1937 Plymouth Pickup Truck PT50. The original Ignition Switch did not work. There was no continuity through any of the terminals. I got some Lube-a-Trol in it and worked the key back and forth a lot. The truck is still running today with the original ignition switch and headlight switch. The reason I wanted to save it is the switch and coil are connected together with a metal tube. The wire is inside the tube. The tube connects to the bottom of the coil and the coil is mounted through the firewall. -
The difference between BKR6E and BKR6E-11 is the -11 is a V tip. Both are copper core with nickel tips. Both are gapped at .44. Maybe the plug that misfired has a crack in the porcelain. If you want to try a hotter plug, it would be BKR5E or BKR5E-11. The lower number is hotter, the reverse of other brands. You can get a misfire code if the spark is leaking out around the coil and not reaching the plug. Our 95 just did it on number 2. I used a wire grounded on one end and moved the other end around the coil. When I got close to the rubber cap on 2 it sparked. I cleaned all of them and added some dielectric grease, problem solved.
-
96 obw exhaust
Rampage replied to Cfoust's topic in 1990 to Present Legacy, Impreza, Outback, Forester, Baja, WRX&WrxSTI, SVX
Yes, that is duel port. I am surprised because partsgeek lists the 96 2.2 as a single port. It lists the 2.5 as a dual port. Our 97 had the single port, but I changed the heads to 95 heads because they have hydraulic lifters and they have dual port like in your picture, so I had to use the 95 Y-Pipe. -
96 obw exhaust
Rampage replied to Cfoust's topic in 1990 to Present Legacy, Impreza, Outback, Forester, Baja, WRX&WrxSTI, SVX
Look at the bottom of the head where the exhaust Y-pipe connects. It will have 1 or 2 pipes going to the head. -
I went to two local auto parts stores and they brought out four each of three different part numbers of NGK IR plugs and we looked at them. All of them had the 4 digits stamped on the hex. Most but not all had the letters centered vertically on the lower part of the porcelain. The boxes of certain part numbers did not have the Russian printing, other part numbers did. So far it looks like the only real giveaway will be the 4 digits missing on the hex.
-
96 obw exhaust
Rampage replied to Cfoust's topic in 1990 to Present Legacy, Impreza, Outback, Forester, Baja, WRX&WrxSTI, SVX
Partsgeek.com has the Y-pipe with single port. RockAuto.com has the center pipe for an Outback. Click the INFO button. You can also download the PDF parts manual from Walker and AP Exhaust and get part numbers and then find someone that sells that brand. -
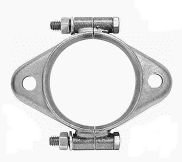
Same thing happened several years ago on our 95 RHD 472k miles. I can see part of the flange rusted and blew away. It can be fixed with a two piece flange like in the picture. I don't remember the pipe size. I had to get a spring and bolt kit and a new doughnut gasket. I think I had to get two different kits, one for the right size bolt and one for the right size spring. Most local auto parts stores that carry exhaust should have these.
-
1989 subaru leone efi fuel pump
Rampage replied to turbo1600's topic in Old Gen.: 80's GL/DL/XT/Loyales...
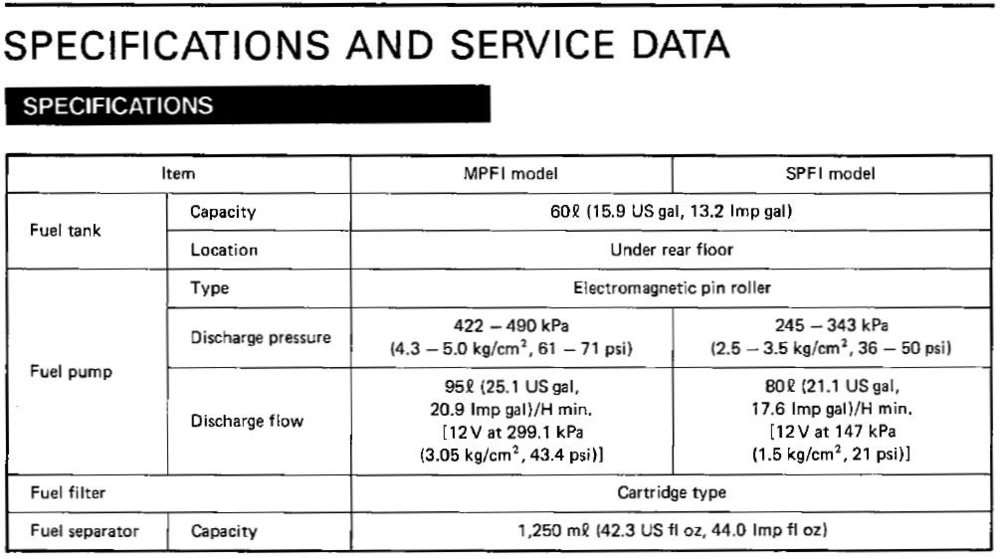
Is the engine SPFI or MPFI, single port fuel injection or multi port fuel injection? They use different fuel pumps that run at different pressures. Are there numbers on the old pump? -
I never had any problems with the Cardone brand, reman or new. They list different pumps for the 2.5 and 3.0. For our 97 RHD Legacy I bought seals for the rack and pump. I was adding a lot of fluid every two days. Sometimes it was below the strainer. I missed checking it once and it got low and ruined the pump. I got one from a local yard that worked good. I think it was 25 bucks. I think it was lmdew mentioned TransX so I tried it. Now I only add about half an inch every week for the leak in the rack. That's around 600 miles. Take your pick for the FSM. http://jdmfsm.info/Auto/Japan/Subaru/ https://sl-i.net/FORUM/showthread.php?18087-Subaru-Factory-Service-Manuals-
-
Welcome. On the A/C, do you know the system must be pumped to a vacuum before charging? If you go shopping for a used automatic the first 7 digits in the number you posted must match. The last 3 don't matter. Try www.carpart.com and see if there is a yard close to you. Or www.hollanderparts.com . I have found that some of the yards forget to remove items when they are sold, so it is a good idea to call them. Phone numbers are listed. And most will have a core charge to get the old one back. Get the Factory Service Manual here http://jdmfsm.info/Auto/Japan/Subaru/
- 14 replies
-
- sti
- manualswap
-
(and 2 more)
Tagged with:
-
One thing about probing Air Bag circuits or any circuit with control modules is, you need a low voltage ohm meter. A lot of ohm meters use too high a voltage on the probes and can damage the electronics. I have two VTVMs (Vacuum Tube Volt Meters) for testing sensitive circuits. The one picture shows the Roll Connector in the steering wheel wired to the air bag, so I guess it would be the clock spring. If the plug under the seat is yellow, then it goes to the Inflator which would be the side air bag. That same picture shows the same system on the passenger side, but it could just be an option. I have never had to probe an air bag and I don't know how sensitive they are to voltage. The only thing I know for sure about air bags is they stink when they go off. GD has the right idea. Without the diagnostic harness and resistor kit, your only option would be to unplug the module and 4 air bags and then probe the sensors and wires between connectors.
-
The first 7 digits must match. The last 3 don't matter. Looks like the T has dirt on it. There should be 10 digits. TZ1B5LCXAA T - transmission Z - Full Time 4WD AT 1B - Gear ratio 5 - Series code L - not on my chart, but references the internal workings of the transmission C - engine type and turbo or non-turbo X - Year AA - unknown
-
G: TROUBLE CODE 12 DIAGNOSIS: Airbag main harness circuit is open. Driver’s airbag module harness circuit is open. Roll connector circuit is open. Airbag control module is faulty. CAUTION: Before performing diagnostics on airbag system, turn ignition switch “OFF”, disconnect battery ground cable and then wait at least 20 seconds. I got the FSM here. https://sl-i.net/FORUM/showthread.php?18087-Subaru-Factory-Service-Manuals- When you click the Green button to download, a new window will open, just close it. Save the zip file to a folder like Legacy 1998 and Unzip the file into that folder. I use 7 Zip, but windows will do it too. Look in Diagnostics--Supplemental Restraint System, also in the Wiring Diagram. One thing you could do is compare seat to seat. Unplug both seat connectors. Do not probe the connectors from the harness. Check ohms on the connectors from the seats. It looks like the sensor has a resistor that is shorted by a switch when there is weight on the seat. Wiggle the wire and see if the reading changes. In order to probe the harness disconnect battery neg. and all the plugs must be removed from the module. The diagrams will give you pin numbers and wire colors on the connectors.
-
Fluid Film is an Amazing product. I saw a friends Ram pickup that he had sprayed the frame and suspension at the front wheels with it months before and it looked new and shinny. I first used it on the rollers and hinges on the big garage door where I used to work. No more squeaks. I had to change rear brake shoes on our 97. It was late when I started. I hit one of the drums about 6 times with my 3 lb. hammer and it did not budge. I decided to work on it in the morning. I sprayed only a little bit of Fluid Film on top of the center hole of both drums and worked it around with the tube on the spray can. It bubbles up like crazy and will splatter if you push the button down hard. The next morning I got my hammer. Like most people, when I want to hit something really hard with a hammer, I put the head where I want to hit and tap then draw back for a big swing. Well, when I tapped the drum, it moved. I removed it by hand. That stuff actually has a good odor too, unlike some of the penetrating oils. After seeing GDs posted Videos I will be getting more of it.
-
Trying to repair/restore my new 1982 GL Wagon!
Rampage replied to Subastu's topic in Old Gen.: 80's GL/DL/XT/Loyales...
Maybe, just maybe corrosion on a valve stem is not allowing one or more of the valves to close tight. Cranking the engine would have pushed the valves open. Closing them relies on the spring pressure. Or maybe a broken valve spring. A weak spring will close the valve (if it moves freely) when cranking the engine and there will be compression. -
Have you checked to make sure the battery posts and terminals are clean? The other causes for a no crank are IGN Switch, Starter Relay or socket, Clutch Switch or plug or the Starter itself. See wiring diagram above. You need to find the culprit through process of elimination or just replace parts and see what happens. Have you tried jumping the plug that goes to the clutch switch like I posted earlier? The next step would be to see what the voltage is coming out of the Start terminal of the IGN Switch with the clutch depressed or with the plug jumped. 20 bucks (plus shipping) isn't a bad price for the IGN switch and considering the age of yours it might be a good guess.
-
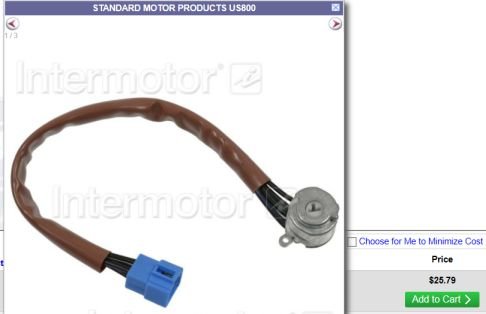
Do you think the IGN Switch is faulty? I had to replace the one in our 97 RHD Legacy. It is really not that hard to do, just takes a little time. Release the lever and lower the steering wheel, remove the plastic housing and there it is. I see that Standard sells the assembly with and without the lock cylinder, so it should interchange if you get one. AutoZone shows the switch only for $41.49, but they have to order it. RockAuto shows the switch only for $19.82 and you can order it. https://www.rockauto.com/en/catalog/subaru,1996,legacy,2.2l+h4,1269873,electrical-switch+&+relay,ignition+starter+switch,4700 I never heard of the brand they are showing.
-
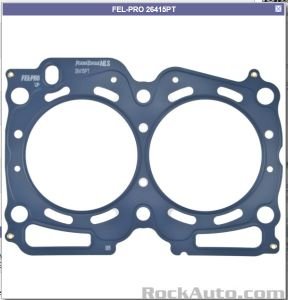
Start here https://jdmfsm.info/Auto/Japan/Subaru/ and get the Factory Service Manual. It has a lot of info that you will need. Also, if you go back to previous pages in this forum you will find lots of discussions about head gaskets, timing kits and everything else, not that long ago. Try the Search at the upper right. That is how I started years ago. Google led me to this forum. I joined and donated so I can try to give back some help if I can.


