Rampage
Members-
Posts
683 -
Joined
-
Last visited
-
Days Won
25
Content Type
Profiles
Forums
Gallery
Store
Everything posted by Rampage
-
Wow, that brings back memories. In the early 60s I had a 51 mercury coup with a flathead V8. It had a Marvel oiler on it. The tank mounted on the firewall and an aluminum tube ran down to a plate mounted between the carb and intake. There was a site glass on the tank and you could adjust the flow of the Marvel Mystery Oil for one drop a minute or something like that.
-
I have seen application specific kits somewhere maybe partsgeek.com or rockauto.com maybe even Subaru. I bought an assortment. One thing to consider, if you remove the evaporator core you will be able to clean the outside of it. On our 95 I found about 3/4 of it was blocked with small parts of leaves. The air could only go through the upper front corner and that is where they put the temp sensor on the air flow output side. If the a/c was on recirculate the compressor would cycle on and off because the temp sensor was getting too cold. With the air from the outside the compressor ran normal. I really wish these cars had a cabin air filter. Also, the expansion valve is bolted to the evaporator (it is on our RHD) so maybe replace it while it is out. I had to put one in our 95. That is when I saw how blocked the core was. Make sure the pully bearing spins free and does not make any noise. I replace one on ours. It is pressed into the pully. If you remove the clutch be careful when you pull it off. There may be one or two thin washers inside used for adjusting clearance of the clutch and pully. Somewhere I found what I call a plastic spring. They make a 1/4 inch strip of plastic and then mold it into the shape of a spring. It can be spiraled around the pipe any place it might rub against something.
-
Do you feel the "bump" in the steering wheel? I found this on our 95 RHD Legacy. Check the transmission and motor mounts. Make sure the rubber is not broken away from the metal plates on any of them. And they are not soft and spongy from oil. If the tranny is shifted to one side, it will put extra pressure on that outer axle joint and as it rotates it will bind on the rear side and push against the steering knuckle causing the steering wheel to turn a little. I know the inner joint slides, but under a load it doesn't slide easy and if the tranny is shifted enough there is no space to slide. The binding doesn't seem to happen on the front of the joint, only the rear. The front axles are angled forward to meet the wheels. On a tight left turn on the rear of the left joint on the left wheel is much tighter than the front of the axle joint on the right wheel. Hope I explained this ok.
-
You or your mechanic should check out the piping from the PCV Valve down to the Block. The rubber hoses get very hard and the plastic y gets brittle, so taking them apart can be a chore. I did brake the y one time. Best to replace the hoses with new. Check the inside of the y and the hoses, also the hose from the y down to the block. With the gases and oil coming from the crankcase, they build up crud on the inside and the passage becomes smaller. With the passage becoming smaller the air flow moves faster and will tend to take more oil with it to the intake to be burned. With the higher rpm of driving you have more leakage past the piston rings thus more pressure in the crankcase to make its way through the PCV valve. I have removed intakes and had oil run out when tilted.
-
You may want to try swapping these two parts. They are the same on the 96 and 98. For the misfire, swap the Ignition Control Module. It is located at the center of the firewall. It is the same size as the plug connected to it. The ECU sends signals to it and it controls the coil. For the rpm thing, swap the Throttle Position Sensor from the 98 intake to the 96 intake you are using now. It is mounted on the side of the throttle body with 2 screws. It is adjustable, so you will need a volt meter. Turn the ignition switch to ON, do not start. Measuring from a good ground on the meter, the center wire on the plug should be adjusted to .5 volts (half a volt) with the throttle fully closed. The bottom wire is ground and the top wire is hot from the ECU. Which Mass Airflow Sensor are you using?
-
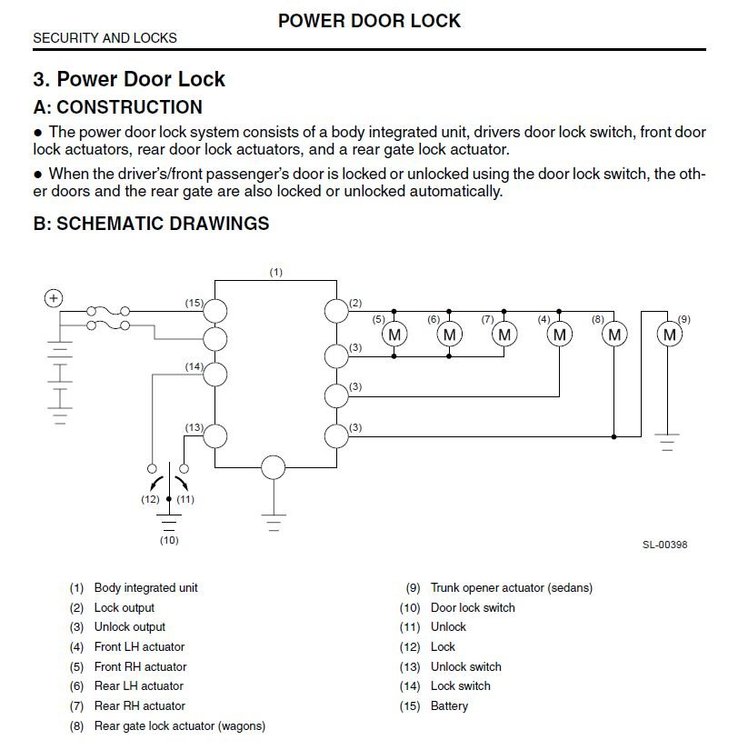
Well, I really hope both wires are broken now. When you grounded one of the two wires and operated the lock unlock switch, it may have burned out one of the outputs in the "Body Integrated Unit". I don't know if it has short protection built into it or not. In the diagram you can see the operation of the actuators. The big block is the door lock timer built into the Body Integrated Unit (aka body control unit or module). Pins 2 and 3 control the door lock actuators. I am not sure of the polarity it uses, but here is an example. If pin 2 goes positive and 3 goes ground the doors will lock. If pin 2 goes ground and 3 goes positive the doors will unlock.
-
Hope you didn't burn out the Door Lock Timer by grounding that wire. What you call a motor is actually a solenoid. The two wires going to it are switched by the Door Lock Timer, one polarity to lock and opposite polarity to unlock. One wire hot the other wire ground to lock and the opposite to unlock. The solenoid has a center position and will either push or pull the door lock depending on the polarity used on the two wires. Put the wires back the way you found them. If it still clicks when you use the button to lock and unlock, try this. I found this answer here many years ago for our 95 Legacy wagon. Open the drivers door. Hit the button to lock all doors. Go around to the rear hatch and push in on the handle hard. Go back and hit the button to unlock all doors. Now try the hatch and see if it opens.
-
The mechanic said it rolled a few feet and stopped. That would mean the tires rolled maybe one third or one half of a rotation. More than likely the problem would be an axle or differential. I doubt the problem would be in the actual transmission because of the gear ratio in the differential everything in the tranny turns 3-4 times faster than the wheels. He would have put it up on a lift for inspection. That lets the wheels drop and extend the axle joints. I would look there. Letting it sit for an hour and then it worked fine, that is weird.
-
I like the DAYCO belt, never had a problem with one yet. The outside of any timing belt will start to get shinny, therefore slippery, and that drives the water pump, so replace it. Also, I have yet to see the factory tensioner fail. When you do the clutch, pull the flywheel and change the rear main seal on the crank. The parts man at Subaru told me to smear a little silicone gasket compound on the outside of the seal to help it slide in easier. It goes in flush with the outer edge of the block. Be careful because there is no lip on the inside to stop it from going in too far. That happened to me once and I had to run screws in it to pull it out. It is hard to put mileage failure on seals because heat and age is hard on them. The best thing to do is replace them while you are there. If they do leak, the oil does not get on the belt, but it makes a mess on the underside of the block and frame.
-
Mitchy Look at the two smooth pullies in both pictures you posted. In the top pic they are side by side and one is flipped over in the second pic one is on the left and one on the right. In the first pic they have 2 bearings per pully. In the second pic of the GMB and you'll notice they only have 1 bearing per pully. I tried GMB once and those two pullies lasted less than a year. The water pump from the kit leaked at the shaft seal in 3 weeks. The belt was Dayco so I reused it on both repairs.
-
More battery info. A car battery should not be deep cycled. This page will explain why. https://batteryuniversity.com/learn/archive/can_the_lead_acid_battery_compete_in_modern_times I have not looked at the following, but it does sound interesting. German medical officer Wilhelm Sinsteden investigated different electrodes including silver, lead, tin, copper, gold, platinum https://books.google.com/books?id=4KDvAwAAQBAJ&pg=PA4&lpg=PA4&dq=german+gold+acid+battery&source=bl&ots=LtebJb6Vv5&sig=ACfU3U29jmo7kqdM407jWdBF-QsD77vesA&hl=en&sa=X&ved=2ahUKEwiWmcOMydXkAhU_GDQIHaV4ATo4ChDoATADegQIBxAB
-
In our 95 and 97 I use the 35 series with 640 CCA at 0 degrees F. It is around a hundred bucks. It fits the box and is just the right height and the terminals are correct. The 65 has reversed posts + and -. I never looked at the weight. I go by size and CCA. I noticed Walmart does not say at what temperature the CCA is, could be 32 or 0 degrees.
-
The normal life expectancy of a lead acid battery is 4-5 years. I have only seen a few last 8 years. Batteries used to ship without acid in them. The acid was put in when it was sold to the customer. That is the start if its life span. Now the acid is put when it is made. It will set at the manufacture then sold to a corporation and set in their warehouse then move to a store and set on their shelf, then we take it home. Who knows how old it is when we get it. When the battery is used the lead plates form an oxide coating on them that insulates the plates from the acid (weak). When the battery is charged that knocks the oxide coating off the plates and it falls to the bottom of the cell. If charging does not remove all the oxide from the plates it will be a little bit weak. The lead plates are raised from the bottom. If the oxide builds up and touches the plates they are shorted and that cell becomes dead. Now it would read 10 volts instead of 12 volts. More lead plates and larger surface area gives more cranking amps. It is still 2 volts per cell. A lead acid 12 volt battery is supposed to be charged with a constant voltage of 14 volts. Newer vehicles have raised that a little bit.
-
The whine and clunk in the diff usually comes from worn ring and pinion teeth or carrier bearings, or both. Best and easier to replace the whole diff with one of the same "gear ratio". Replacing parts inside is time consuming and if not adjusted correctly you will end up with the same thing you have now. Try these sites and find one close to you. car-part.com hollanderparts.com
-
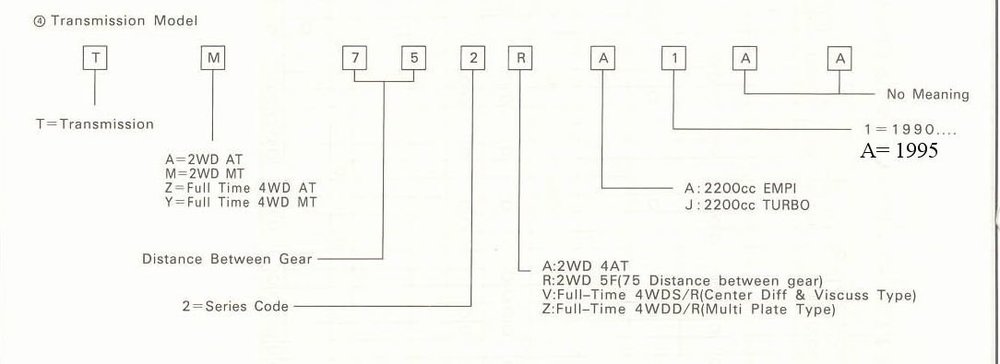
The following is from a previous post. Being all wheel drive the gear ratio must match what you take out. Posted August 23 I also use this web site https://www.hollanderparts.com/ to find parts. Look up your vehicle then enter your zip code to sort closest to you. transmission - transaxle. Get the number on the sticker located on the bell housing above the starter or from the plate on the strut tower and using the chart in the attachment you can identify your transmission and a replacement. The first 7 digits are the important ones. I found this chart somewhere when I needed a tranny for our 95 Legacy. TZ102ZA----
-
I too have built quite a few large speaker enclosures (18" woofers, horn and cone mids and tweeters) years ago. That speaker area is not very large so foam is a good idea. You do not want to seal it because then it would require a tuning port to match the volume of the enclosure to the resonant frequency of the speaker. First, I would either put a 1/4 inch of foam under the rubber lining, or glue it to the metal underneath it so it doesn't vibrate against the metal. Then, I would glue a layer of foam on the bottom and sides of that rubber lining. Too bad those studs aren't longer, you could make your bracket out of wood. If you use sheet metal bend the edges up to make it more rigid.
-
Since it cooled for "many weeks" the leak is small and you may not see the dye. Remove the caps on the low and high charging ports. Cover the hole with your thumb for about a minute. Then remove your thumb slowly and listen and feel for a pisst. That is how I found the leak on my Ranger. I could have used a rubber hose and a low pressure gauge, but my thumb worked. You also have the option to dump in a can of A/C Pro that contains stop leak. I don't care much for stop leaks, but I used it on our 96 Voyager when I could not find the leak. After 4 years I checked it for pressures and only added a few ounces of Freon.


