mka
-
Posts
34 -
Joined
-
Last visited
-
Days Won
4
mka's Achievements
Advanced Member (3/11)
18
Reputation
-
'79 Brat EJ22 Retrofit Build Thread
mka replied to mka's topic in Historic Subaru Forum: 50's thru 70's
And a major milestone has come to pass. The Brat touched back down on all four tires for a brief time here this afternoon, and the stock Impreza wheels really fill those wheel wells up nicely. I've left out images of the tacked in brackets because they're A) extremely ugly albeit functional, and B ) not particularly different from where they sit in the mockup. After having completed this milestone I will say for those following in my footsteps - getting these brackets to site evenly and where I want them was very tedious to do by myself, on the ground, in the sun, in my driveway. They also need about a quarter inch spacer installed underneath them to allow the vertical edge of the upper bracket to get good contact for welding to the frame. I'll be welding a chunky fender washer or fabricating a spacer to thicken the base of the bracket to accomplish this. Installation of the bracket sets would have been much, much easier if I'd had a lift to use or removed the engine first (or ideally both.), neither of which I have or did. Egg on my face there. I'll get some more images of the engine bay and bracketry once I've put this thing back up on the stands to pull the engine and subframe. Next up is getting these welded in completely, boxing the frame rails back in, and modifying the subframe to accept the impreza power steering, as stated in earlier posts.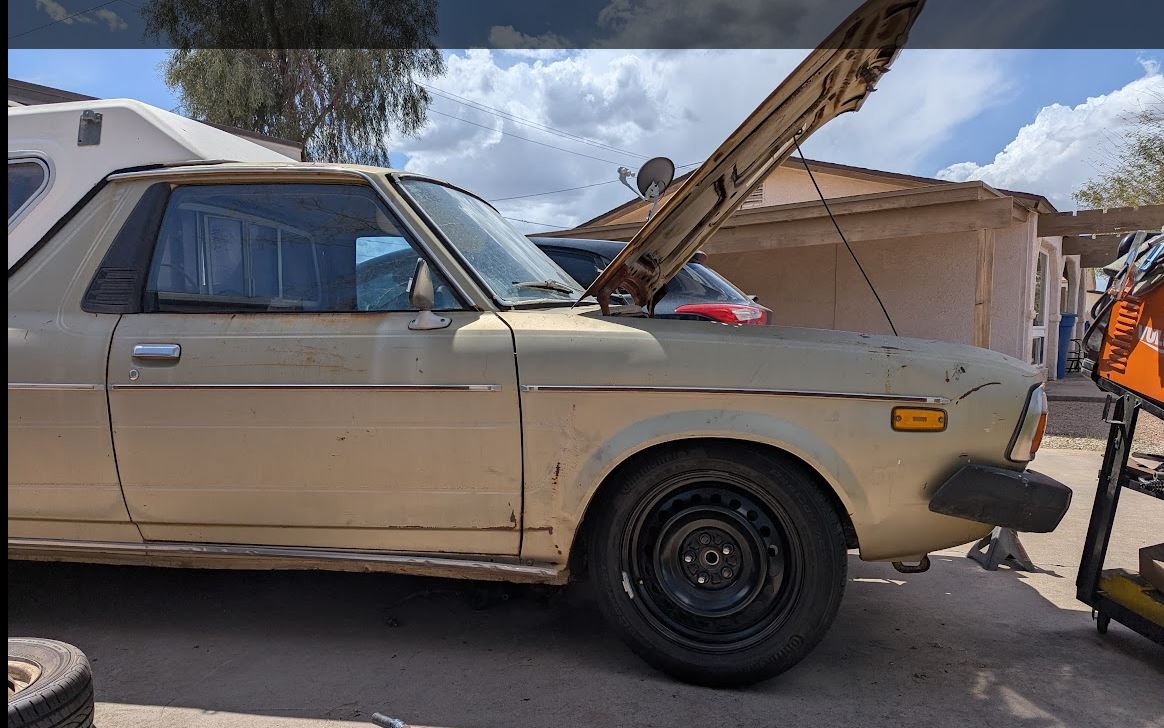
-
'79 Brat EJ22 Retrofit Build Thread
mka replied to mka's topic in Historic Subaru Forum: 50's thru 70's
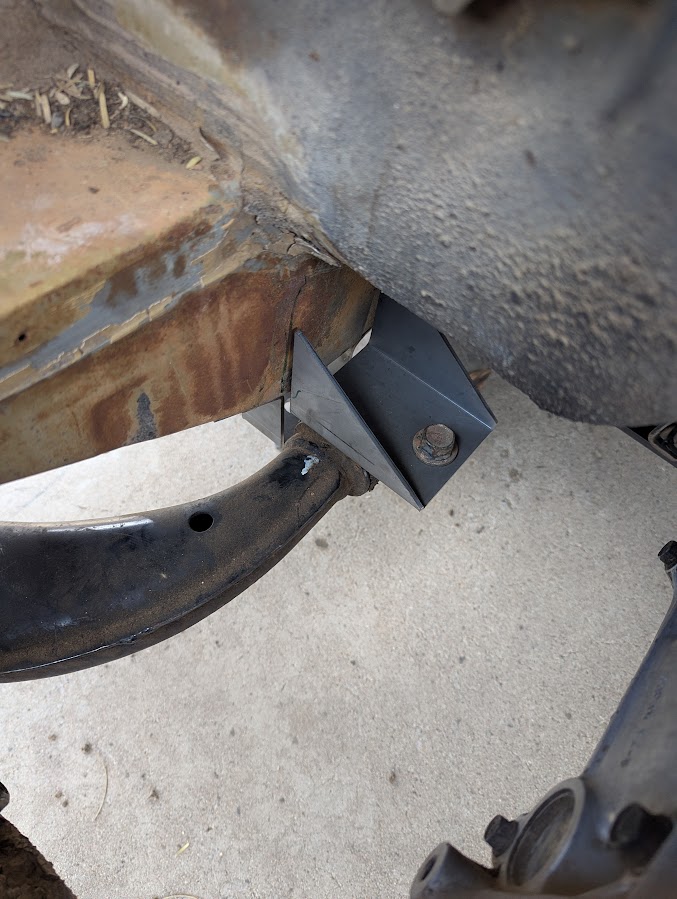
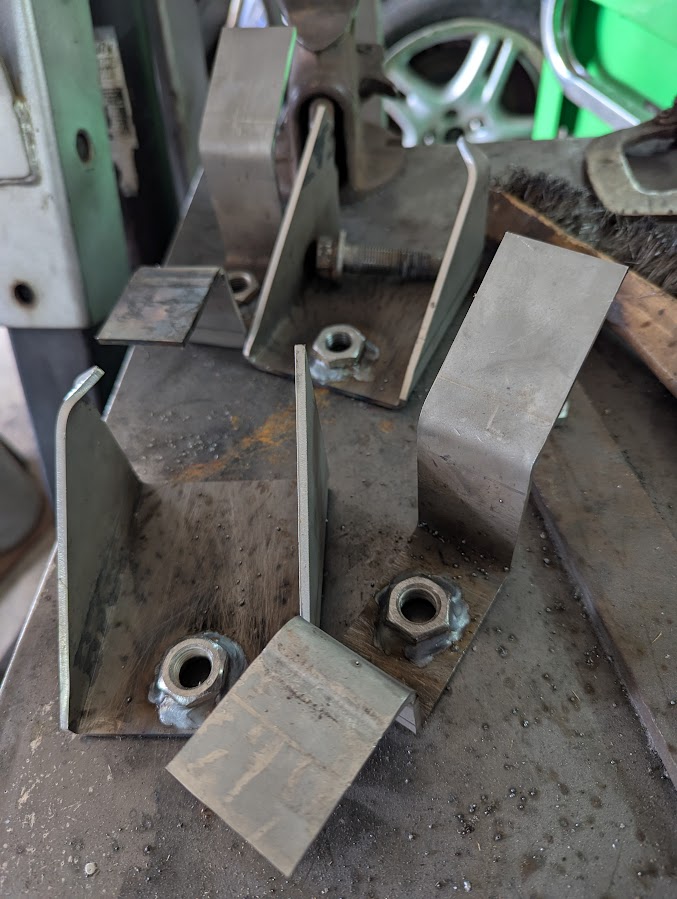
Well, It's been a couple more weeks, and I have a couple more updates! I had to go through a few design iterations of the brackets in order to get them even made. I'd hoped to design a version that was one piece, however due to some equipment limitations I had to go with a two-part construction. However, this appears be a more convenient method when it comes to installation, at least at the outset, and since i sprung for some chromoly steel I expect this to be adequate in terms of strength, though I may go back and add some gusseting later - I'll have to report back when I've actually got the parts permanently attached to the truck. Enough blathering, though - let's get to the actual part and placement photos! The first image is of the bracket set as received. Pretty damn close as a first fitup, but in the second image you'll see I ran into a few interference issues. The 90 degree bend on what i'm calling the "lower" bracket needed to be rebent to place it about 3/8" lower than the 45 degree bend, and the rearmost flange on what I'm calling the "upper" bracket bumped into the floorboard by about the same amount. This is true on both sides, so at least I'm consistent. I've adjusted the design files to match these changes, but for my purposes I was able to make these changes here without completely recutting the brackets. These adjustments can be noted on the third image, as well as the fact that I've also welded captive nuts onto the assemblies. Usually I'd just let the fixation carry me through and I'd actually have these installed at this point but I had some prior obligations that forced me to leave the final weldup to another day. The plan there is to clean the mating surfaces to be welded of paint and gunk, bolt the brackets to the pivot then use my floor jack to push them into place so I can tack them up. Not the most precise of motorsport fixturing and fabrication, but for this build it will have to do. Also, the way I see it these factory bushing housings have some room for slop in the way of slots for the bolts, so I have some pretty significant leeway when it comes to placing them as long as I'm even on both sides. More updates to follow soon when I have the front end on the ground (briefly) before I move onto fabrication for the steering gear and have to take it all back apart. 😅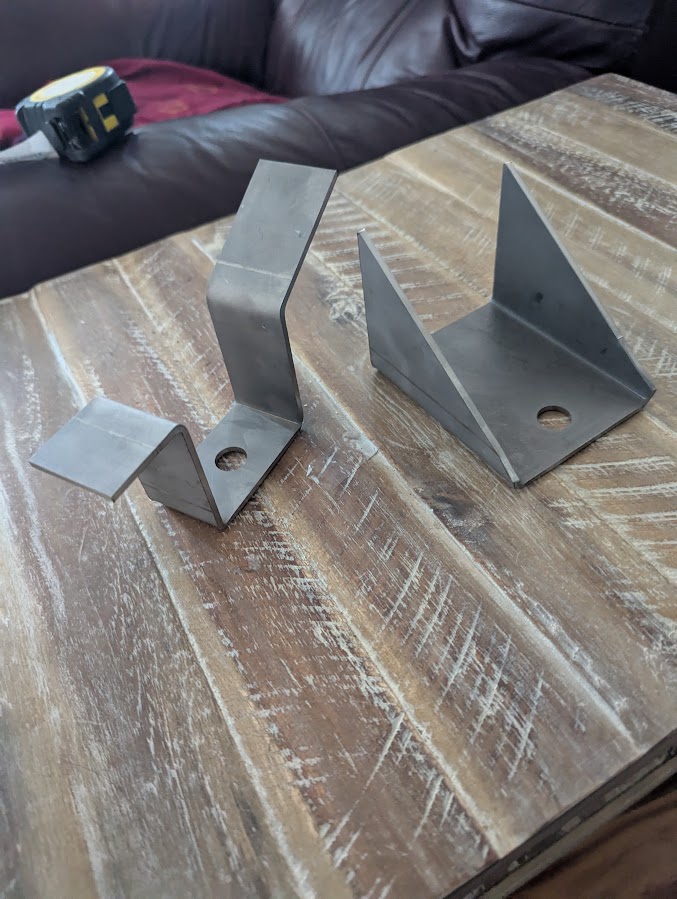
-
'79 Brat EJ22 Retrofit Build Thread
mka replied to mka's topic in Historic Subaru Forum: 50's thru 70's
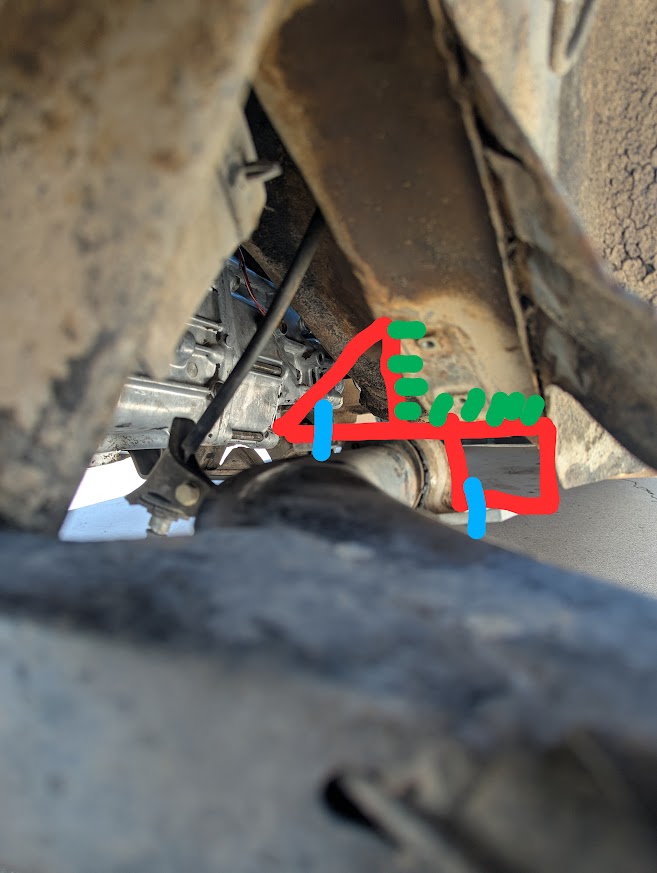
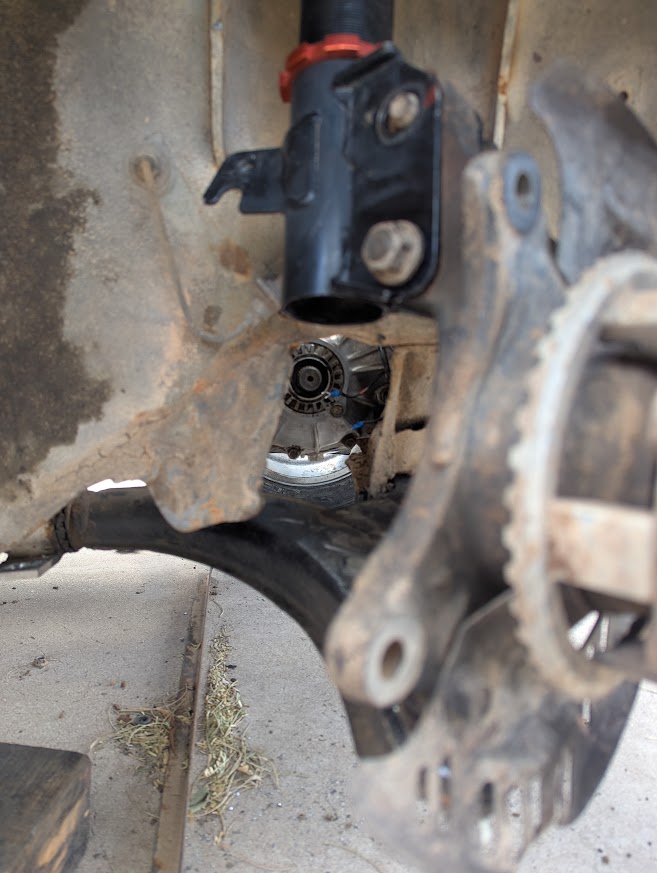
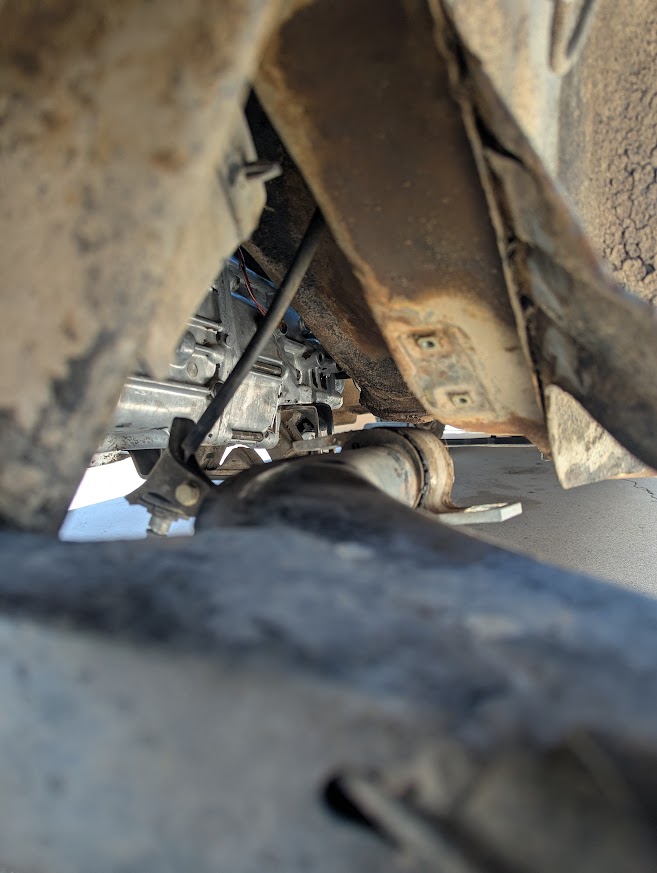
Well, I'm so close to getting the jackstands out from under the front of this thing I can almost taste it. Did a little measuring under the car today, no convenient bolt holes but I did manage to rough measure and sketch up an idea of what my new control arm mount will look. Started on cardboard then transferred it to CAD this evening. I need to remove one of the control arms to do a more detailed measurement so I can get the bolt holes lined up where they need to be but I think withe some decent 4130 chromoly sheet this should be plenty stiff welded in where it needs to go once I get those measurements. this part will again be available to folks looking to do a similar build. First photo is of the render, second is looking in through the drivers (Front left) side wheel well towards the rear of the car. Red lines represent the assembly, blue the bolts, and green the places I intend to weld the bracket to the car. Next fitment and fabrication project is the steering rack, which I pulled from the Impreza today as well. I'd really like to get away with an install that doesn't end with me resorting to cutting up the transmission bell but that's honestly looking like more and more of a chore.If the fabrication to get the impreza rack in ends up looking like it will be just as much of a hack job I might just capitulate and try to clearance the existing manual rack as cleanly as I can. But I'm getting ahead of myself, - one problem at a time. More updates to follow once I have the control arm mounts ready to go in or once I have the impreza stripped enough to warrant a celebratory "it's out of my shop!" post.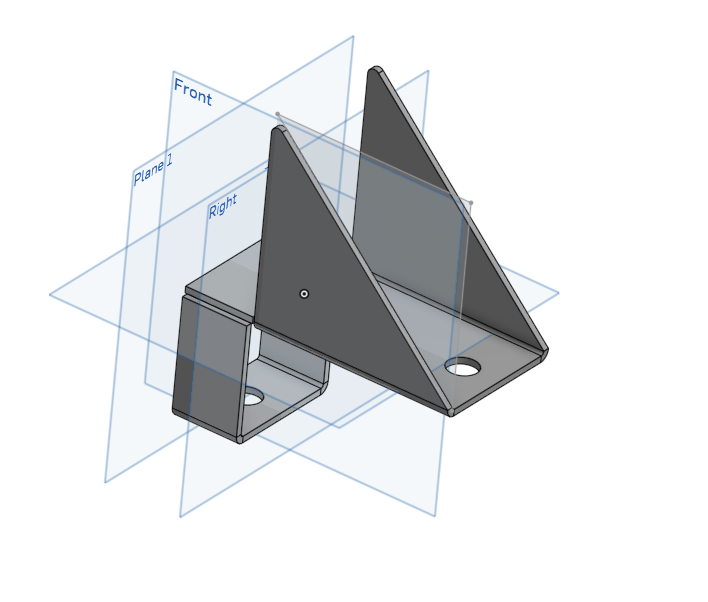
-
'79 Brat EJ22 Retrofit Build Thread
mka replied to mka's topic in Historic Subaru Forum: 50's thru 70's
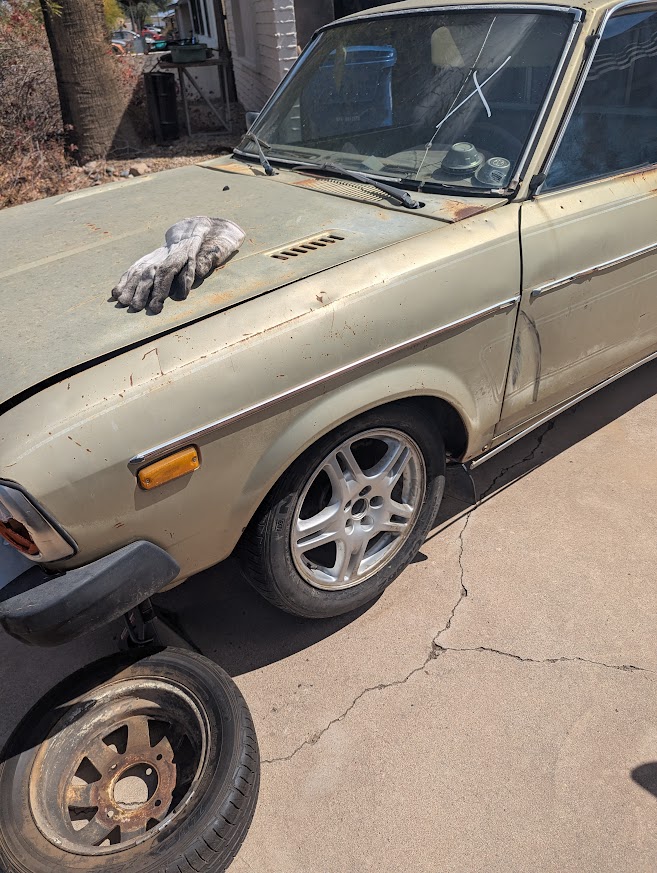
Second post to keep things flowing and file sizes under control- Repeated the operation on the passenger side of the car. Bolted the brake mounts and calipers on lightly, and threw a wheel on each side - one WRX alloy and a newer impreza steelie. Thinking I might go with the steels and paint them white, but that's a long time down the road. A lot more fabrication to go - control arm brackets, shorter CV axles (probably some chopping for clearance in my future here - it's a pretty clear shot but it's tight), steering rack install (still haven't solved that clearance issue at the transmission bell), transmission tunnel (still part of the impreza)... A long list but I'm really excited for the milestone of putting this back down on its wheels. Even more excited to get the impreza out of my workshop! More parts and pieces to come - Again I do plan on having these bits available for others doing a similar build - just reach out if you're interested :).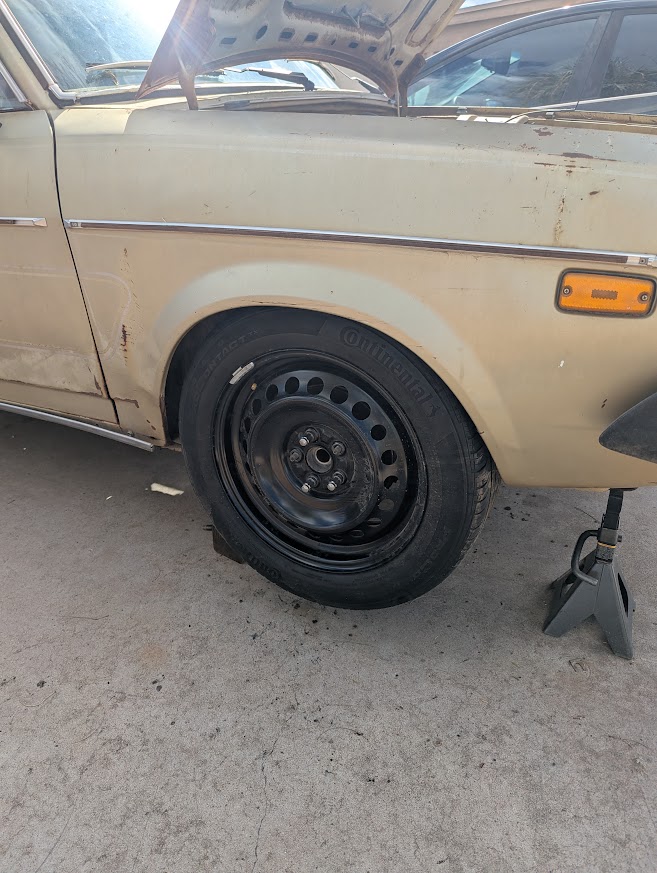

-
'79 Brat EJ22 Retrofit Build Thread
mka replied to mka's topic in Historic Subaru Forum: 50's thru 70's
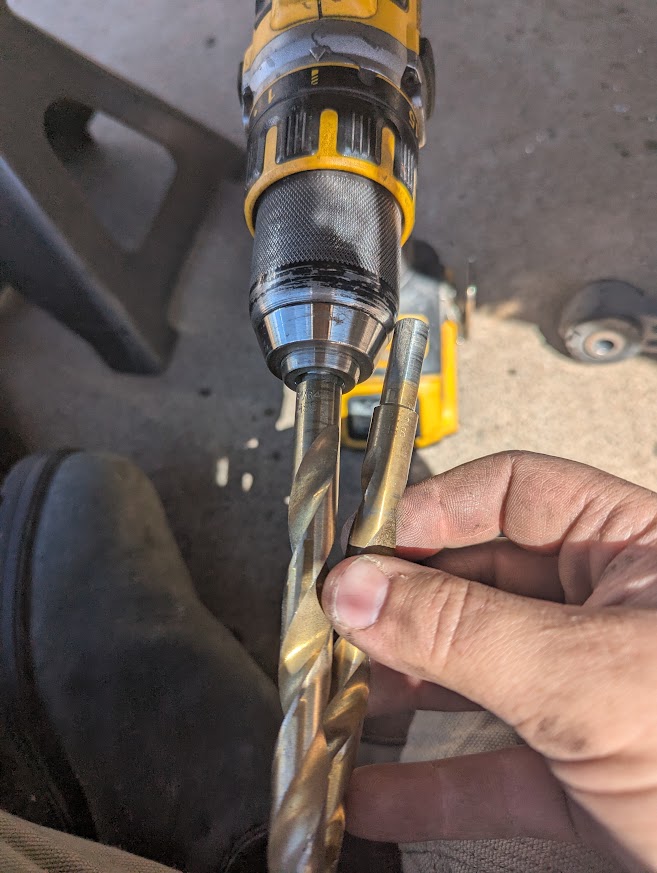
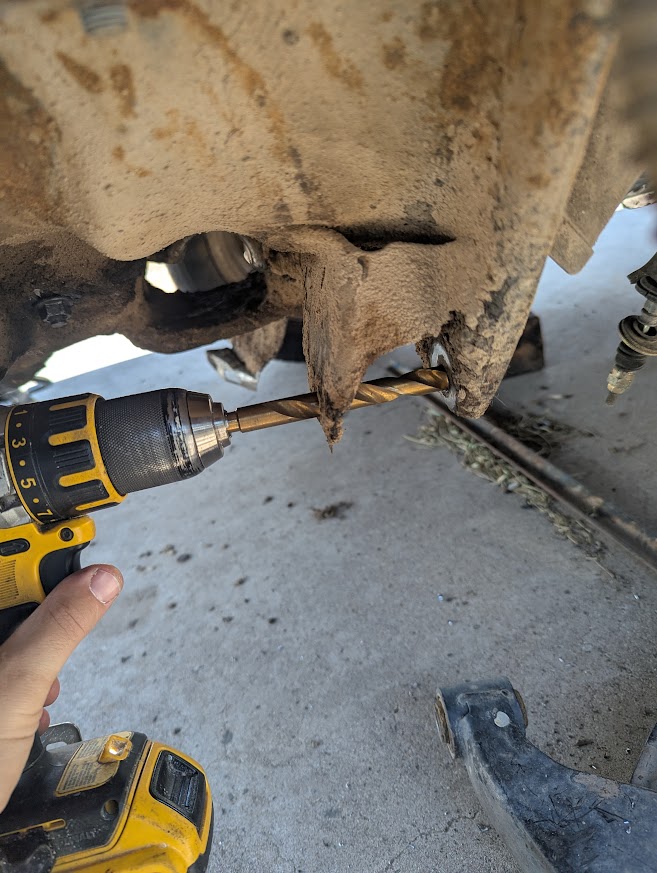
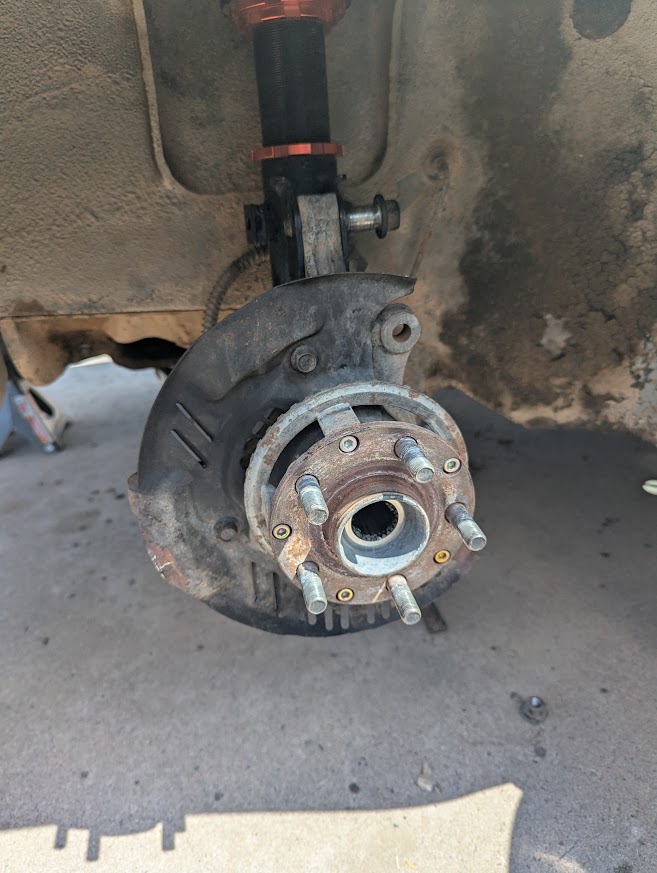
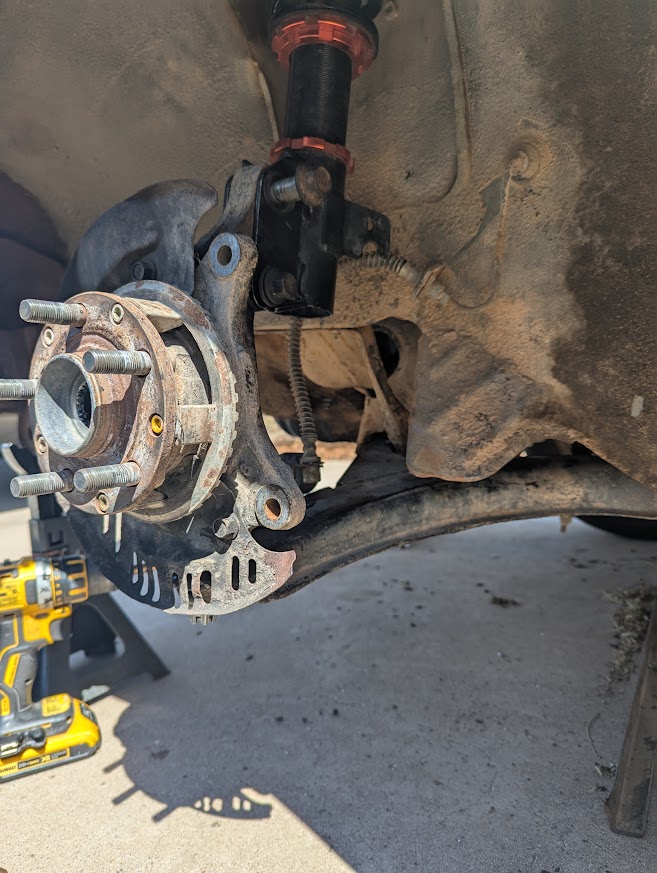
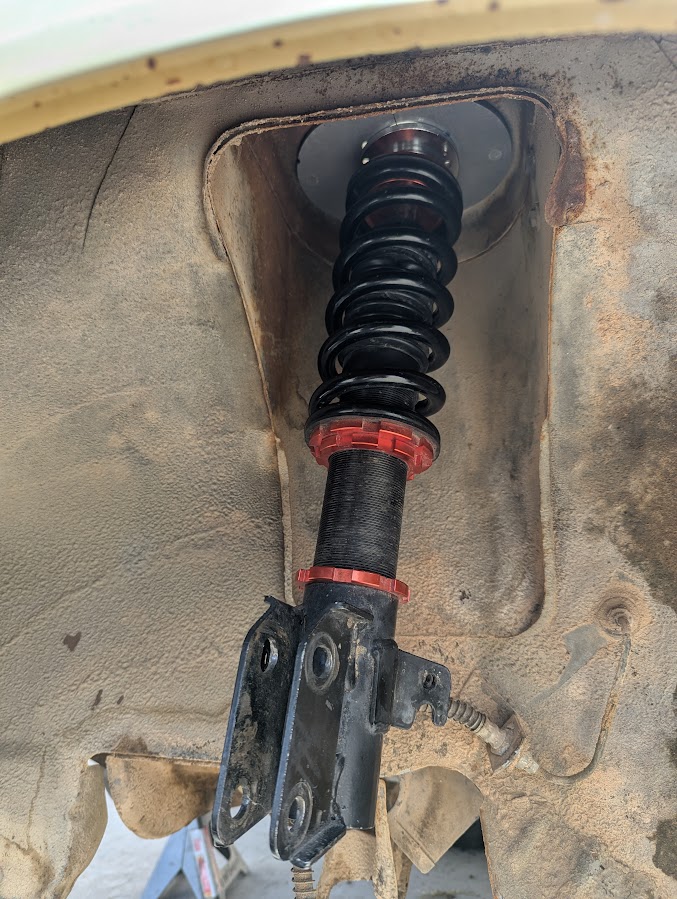
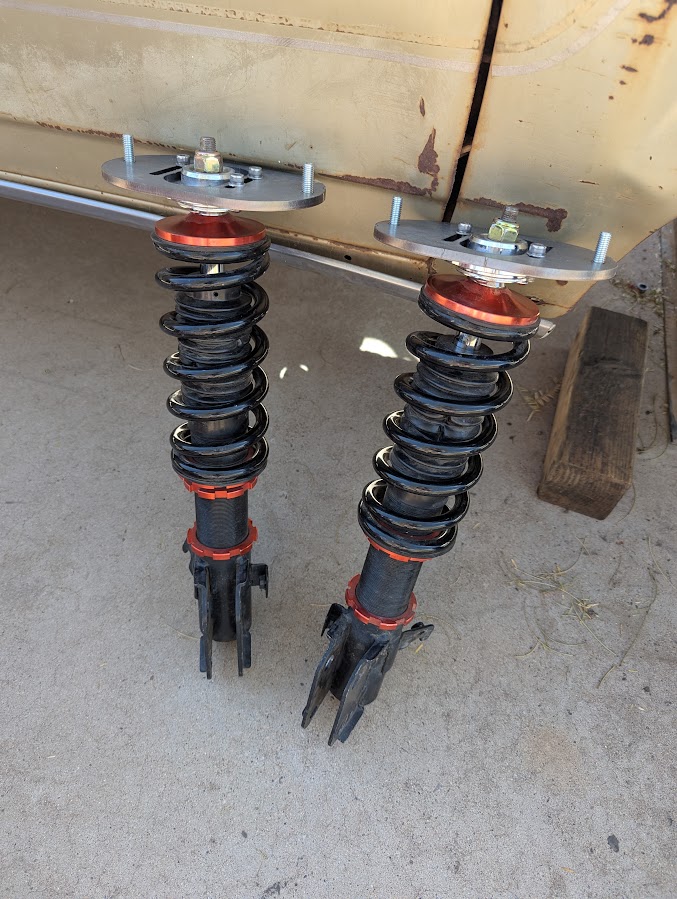
More steps forward today! I took the leap and pulled the front knuckles & lower control arms from the impreza. No going back now! One of my buddies gave me the great suggestion of putting the car on a pair of small Harbor Freight moving dollies, so $20 and a scrap 4x6 later and I'm still able to push the husk in and out of the shop after all of today's work - which is both great and not so great. Great in that I can keep my neighbors happy for a time longer - not so great in that it's still in my workspace every morning until I push it out of the way 😅. Enough about my neighbors though - onto the nuts and bolts of the matter! Jacked up the Impreza and got to disassembly. Not too hard, just took some time to keep nuts and bolts together with their constituent parts and assemblies as I removed things, moving one side of the car at a time. Starting on the drivers side I pulled the CV, knuckle/hub assembly, and lower control arm. The knuckles bolted right onto the new coilovers, however the stock cam bolts at the top from the Impreza don't fit the new coilovers - the holes are too small. Going to have to do a little figuring there but for now they're good enough to hold everything roughly in place. I'm going to have to go digging to see if they come with bolts when new or not. Minor problem. The lower control arms almost fit perfectly into the mounts on the original subframe. The distances are exactly the same and accomodate the width of the bushing like it was supposed to go in from the factory - only modification required here was opening up the holes a little bit. There's probably a metric equivalent but i took a pair of calipers to the bushing bolts and found that boring out the mount first to 15/32" and then only the front flange to 31/64" with a hand drill will accommodate the bolt with no play. Based on another build I've seen I will need to reinforce the front flange by welding in a thick washer later - suspension action has the potential to make this hole oblong over time. After that, just had to hook up the control arm and knuckle to get an idea of what this will look like. I loosely reattached the brake caliper bracketry, rotor, and a wheel to get an idea of how this'll sit and I'm pretty tickled with where it's at. I'm going to want to adjust the coilovers longer, these 15" wheels take up a lot of space in the wheel well in comparison to the old 13's. Now that that's done I'm going to have to mock up a template for the other mount on the control arm - likely will get something cut and bent like the transmission mount so I can just bolt it up and zap it in. I'll have a little peek around under the car tomorrow or early this week - maybe I'll get lucky with another choice bolt hole somewhere.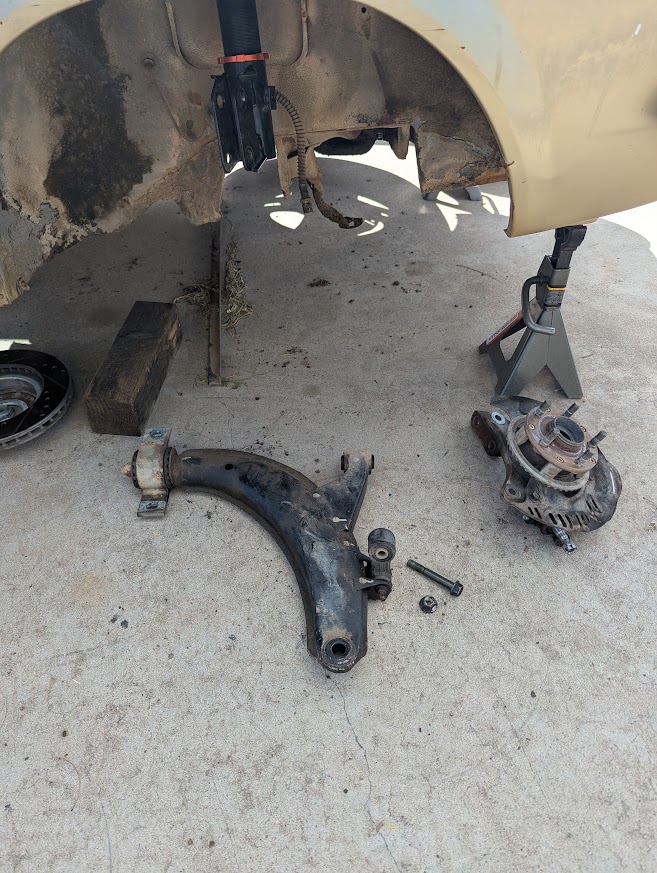
-
'79 Brat EJ22 Retrofit Build Thread
mka replied to mka's topic in Historic Subaru Forum: 50's thru 70's
Small tangential update... Firstly, got the slots on my camber plates adjusted to where i can install all the mounting hardware. Hooray! Secondly, and more importantly - I took a little side quest to investigate using similar coilovers as replacements on a more OEM setup using these camber plates. Seems to me one more part combined with a slight modification to the lower bracketry/threaded tube on the coilover would be all that's needed to fit these into the original knuckles. The lengths are nearly perfect, the coils would still have a decent amount of adjustment in them after, and I think this will allow for a very no-nonsense approach that gets a lot of older cars a much-needed suspension refresh up front. I'm going to get a draft done, once I have that and some initial parts turned out I can test fit them off the car myself, but I will need a brave volunteer to try the kit on an unmodified EA setup. Reach out if that sounds like you!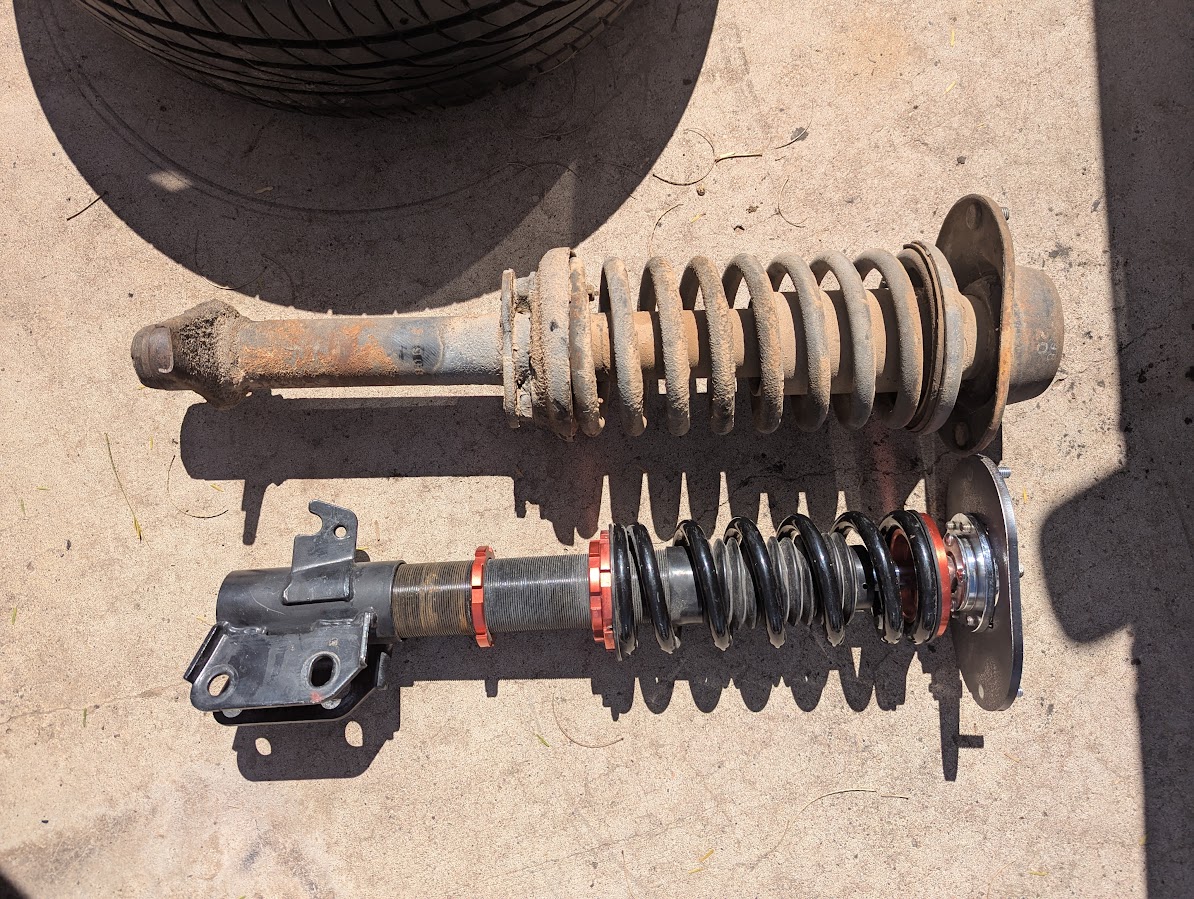
-
'79 Brat EJ22 Retrofit Build Thread
mka replied to mka's topic in Historic Subaru Forum: 50's thru 70's
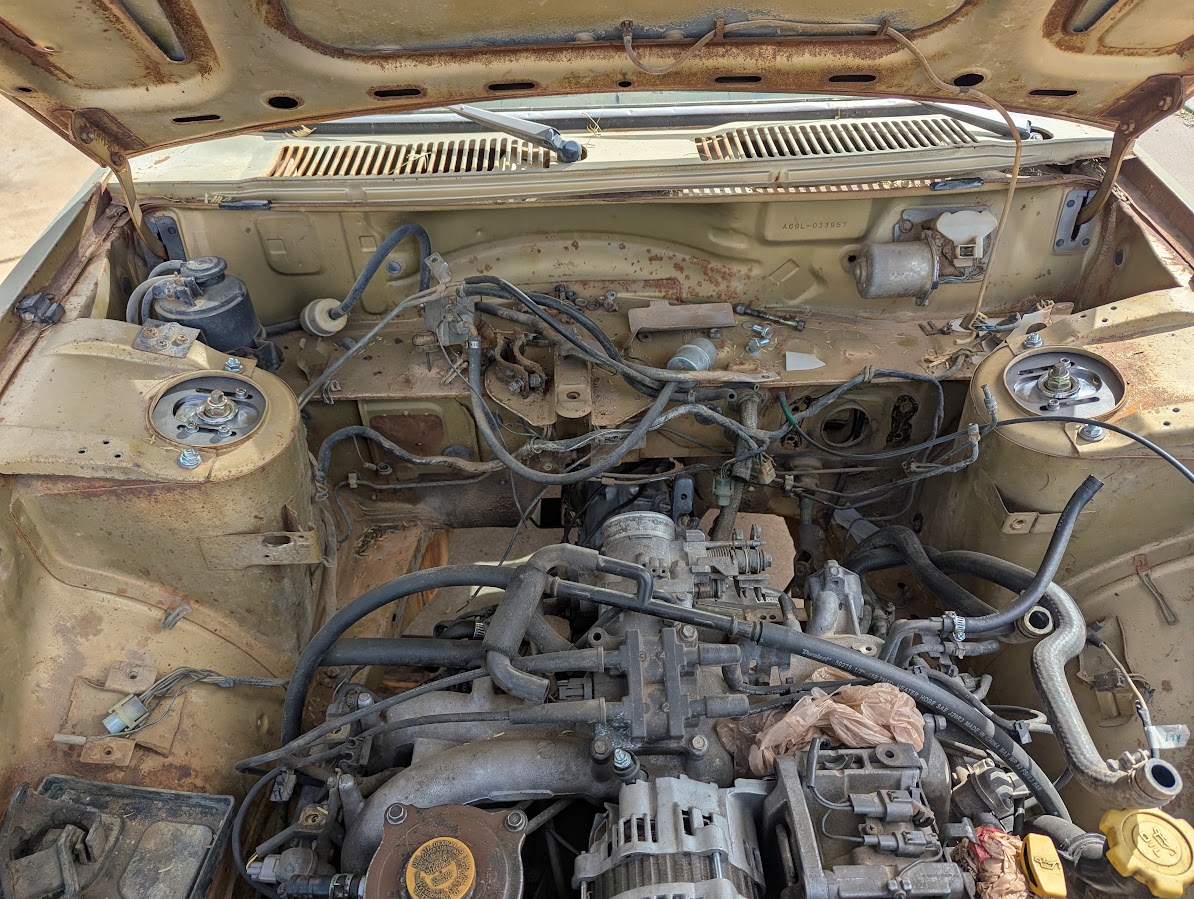
It's been a busy couple weeks, and today was another rough Monday so again I stopped what I was doing to work on the Brat a little. Got the second attempt at the camber plates in for the front suspension late last week. They need one more revision (slight widening of the distance between the bolt slots, i overcorrected just barely from the first version. I'd make them again if I were putting together a kit for sale or if this were not my personal car but again, for my purposes, a little filing and these will do the job. Once I get the filing and all the bolts in their respective places I'll be putting in the front knuckles and figuring out the second mounting point for the lower control arms. As far as length and diameter goes, these coilovers look like they were made to fit this application now. Very excited.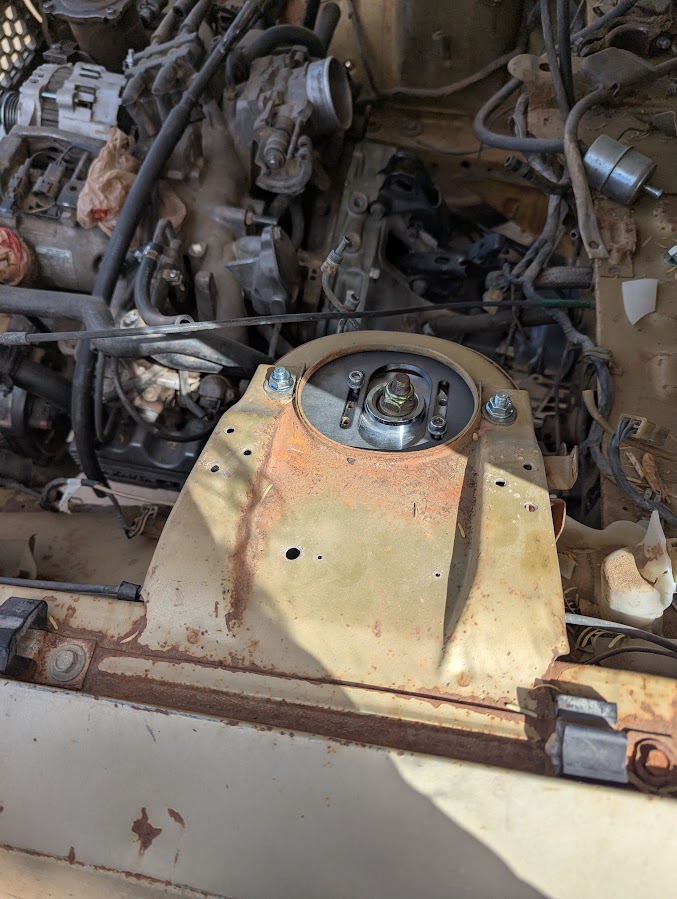
-
'79 Brat EJ22 Retrofit Build Thread
mka replied to mka's topic in Historic Subaru Forum: 50's thru 70's
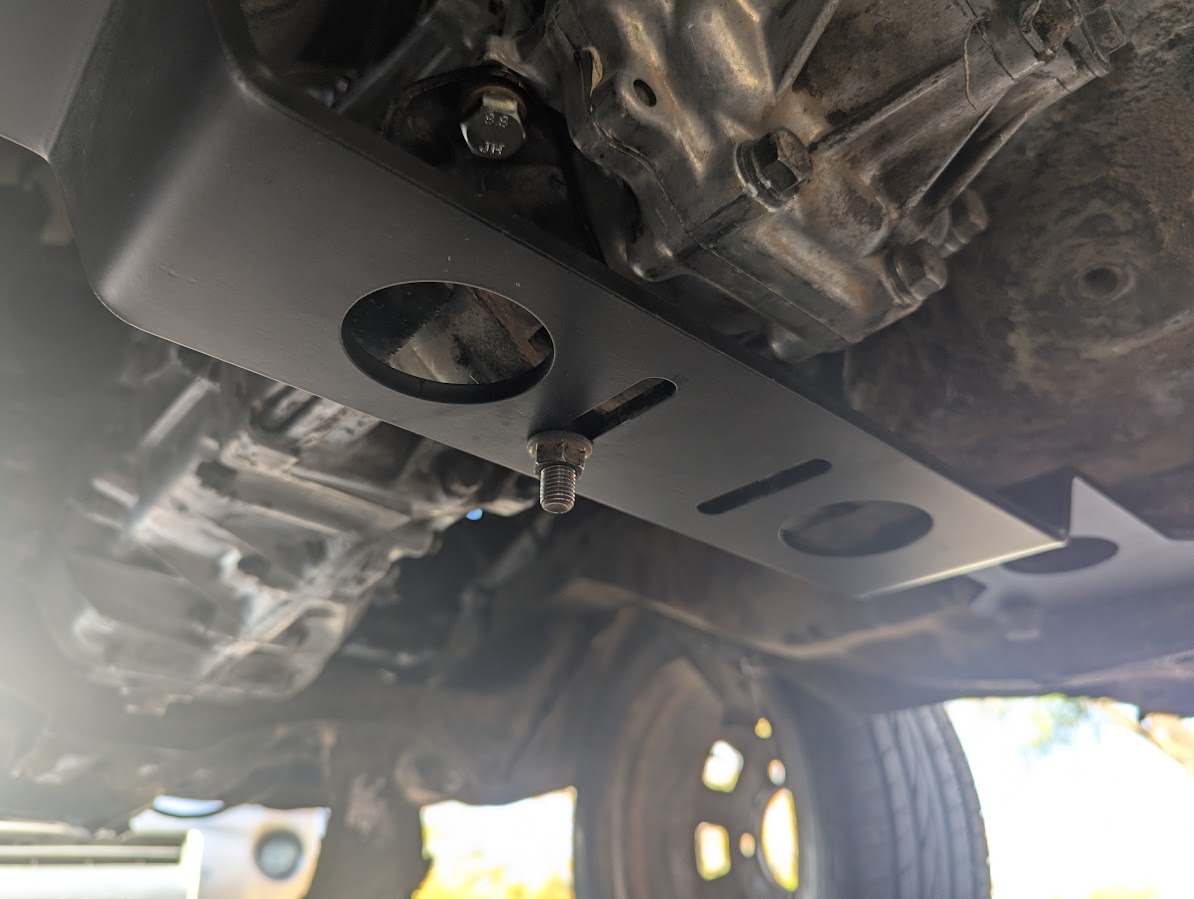
Well, I got the crossmember bolted in late yesterday afternoon/early evening. Looks like my measurements for the holes and slots were close enough to make it work - I did have to knock the passenger-side/right-side stud out of the stock rubber transmission mount to get things to bolt on properly. This is temporary, again due to the offset of the stud pattern on the mount. I'll most likely install a replacement stud in parallel with the existing one for this build, and if/when it comes time to put in a new mount i'll adjust the crossmember to suit. (The CAD file has already been updated to match so other future builds should be just bolt-on.) I'd be very interested to get in touch with one or two more individuals doing Gen 1 builds like this so that I can further beta-test this crossmember design. If you're looking to do similar, get at me! Once I've got the *new* new camber plates on hand it's going to be a hard charge forward to put the impreza suspension in and the front wheels back on the ground so I can start cutting out the impreza transmission tunnel, rear suspension, and anything else I might need so I can reclaim its current parking spot. Truckin' right along! Thanks for following!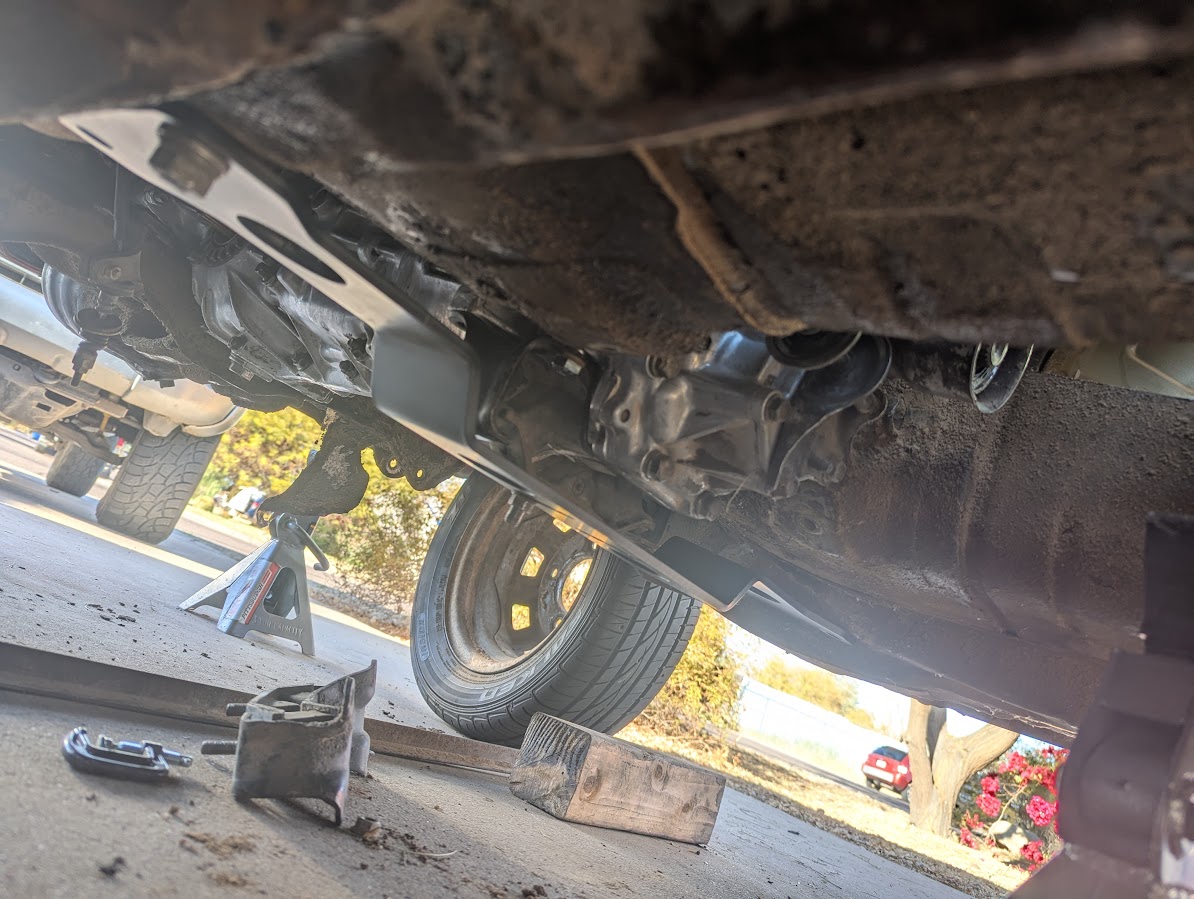
-
'79 Brat EJ22 Retrofit Build Thread
mka replied to mka's topic in Historic Subaru Forum: 50's thru 70's
Well, parts arrived, and i have some iterating to do, but progress is progress. I made a slight mistake on my CAD draft of the camber plates 😕 The stud locations are dead nuts on, as is the center slot, but the slots for the plate-to-strut attachment screws don't line up. I'll have to get a second set made, oh well. I might hack up the original ones that came with the struts to get me by until they arrive but the turnaround time on these was so fast I just might not bother. Similar story for the trans crossmember but it's less serious there. I didn't design the slots in the middle quite far enough forward to accommodate the offset of the stud pattern on the transmission mount. From where I was measuring under the car on my back things seemed to be much more in line than they actually are. I'll be making the slot a little longer on my current build out, but the likelihood is high that I'll want to remake this part too later down the line as well. If anyone needs or wants one of these transmission crossmembers from me in the future I will have it fixed by that point. Photos in the car to come as soon as I'm able to spend some real time under there, maybe this evening, maybe tomorrow.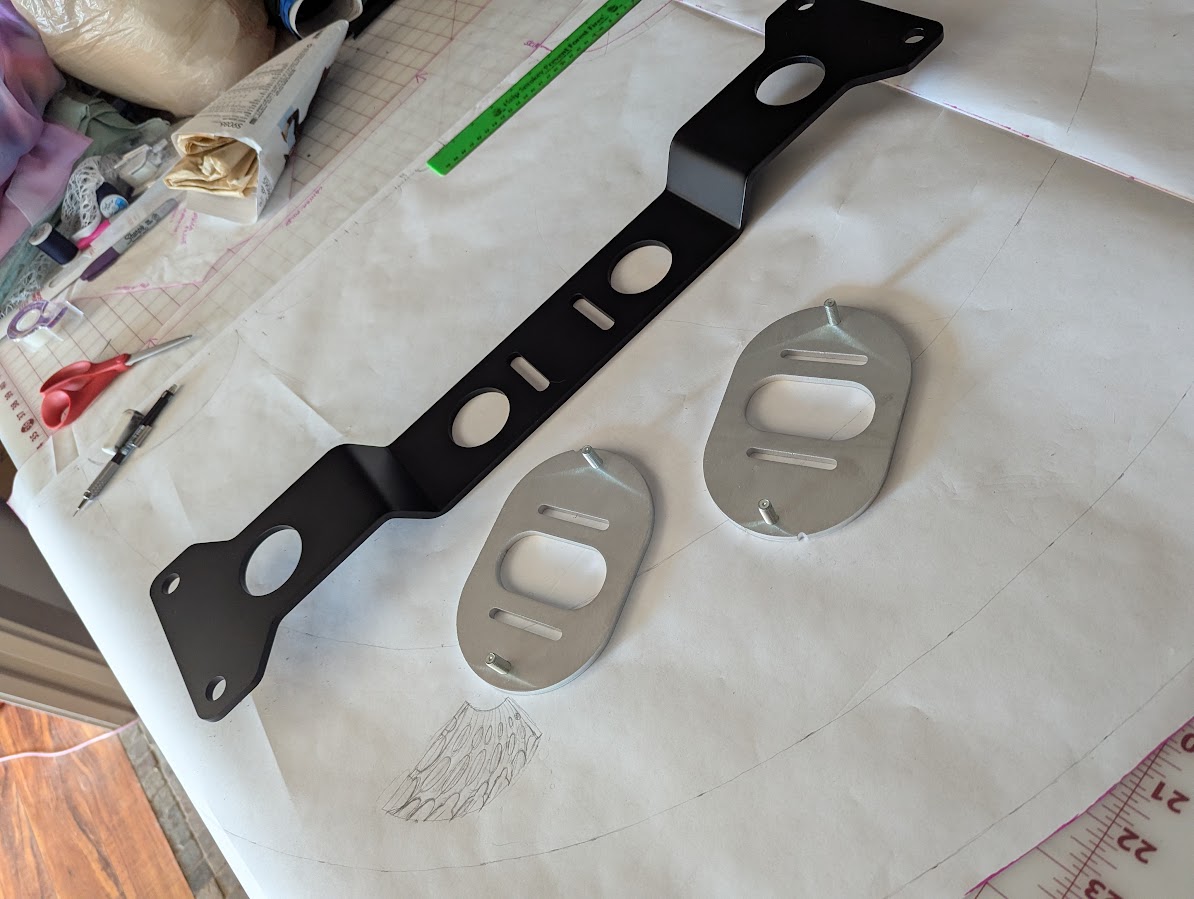
-
'79 Brat EJ22 Retrofit Build Thread
mka replied to mka's topic in Historic Subaru Forum: 50's thru 70's
Been on a bit of a stall since the last little update for some event travel, but over the last few days I got out the tape measure and CAD and have modeled up a new crossmember. Finally bit the bullet and had it sent out for CNC cutting, and bending this afternoon. Also have the camber plates for the new suspension included in this parts order - so hopefully I'll have a good bit of progress after those parts get in, probably a little over a week. This'll be done in 1/4 plate and the final piece has had a bit width removed for weight savings so I'm hoping I can get away with building this without too much additional fabricating. I suspect if anything I'll want to add in some gussets to the bend areas as a belt-and-suspenders approach. On the flipside I'm also hoping I don't get this thing in and say to myself "man I really overbuilt this thing" - aiming for the Goldilocks zone here, so to speak. If other folks have other Gen 1 cars of similar body style, I'd be interested to see if the crossmembers and bolt locations are the same across 79-81 and across the brat and wagon platforms. If they're the same or not too different I'd be able to put a more commerically-viable version of this together pretty quick with the right datasets and measurements.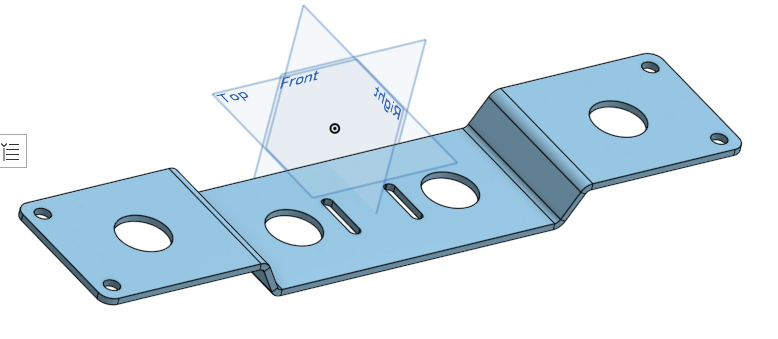
-
'79 Brat EJ22 Retrofit Build Thread
mka replied to mka's topic in Historic Subaru Forum: 50's thru 70's
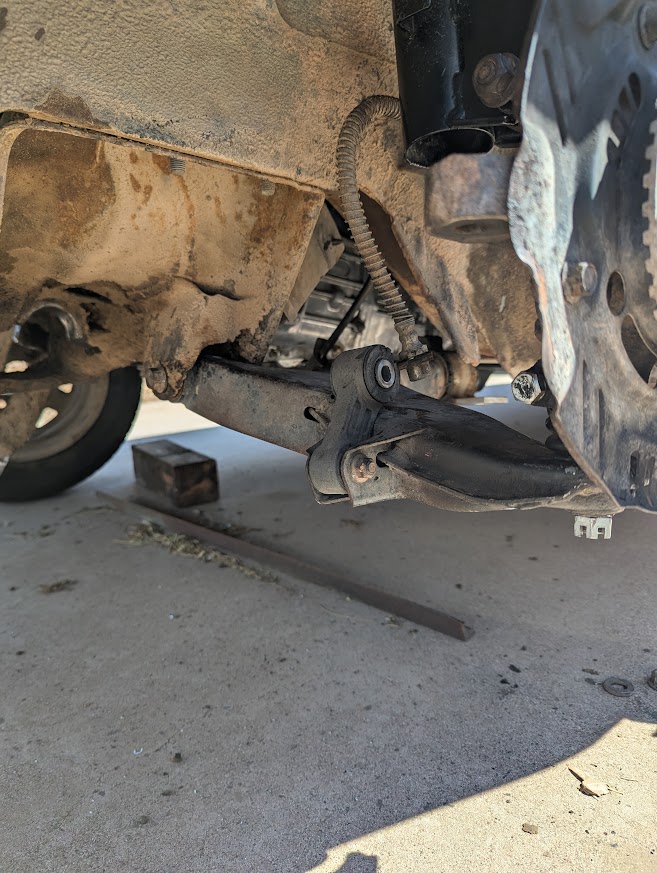
Small update from today - had a couple minutes to tinker at the end of the day (much better workday than Monday). Got the stock rubber transmission mount bolted to the transmission under the car and wouldn't you know it - the bolt holes for the original transmission crossmember are very very conveniently placed. Almost directly in line - should be able to build a very low profile replacement crossmember with little difficulty. I'm probably going to use some plate or chromoly tube for simplicity's sake. The great part about this is that much like the camber plates for the front suspension - I will readily be able to make these parts for someone doing the same or similar conversion, and I intend to do this pretty much anywhere and everywhere possible.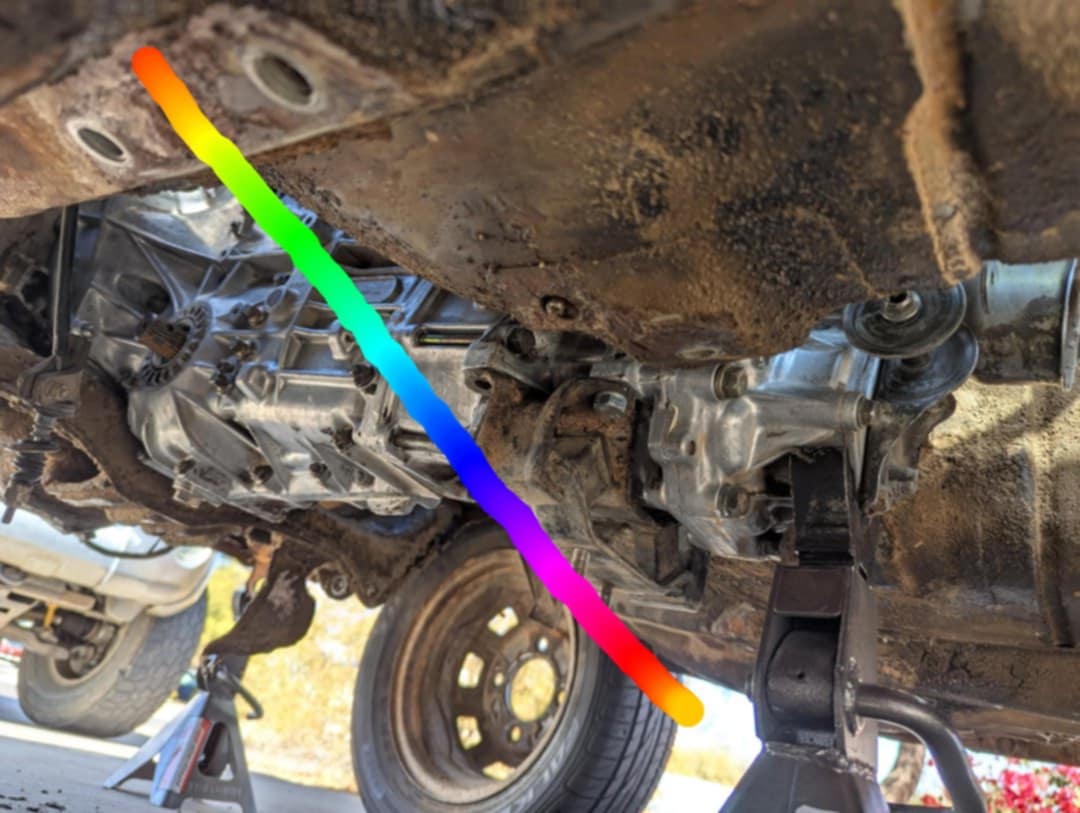
-
'79 Brat EJ22 Retrofit Build Thread
mka replied to mka's topic in Historic Subaru Forum: 50's thru 70's
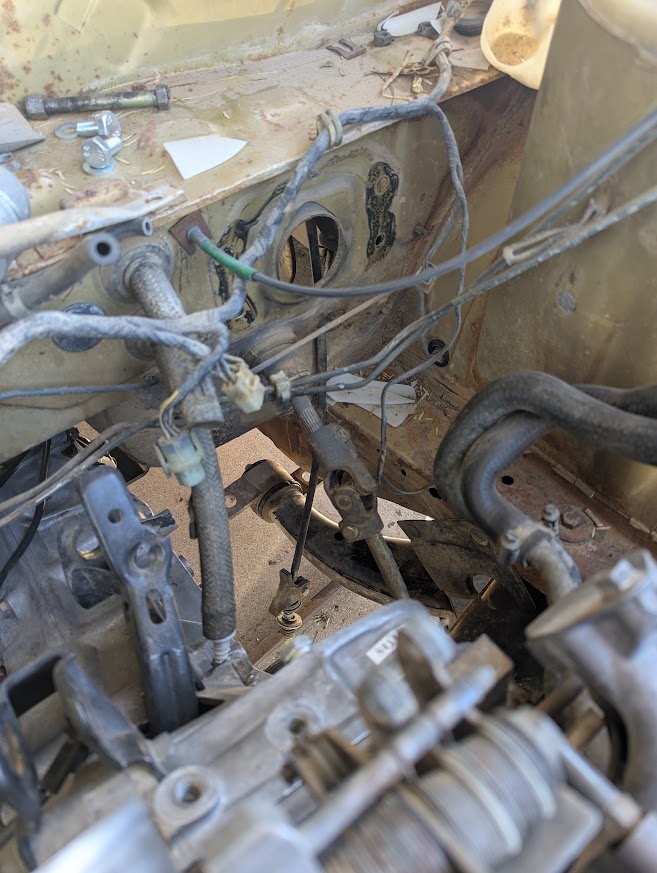
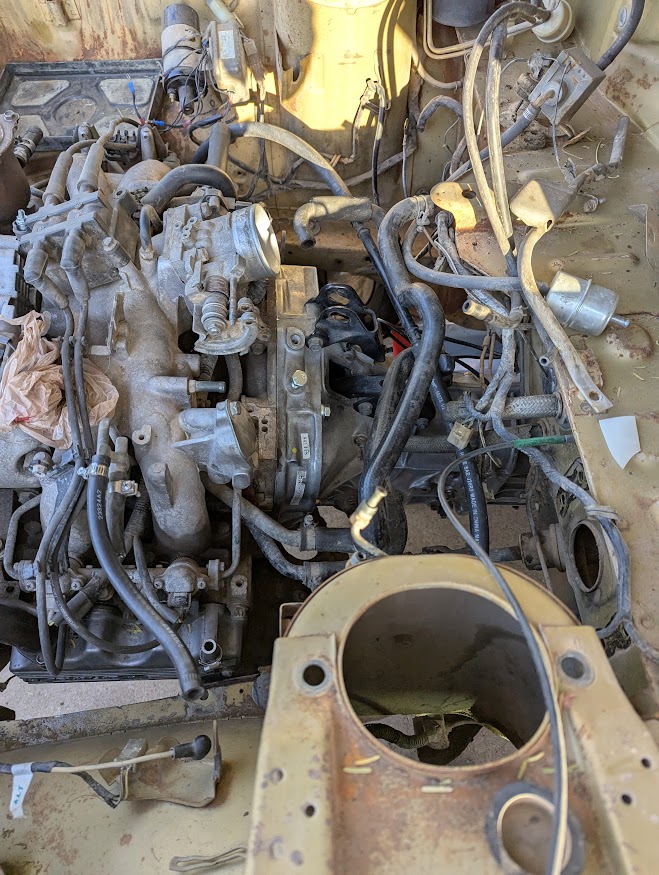
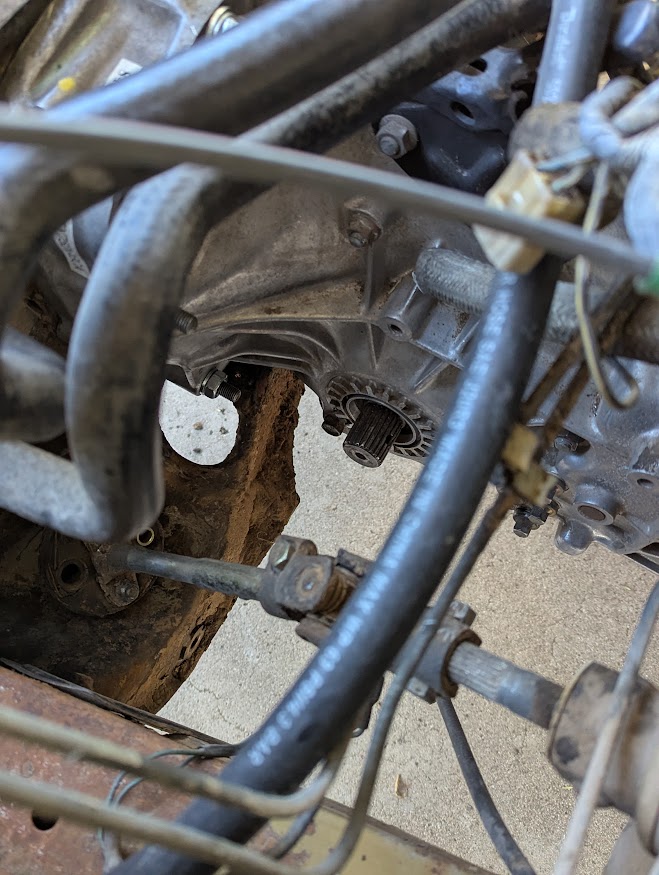
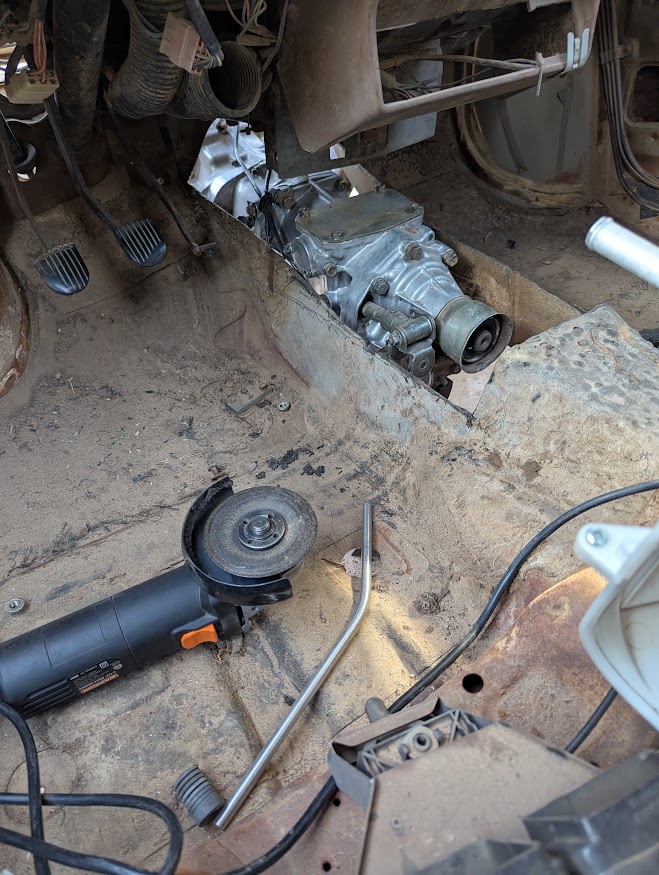
...Yesterday. Yesterday was a Monday. Benefit of self employment is that when you have a garbage day at work, often you can stop what you're doing and change gears when things aren't going well. So that's what I did. Shipping carriers made a mess of my Monday morning and so instead of snowballing that terrible feeling into the rest of my day, I decided to start plugging away at the engine/transmission mockup a little, just to take my mind off things and see where I got. Well, I hit a pretty good milestone without too much fuss. First photo may look familiar, but difference this time, is that i didn't just stab an engine in there - the engine and trans are both bolted up together, and the clearances are very good. Still tight at the valve covers, but that's no surprise. Plenty of room at the firewall and tunnel, and today after my lunch break here I might start taking a look at what I'll need to do fabrication wise to get the impreza transmission mount hooked up to the Brat chassis. Still have a little work to do to get the steering rack hooked up, this mockup is a great visual on the interference happening with the new transmission and the rag joint. I'd really like to avoid chopping up the bell housing to do this conversion. While i've seen it on almost every build I've been able to find, and while it's probably totally 1000% functional, it just doesn't feel the right way to approach the build If i can manage it any other way. With that in mind, first I'm going to try to open up the hole and play with the mounting bushings a little bit to see about getting the impreza rack to fit. I think with a little clever measuring of the Impreza crossmember, I should be able to figure a way to mount it up to its equivalent in the Brat without *too* much fuss. Absolute worst case I can chop the impreza crossmember up to shorten it to fit. There's some benefit there and I've seen it done on one build as well - the reason I haven't started with that first is more a logistical one because of my storage limitations - (see the "neighbor saga" above) If i need to use the impreza crossmember to get the steering to work it'll be a little bit of retreading ground, but once I have just the one car shell to work on I don't think I'll mind that too much. That's where it sits now. Engine and transmission are where they roughly need to be, and I can close the hood over all of it. Camber plates for the front struts are on the way too. I'm pretty close to ready to chop into the impreza for the front end suspension conversion - I can almost taste it.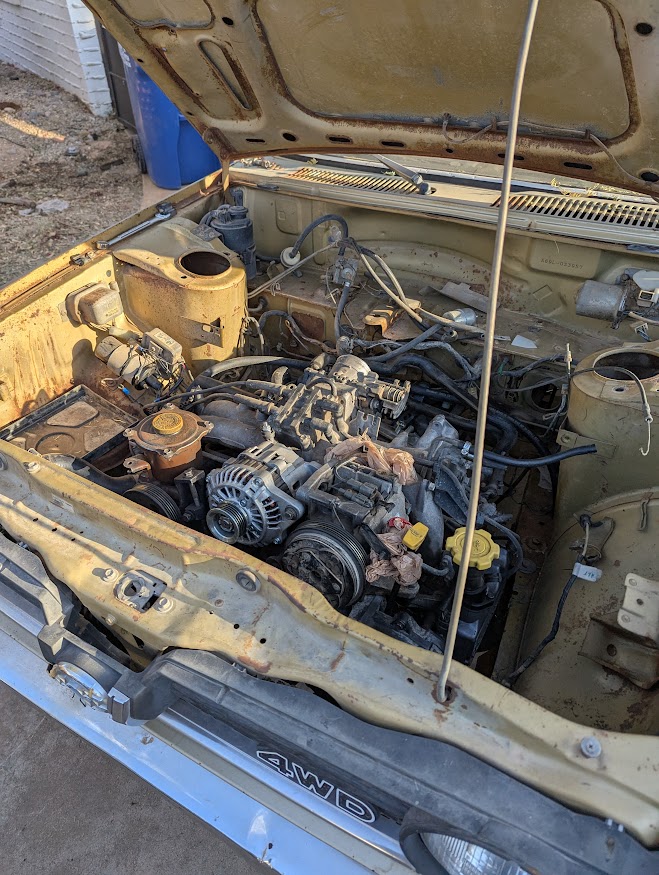
-
'79 Brat EJ22 Retrofit Build Thread
mka replied to mka's topic in Historic Subaru Forum: 50's thru 70's
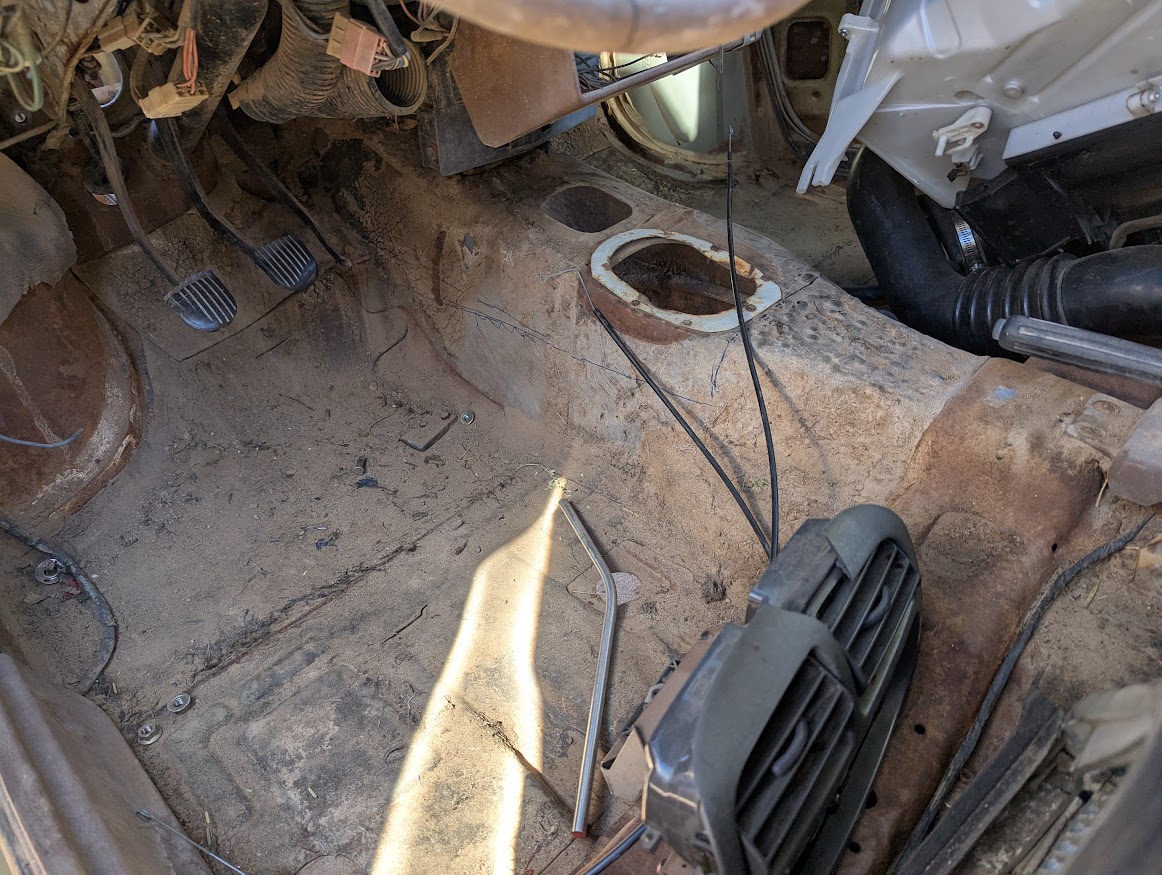
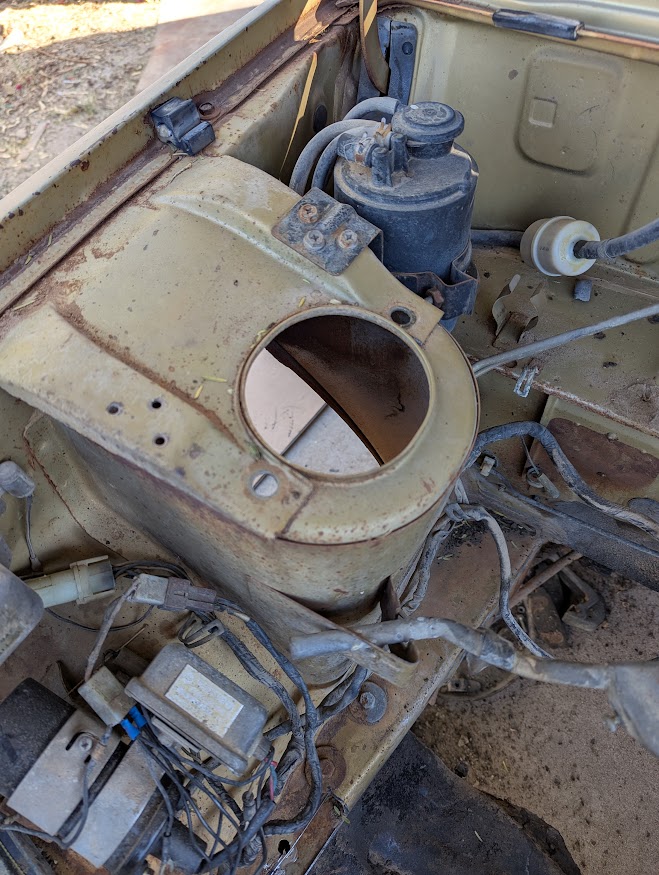
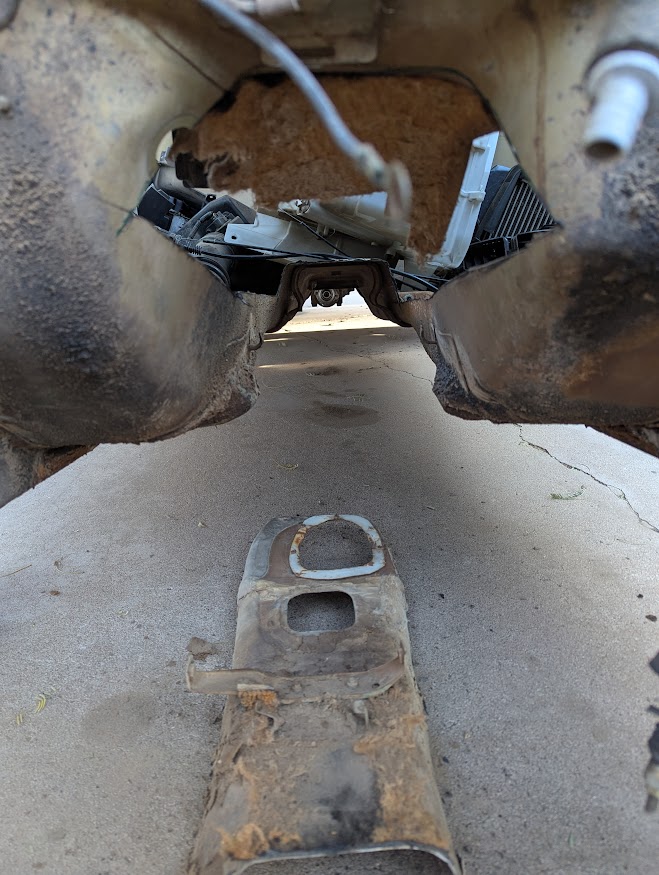
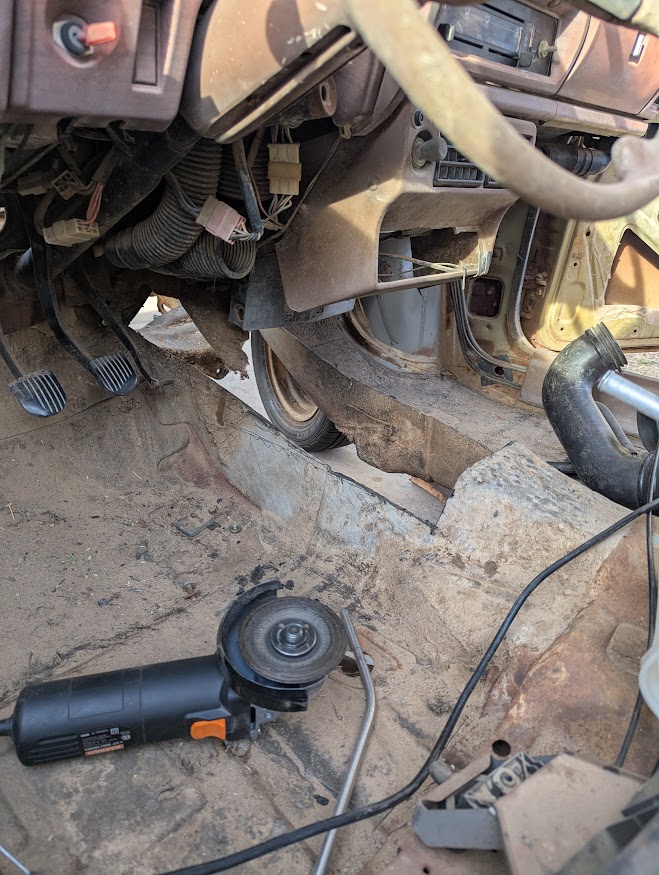
Thanks, moosens! I see the view count steadily climbing - This is really mostly a build log for me than anything else, a repository for the photos so folks doing similar might find something useful in it. Audience participation is not required 😅 That being said i have a pretty good update, so buckle in for some more photos! I'm going to split these into two posts to help manage my thoughts and keep things coherent. Last post I'd marked where I need to rough cut to get the 5 speed in under the car, so earlier last week I finally took the death wheel to the tunnel. I also needed to cut into little tiny bit of the firewall, but I've not started disassembling the dash or any of the guts under there. Luckily I'm not a huge dude so with no engine or trans in it I was able to jump in the engine bay and cut from the inside where i needed to (only the frontmost horizontal cut, really. The rest was accessible from inside.) Garden hose and fire extinguisher were at the ready in case I caught any old matting or something on fire under the console but no such emergency occured. I will need to get in there and remove the dash and underlying componentry to assess the condition of those parts - as evidenced by the clutter in the cab, I'm really leaning towards splicing a lot (if not all) of the impreza interior workings and trims into the cab. If I can restore the original dash I will do so, but at the moment I'm not sure how much hodgepodging is going to be necessary under there to keep everything working as it should, given that I have decided to do an entire wiring harness install from the Impreza - completely replacing the old crusty stuff in the Brat. But I digress - none of that can happen until I've built a roller of the brat again - so after the tunnel cut, I roughly placed the transmission where it will live by way of careful propping up on jackstands and the engine crossmember , and promptly left it there for a few days... until yesterday. Onto the next post!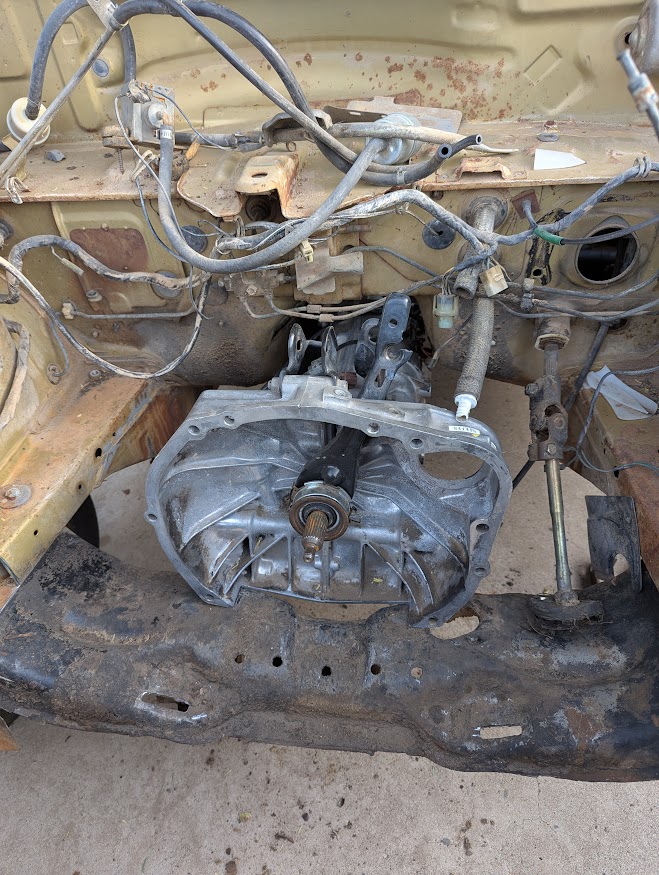
-
'79 Brat EJ22 Retrofit Build Thread
mka replied to mka's topic in Historic Subaru Forum: 50's thru 70's
Spent a little more time on some further disassembly last night - got the control arms, sway bar, and transmission crossmember out without having to cut anything major - just one little bracket needed chopping to get the parking brake cable off - the bolt was so caked it was practically cemented on. I've also removed the steering rack so I can drop the engine and transmission on without running into the rag joint while I work out that problem. After reviewing some other builds again (there are only so many I've been able to find) I may end up switching tracks and modifying the impreza engine subframe to fit in the Brat for an easier time getting the steering rack clearances I need in order to avoid chopping up the transmission bell housing. For now, however, I'm going to push ahead using the modified Brat subframe so I can keep the impreza actually rollable for a little longer. I need to put together a couple dollies for the husk so I can keep workflow going in my shop during the day, and once i pull the control arms, knuckles, steering, and front suspension components that becomes much much more of a chore. I've got the camber plates sketched up and getting ready to be CNC'd - very excited for that part. I'd like to design an adapter to allow for the install of these coils into the original knuckles while I'm in here for the folks more committed to keeping the 4x140 bolt pattern than I am. In combination with the coilovers & camber plate adapters this may end up being a serviceable way to get new suspension on these old cars. -
'79 Brat EJ22 Retrofit Build Thread
mka replied to mka's topic in Historic Subaru Forum: 50's thru 70's
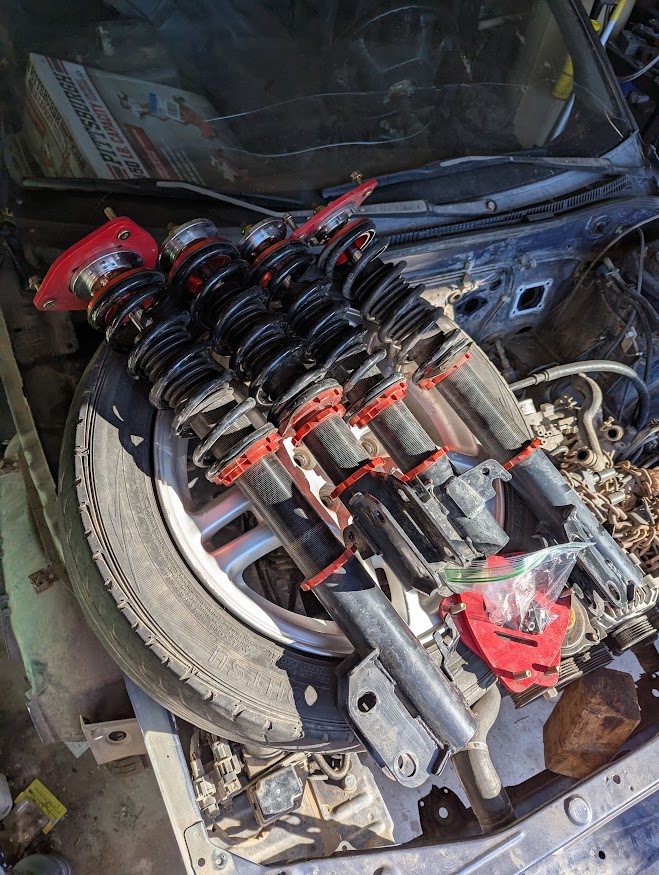
Annnnnd we're back from the holidays! Thanks to my storage solution for the Impreza husk I'm pretty motivated to get that disassembly completed enough to be able to get the shell out of my shop, and in order to do that I've determined I need to be able to mount and store the engine and transmission in their proper places in the brat before I can start installing and adapting the steering and suspension components in around that. First go at the transmission mockup was yesterday, but I didn't bother taking photos - it was a hassle to say the least, but i did learn some things. The transmission doesn't just 'drop in'. Not even close. Kinda expected this, but I'd still hoped for a little miracle. It's a difficult install without coming in from the bottom - next time I'm going to try to block the body up taller and lift it in from below with a HF special transmission jack. As mentioned in the last post, I'll need to modify the steering setup, either by installing the impreza rack, or somehow shifting the existing one without inducing any gnarly bumpsteer. Any suggestions there would be awesome. I've since been in touch with a guy who built a similar '79 wagon and his solution was to chop up the bell housing. I'm not really willing to go and do that (yet.). Lastly I'll need to modify both the trans tunnel and the crossmember. On newer builds there's enough room to stab the EJ transmission in just weld in an extra plate to relocate the mount holes to match. My particular car does not appear to have the clearance to do this, and I'm hoping not to put in a body lift so I will likely be adapting the EJ crossmember to fit in some way. If this proves to be fruitless or too complex I may explore the body lift at a later time. I'm planning on cutting the tunnel out just enough to get the transmission IN the car on its own, then I'll trim away as needed and splice the impreza tunnel in to get the bolt holes and mounting points I need. These new tidbits of knowledge in hand, I got to some more fruitful work today disassembling and disconnecting the front suspension so I can remove the Brat's transmission crossmember. Dirty work, and so many of these bolts were caked in 30 years worth of oil/dust/dirt crud mix it was hard to determine where they all were and bolt sizes. To be expected there were some siezed threads. I almost decided to just whip out the death wheel and start cutting, but I came to my senses when I remembered how hard parts are to find for these things so I'm going to do my best to affect a non-destructive disassembly where possible in the off chance someone needs some of the parts. Lastly the other day I also scored a deal on some inexpensive coilovers - almost no miles on them as the guy bought them to keep his "good ones" dust free while getting bodywork. Lucky me, as I don't need fancy or clean at this stage. The stock impreza suspension was giving me a headache on how to install them and were really going to be tight because of the spring diameter, but these have a much thinner spring and some really simple camber plates - something I'm very very able to make in order to fit the stock brat towers.