wagonist
Members
-
Joined
-
Last visited
Everything posted by wagonist
-
What did you touch the wire inside the wheel against? Not everything is conductive. but the shaft inside the main nut will be. Take the steering wheel off like others have suggested & check the contact ring. Also, does the contact inside the wheel move enough to make a connection when you push? Do you have a test light or multimeter? If you disconnect the wire inside the wheel, and then unplug the horns & bypass them, you should have 12V at the wire inside the wheel.
-
Yeah, been to Dapto a bit, just a bit of a hike form the western suburbs. Looking to scout for some bumpers. Agree with the theory about pulling stuff yourself.
-
To do this job, need to be short of stature so you can fit down into the footwell, athletic like a gymnast to get yourself upside down & back out again, skinny to fit between the seat & the steering wheel, have arms like a monkey to reach up, and then the dexterity & finger feel of a surgeon to find where to push it into... but a bit of practise helps
-
Cheers Coxy. I've been meaning to get a pic of the engine bay & circle the areas I'm curious about. Last minute arrangements to get up to the WRC this weekend haven't helped I'm trying to sell my manual Caldina GTT at the moment. Was happy it was missing the snow gear (which is usually the fitment of rear fog lights & heated windscreen). Although I think it depends how they're treated. I had an older turbo diesel Caldina which had the snow gear but didn't have any issues (but maybe being only 2wd helped ) He hasn't been on the ausubaru forum since Feb.
-
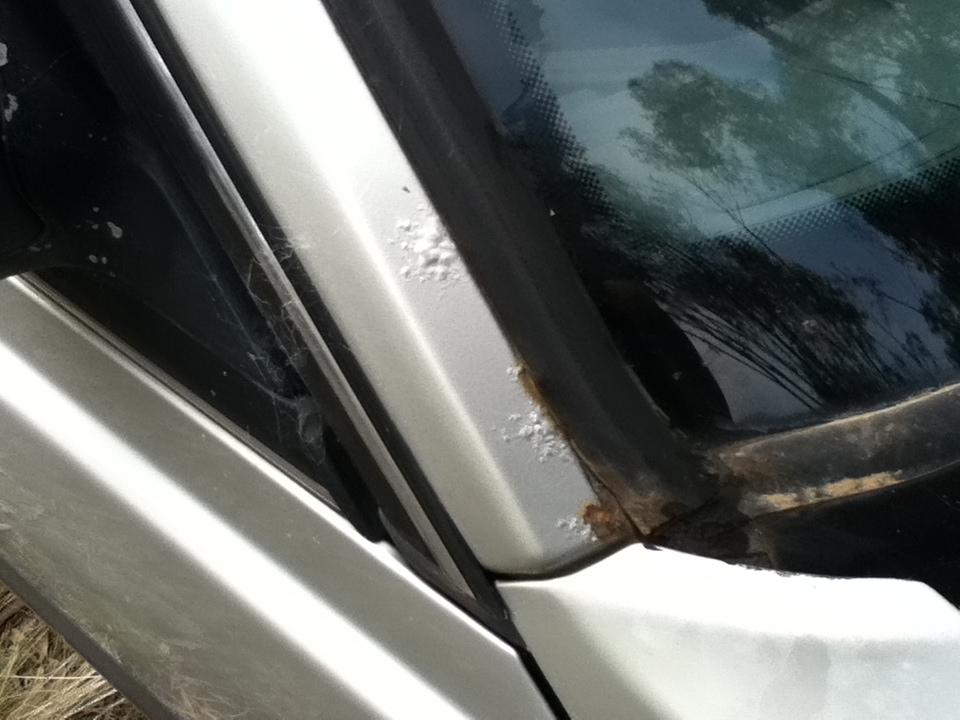
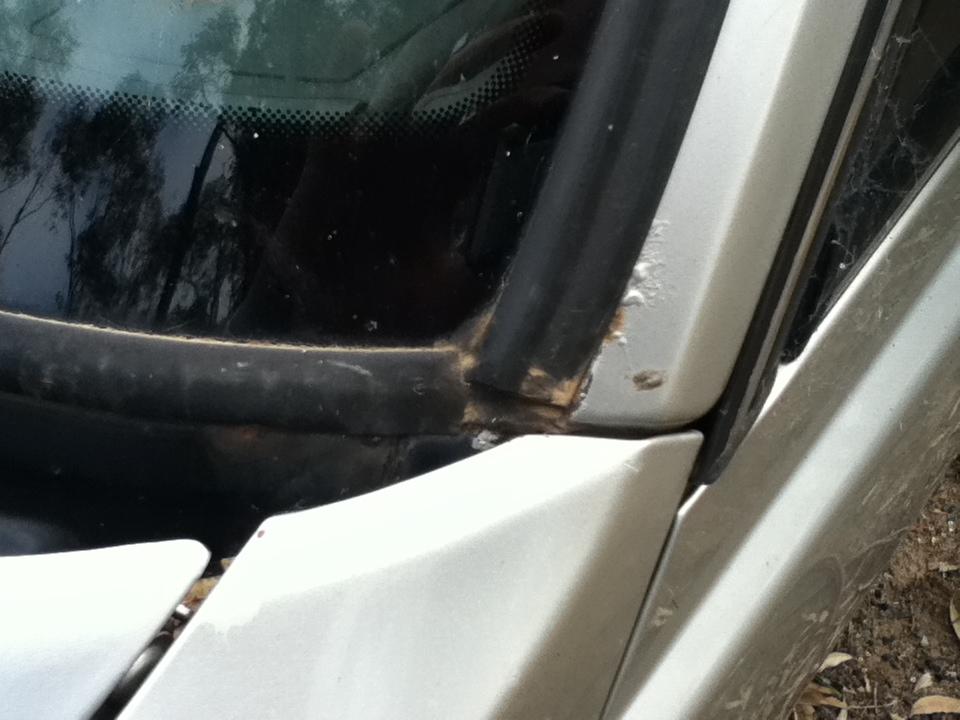
After joining this forum, I've realised that Aussies get not too bad a deal when it comes to rust. We only get it around the screen (and then only due to poor workmanship when replacing it) or around damage. I've decided to buy it. Got enough to make 2 complete cars, so I'll see about repairing the rust & fixing it after I get mine on the road. The rest of the car is tired, but not too bad. How do you go with replacements parts over in NZ? Getting thin on the ground in a few places here now.
-
I had an EJ box fitted into my 85 L series and before I fitted a lift kit, it would bump. when the 4spd auto came out in the series 2 L series, Subaru enlarged the tunnel so it wasn't a problem, but anything before that does. The problem was due to the longer gearbox, and was fixed with a big hammer. Helpful to have the dash & heater box out so you don't damage anything. Painful to do, but the best way is to fit the stuff into the car and see what's close to hitting. Run it & look for the marks against the paint. Then hit it again. But I'm sure others can at least others can give you some better guidance.
-
Actually, there was a twin carb EA82, but extremely rare and extremely limited release period. I've only ever seen one and that was a series 1 JDM import something like 25 years ago. Have never found any more info anywhere about them. Never got a chance to see what the manifold was like though, but I remember the air filter box was the same overall shape as the standard carb one which suggests a manifold similarly shaped to the pic above. My 2nd car was an 85 touring wagon which had a Jap import motor. It went unbelievably hard, to the point where it wasn't that much slower (which is a relative term ) to the EA82T I replaced it with. Sold it to a mate who put it in his car and then could almost keep up. Mind you DL model vs JDM full luxury model means he probably had a good 100kg weight saving I suspect the EA82 has some flow flaws into the head, plus there's the rolling resistance of the 2nd camshaft and driving a belt. Pushrods are probably more energy efficient, but don't allow as efficient a combustion chamber shape
-
Why are you looking at swapping? Your's is dead and need a replacement? I remember a mate 20 years ago having his flashers die on his 85 model and managed to find the resistive bit of wire in question on the circuit board. If you could cut & intercept that, or else bypass the flasher in the EA81, that might work.
-
By PCM, I assume you mean Powertrain Control module. If so, they don't exist in these early models. The Legacy was the 1st model which controlled bot the engine & gearbox. The 87 has an ECU for the engine (which is mounted under the steering column on MPFI and turbo, and if it's got a flapper style MAF sensor, there is an ignition timing box mounted behind the dash between the glovebox & door (please correct me if I'm wrong, but that's where it is for RHD models). and if it's got a 4 spd auto, then the separate controller for that is in the left rear 3/4 panel. Other transmissions (including the 3spd auto) have no electronic control. Isn't a Brat carburettored? if so, why would it have any computer at all...
-
The turbo's problems come because the cooling system isn't good enough & they cook the heads. They're not race cars, so don't pretend it's one, even with the turbo. If you've got the time you keep it off the road and do things properly, then subies are a great car to learn on. The drivetrain's more simply laid out than other 4 cylinders. If you've going to do the clutch, as others have said, take some time to do other stuff on the engine while it's out. timing belts water pump replace the small coolant hose that runs under the intake down to the block above the crankshaft. don't know about over there, but these fail here. Replace it with high pressure EFI fuel hose
-
coxy, you know anyone who could do that work? I don't know how to weld and this wouldn't be a good place to learn If I can buy it though, the seller's become a bit elusive...
-
Did you put the bumpstops back in? what length are the 4runner springs standard? Those shocks are designed to handle the heavy end of a much bigger car so it's strange that they're bottoming, but you might have them outside the standard operating range
-
Seems I've already got that FSM. Looking at it, what I really need is a diagram (or pic) showing which components are located where (and labelled). I know what most of the stuff on the standard engine looks like, but confused because they're in a different place on the Spider.
-
Yeah, had ended up in my "junk" folder somehow
-
cheers Tom. Just registered for a log in, but didn't get an email acknowledgement. Will check again tomorrow. Although, if I could work out what the things attached to the ends of the wires are, I could do the wiring.
-
I thought it was one of the 2 on the steering column. Or is that the MPFI only?
-
really old thread dig up Trying to find wiring diagrams for the Spider manifold as I want to swap it for the dud normal manifold engine. Any help appreciated.
-
ok, so I'm still looking for info with this.
-
That might be the system in the US, but here, if one of the globes blow, then the system will start to flash faster. If a second one goes, then it flashes even faster again. Finally, if the 3rd globe goes (most of the world has the side yellow light in the front parkers as a turn signal), then it flashes so fast that it seems on.
-
It was more that I made a post, and then there was silence for a day or so My problem is that I've got a solid rust free Touring wagon in my garage I've been slowly working on for the last 10 years. The JDM one has a lot of features that I was trying to retrofit, but also has the additional one of 4 spd auto. This would allow me to get it registered for my wife to drive around in the city. I think the A pillars are gone. This is the only place we get rust here because of the dry climate and results from poor workmanship while replacing the windscreen. And if it's for my wife to drive, I'd want to fix that properly, something I'd have to pay to do.
-
Kangaroos. Those bars are either called "bull bars" or "roo bars" in Aus, after the 2 things you're most likely to hit with one...
-
Might not be a factory installed system. A/C in Aus was a dealer fit option, not factory fitted, so there is a separate (ugly) loom just draped around. The fuse for our system is just hanging off a wire near to the battery. There should be a factory looking switch somewhere on the dash near the fan speed and vent control that says "A/C". The thermostat will be attached to the box in behind the dash as it hangs a probe wire into the air flow from the fan on the way through the A?C box to the heater box. What do you mean by temp switch? These systems aren't that complicated. It only turns on/off at preset temps. You adjust the temp inside the cabin by using the heater box controls. Of course you can jump the compressor by attaching it to the battery, you've bypassed all of the safety features built in. Did you turn on the dash fan when you're trying to get the A/C to work? You can't just press the A/C button for it to go. It also needs a dash fan "on" signal.
-
Agree with the sticky. Pulled many engines now. Couple of things I was confused about though. I notice you've undone the aircon compressor & pulled it off to the side with the lines still attached, but I didn't really notice anything about that when you wrote it up. I don't know if I just missed it, but didn't seem too obvious. Ditto about removing throttle cable. Also, you're labelling of the "green" for the alternator bracket isn't quite correct. Might be for non-aircon cars, but for yours, it's where the aircon compressor bolted down, not a bracket. also, you don't need to remove the air-con compressor from the bracket, you can remove the bracket completely with it still attached. 2 bolts (one with a really long head) & another sunk in a bit. Plus the one vertically under the alternator. They're easier to get to than the ones you undid. Agree with Miles about removing that long bolt holding the bracket. As these bolts go into the water jacket, they can rust and sieze. If you're not pulling apart the engine, then leave them well alone. And if you're going to be undoing the crankshaft pulley, unless you've got access to a rattle gun, much better to do it while the engine is still in the car. With the radiator & fan removed, plus the ignition coil disconnected, get the tool onto the nut with the handle close to the floor on the left side (you might need to place blocks on the floor to get the height) & crank the engine. Just "flicking" the key though, not a full on start. As the nut undoes anticlockwise when you're looking at it, and the engine spins clockwise, it should "crack" it. Sorry, don't mean to be pickie, but this write-up is very helpful for the noobs and we don't want them doing something wrong by accident
-
I wouldn't worry about the mesh personally. It just makes mounting extra lights difficult and distorts the headlight beam. Unusual to hit small animals, but even if you do, not much damage can be done. More important to see the animals and avoid them rather than hit them. But the damn roos don't think like that
-
When you take off the inner door trim, screwed inside the door at the back of the bottom big hole in the frame. That is where the switch is. It's a black box which should have 3 or 4 wires hanging off it. 1 is permanent power, another is the unlocking signal, 3rd is locking signal. Some models have a 4th wire which goes to the "door lock" light on the dash. There is a linkage that goes upwards from this into the lock itself. when you lock/unlock the door with the latch or the key, it pushes/pulls this linkage. I'd 1st check that this linkage hasn't come off.