wagonist
Members
-
Joined
-
Last visited
Everything posted by wagonist
-
No, I meant you could get the stubs from a manual 4wd to put into your FWD box to get a higher spline count.
-
How is the XT6 being an auto relevant? The front diffs in auto & manual are the same width. As long as you find the correct spline count for the inner CVs for your driveshafts, you'll be sweet. BTW, the stubs from a 4wd gearbox should fit a FWD gearbox. It's only the back half of the trans that's different.
-
You should be lucky & just need to replace the belt. the belts are supposed to last 100 000km, but Subaru Oz got a large number of warranty claims when the cars were new of belts breaking at 80 000 or so, so the service interval was dropped to 75 000km. watch out undoing the bolts for the cam covers. the captive "nuts" are only embedded in the rear plastic cover, so they tend to "spin" & therefore you can't undo the bolts. Soak them first. also suggest undoing the aircon (you can unbolt it & swing it off to the side without undoing the lines) & alternator to give you room. Remove the radiator also to give you clearance. As suggested, do the water pump while it's all apart.
-
haha. It'll prob get rebuilt as something of a lesser spec. Already got the typical BHG... I want to steal the running gear, wiring, etc out of it for my project car
-
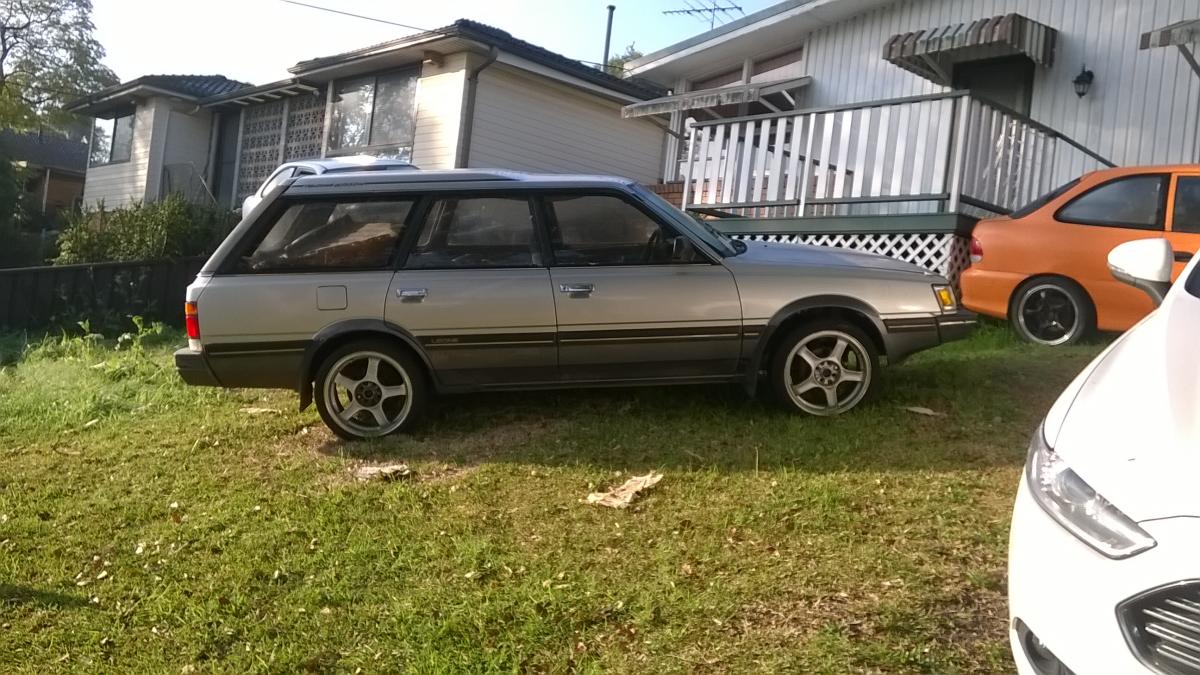
So my parts car got a temporary shoe upgrade...
-
If you're going to junk the wagon harness, you could try to separate out the EFI harness. I did it with my Series 1, but it was taped separately inside the tubing. Most of the wires come out the RHD and into the cabin. Except the wires for the distributor, tacho feed wire, power wire in the fusible link box (runs around the front of the car), and the fuel pump (down the RHS to under the rear seat). Although most aftermarket, non plug & play ECUs come with some wiring harness anyway. If you keep your existing loom, you'll need to patch in the oil pressure & water temp wires from the engine. You going to add the aircon from the wagon into yours?
-
digi dash? I don't see any mention of a digi dash. Not all of these Jap wagons had that. will need to be clarified. But Woodswagon is prob right about the connectors & how to do the aftermarket wiring for the engine. You understand that you'll need to pull apart a lot of the interior. The fuel lines run inside the car down the LHS. So dashboard, rear seat, left seat, carpet. You only need to change 1 of the fuel lines (the carb return line up the top of the firewall gets replaced with a much larger version to become the EFI feed line, the carb feed line becomes the return line), but as they're bundled together, can be easier just to do the lot. Change the fuel tank also as it has the larger lines, plus a swirl pot built in to stop the EFI fuel pump from starving. FYI, the EFI ECU is bolted under the steering column. Your carb version won't have the brackets, so take that out of the wagon also (you can swap the moving/spinning bits if they've rusted in the wagon) Something you haven't mentioned is which manual gearbox is in the wagon. single range (doubt it will be part time 4wd being a series 2) with diff lock, dual range, dual range with diff lock. You'll need to relocate the reverse wires from the shifter to the gearbox. Extend the wires up through the grommet at the top rear of the engine bay on the drivers side & down to the gearbox. I'd take that part of the wiring loom out of the wagon (ie from the gearbox upto that grommet & inside the car) & splice it into yours. If you want the diff lock/lo range lights to work on your dash, you'll need to add those wires in. Bridge the large Black/white & Black/yellow wires on the auto shifter to cancel the auto safety start. Can extend these to a clutch switch if you want, or add your own "kill switch" The wagon will also have rear discs being a turbo. I can't remember if the bias valve (under the rear floor) is different or not. I remember being able to lock the rear discs when I put them on my 85 sedan, but I didn't change that bias valve
-
Dee2, you want to fly down to the southern hemisphere and find these "decent" turbos to buy? I'm doing a similar thing to mjqtown by converting my carby 88 touring wagon into a turbo 4spd auto version using a poor condition JDM import. Firstly, because these cars are hard to find, and secondly, our options list was a lot shorter than that available in the US. Sometimes, doing this kind of work is the only route we can take.
-
My suggestion. I used a 85 JDM EA82T 3 spd auto sedan halfcut to put into a touring wagon. I swapped to manual. Completely strip the wiring loom from both cars. Unfortunately, the loom is one piece all the way through the cars, it doesn't unplug into separate pieces like later models The only difference between the sedan wiring & the wagon is for the rear lights & rear speakers (in the doors in the wagon). The wagon splits in front of the rear seat & runs up each side, the sedan runs up the right side & around the back. Personally, I'd just run the loom in the sedan like the wagon & just change the plugs at the end (the wagon has a little extra length cos it's longer. But then you'll have to figure something for the boot light. Other option is to cut the looms at the back & resolder. Should be about 10 wires. All the L series share the same wheelbase, so swap all of the running gear (including the complete rear suspension) directly from the wagon into the sedan. Hassle will be if your sedan is FWD. It won't have the tailshaft centre bearing bracket welded into the tunnel. Again, cut this part out of the floor of the wagon & weld into the sedan. I've been told that the diff hanger captive nuts may not be in the FWD sedan chassis. Have a look underneath to check. As an aside, can you tell me if the headlight washer pump on the wagon works. Looks like you can't swap that cos the wagon's bumper is stuffed. Mine's failed & can't seem to get replacement from Subaru
-
good luck finding an LSD in one of those
-
I've got an EA82 diff. Everyone I've spoken to in this country (and we've prob been doing it longer due to the lack of EA82 style LSDs available here) has needed to grind the chamfer like I did. Maybe you've got different casings, or smaller, crappier diff centres www.ultimatesubaru.org/forum/topic/99881-what-have-you-done-to-your-soobie-lately-please-post-in-here-and-keep-it-going/page-284#entry1325440 If you get any R160 EJ centre, and then get the snap in stub axles from the 1st Gen Legacy, those will fit directly up to your existing axles with no other mods. We tend to use stuff from the 90s cos its cheap and readily available.
-
You can use the centre from any EJ LSD. You'll need the stub axles from any Gen 1 Legacy diff, and you'll need to grind a chamfer on the edges of one side of the LSD carrier where it bolts to the crown wheel otherwise it won't fit into your case. dunno how many models you got with LSD as we've been getting EJ20T models from 93 which always had an LSD, but our source of EA82 style LSD are extremely limited.
-
Yeah, but by the time you pay for freight from NZ (unless you could convince the seller to dismantle it & just send the LSD centre, but even then still heavy) you'd be better off with my suggestion. Tried Subareck? In the process of moving yards currently.
-
That might work in your country, but not ours LSD were only available in the RX turbo sedan (85-87) & turbo 4wd XTs A number of the RX turbos were used for rallying, so it ends up being a small number in our small market...
-
Never owned an ea81, so I've no idea if the rear diffs are the same or not as the EA82. you'd need to find out that info. sorry can't help any better.
-
You're better off doing what I just did. The factory LSD is unobtainium. Get a Liberty RS turbo or WRX rear diff (if you get the WRX version, get the snap in stub axles from a series 1 Liberty, 89-93) as they fit in directly. Pull apart both diffs and swap your crown wheel onto the later centre (you'll need to grind a bit off to make it clear the case during installation, but it's nothing structural). Bolt back together in your original case www.ultimatesubaru.org/forum/topic/99881-what-have-you-done-to-your-soobie-lately-please-post-in-here-and-keep-it-going/page-284#entry1325440 dunno if that link will work, but it's post #7098 on page 284 of the What have you done to your soobie lately thread. I picked up my series 1 Legacy LSD for only $150.
-
I'm trying to reproduce in CAD during my lunchbreaks the measurements of the adaptor. When I get it done, I'll post up a pdf so people can at least just print that out as a template. The alignment is reasonably critical at least on the later models as the handbrake cable has trouble getting along the swingarm, particularly if you've got a rear sway bay.
-
Can I suggest then that you wait until the hubs are ready before doing the backing plate stuff. I'm going to work on getting a template made up from the stuff I've got at home and we'll see how we go from there. Otherwise kind of putting the cart before the horse Just re-reading Dfoyl's answer about the backing plates. I'd never thought of just welding in large washers, although this doesn't solve the problem of the centre hole being too big. As the caliper is mounted to the backing plate (most other manufacturers have them fitted to the cast suspension part) I personally prefer the idea of having the centre hole fully supported and not just on the 3 bolts.
-
ANIM_Hooneru, You've seen the adaptor plates above? You know how thick they are? You know which hole is threaded, and why? You know why it's the shape it is?
-
I need to reinstall my computer, and it took CAD with it I'm happy to draw up a template. Curious if anyone's got access to a 3D printer? Could make the template out of plastic (or whatever) to accurately mark out the holes for the backing plate.
-
Have you ever tried to draw splines on CAD? PAINFUL I've seen a pic of a sample, the splines are there And I believe he has a brumby, but the L series & brumbies have the same splines anyway (that's how you can fit RX turbo rear discs on to the earlier models) We've also been working to fix the deficiencies of those hubs. I'm glad I got in early buying one of those kits & only bought the 2 useful parts instead of the rest of the useless rubbish... My suggestion for the backing plate. I've got the adaptors as above. They are good, but not the greatest. I'm got a template so you can mark out the holes. Then I'd suggest welding in a plate (full outside weld plus around the inner hole) which has the proper centre diameter, fill in all the holes with weld, and then redrill them. That would be stronger than using the adaptor anyway. More work however.
-
it's never easy when you get someone else's 2nd hand kit. You never know what's missing... Ever since the Outback came out, the custom built (expensive) steering extension has pretty disappeared. you usually get the universal joint out of the steering column of one of those. If you end up with the same camber each side, then I wouldn't worry about it too much. Got no idea how much camber 7/8" is, we usually work off degrees here. To be honest though, these car need more castor angle to stop the wheels being splayed outwards on turning...
-
So a mate's mum crashed her spider manifold EA82T Vortex (XT). I've put the engine into my wagon, but got some problems because the XT didn't have aircon. This means it also has the wrong alternator. And impossible to get the correct ones where I am. I'm also adding a water-air intercooler from a 1st Gen Legacy, so the timing marks on the flywheel are impossible to see. Because of wrong accessories, I've changed all the pulleys over to V belt, but this means I've lost the timing marks on the crank pulley. I will definitely need these as my mate made the engine previously run off a Series 1 "Black" ECU and changed the distributor. Mine's a Series 2, so I need to put the proper distributor back in. Trying to figure how to accurately put them onto the carb pulley, along with drilling a locating dowel hole (which I will do first). any help appreciated
-
Best bet is to put it in 4wd to check. Then if the other wheel turns the other way, it's definitely open. If you get resistance from turning, it's either an LSD, or it's stuffed...
-
That's from a L series RHD style heater box. PITA thing. Poor design I generally get a pair of long nose pliers (if you've got adjustable jaw pliers, these work even better). Then pinch from the end of the shaft to the flap. But this is very important, put the pliers on the flap on the opposite side to where the main lever is. Good chance of snapping the whole thing if you do it from the lever side. You may need to do it in several places around. Try to tap in the tab on the shaft a little bit with a flat screwdriver. Also, do not twist! Also a good way to snap the shaft. Just be patient with it. Once it gets over the lip, it will come off easily.