SuspiciousPizza
-
Posts
30 -
Joined
-
Last visited
-
Days Won
3
Content Type
Profiles
Forums
Gallery
Store
Everything posted by SuspiciousPizza
-

Fuel Pump Whine
SuspiciousPizza replied to SuspiciousPizza's topic in Old Gen.: 80's GL/DL/XT/Loyales...
Ahhh, I see. I'm mechanically-minded so electronics isn't my forte but I can wrap my head around it. Thank you for the explanation I didn't realize RPM correlated with current. I'll be installing a '90 Loyale radio/cassette deck and removing my rear speakers in hopes to mitigate the whine *it's annoying*. Stock radio is 10 or 15W and my aftermarket was 50W. Also makes sense. Thanks again. :] -

-
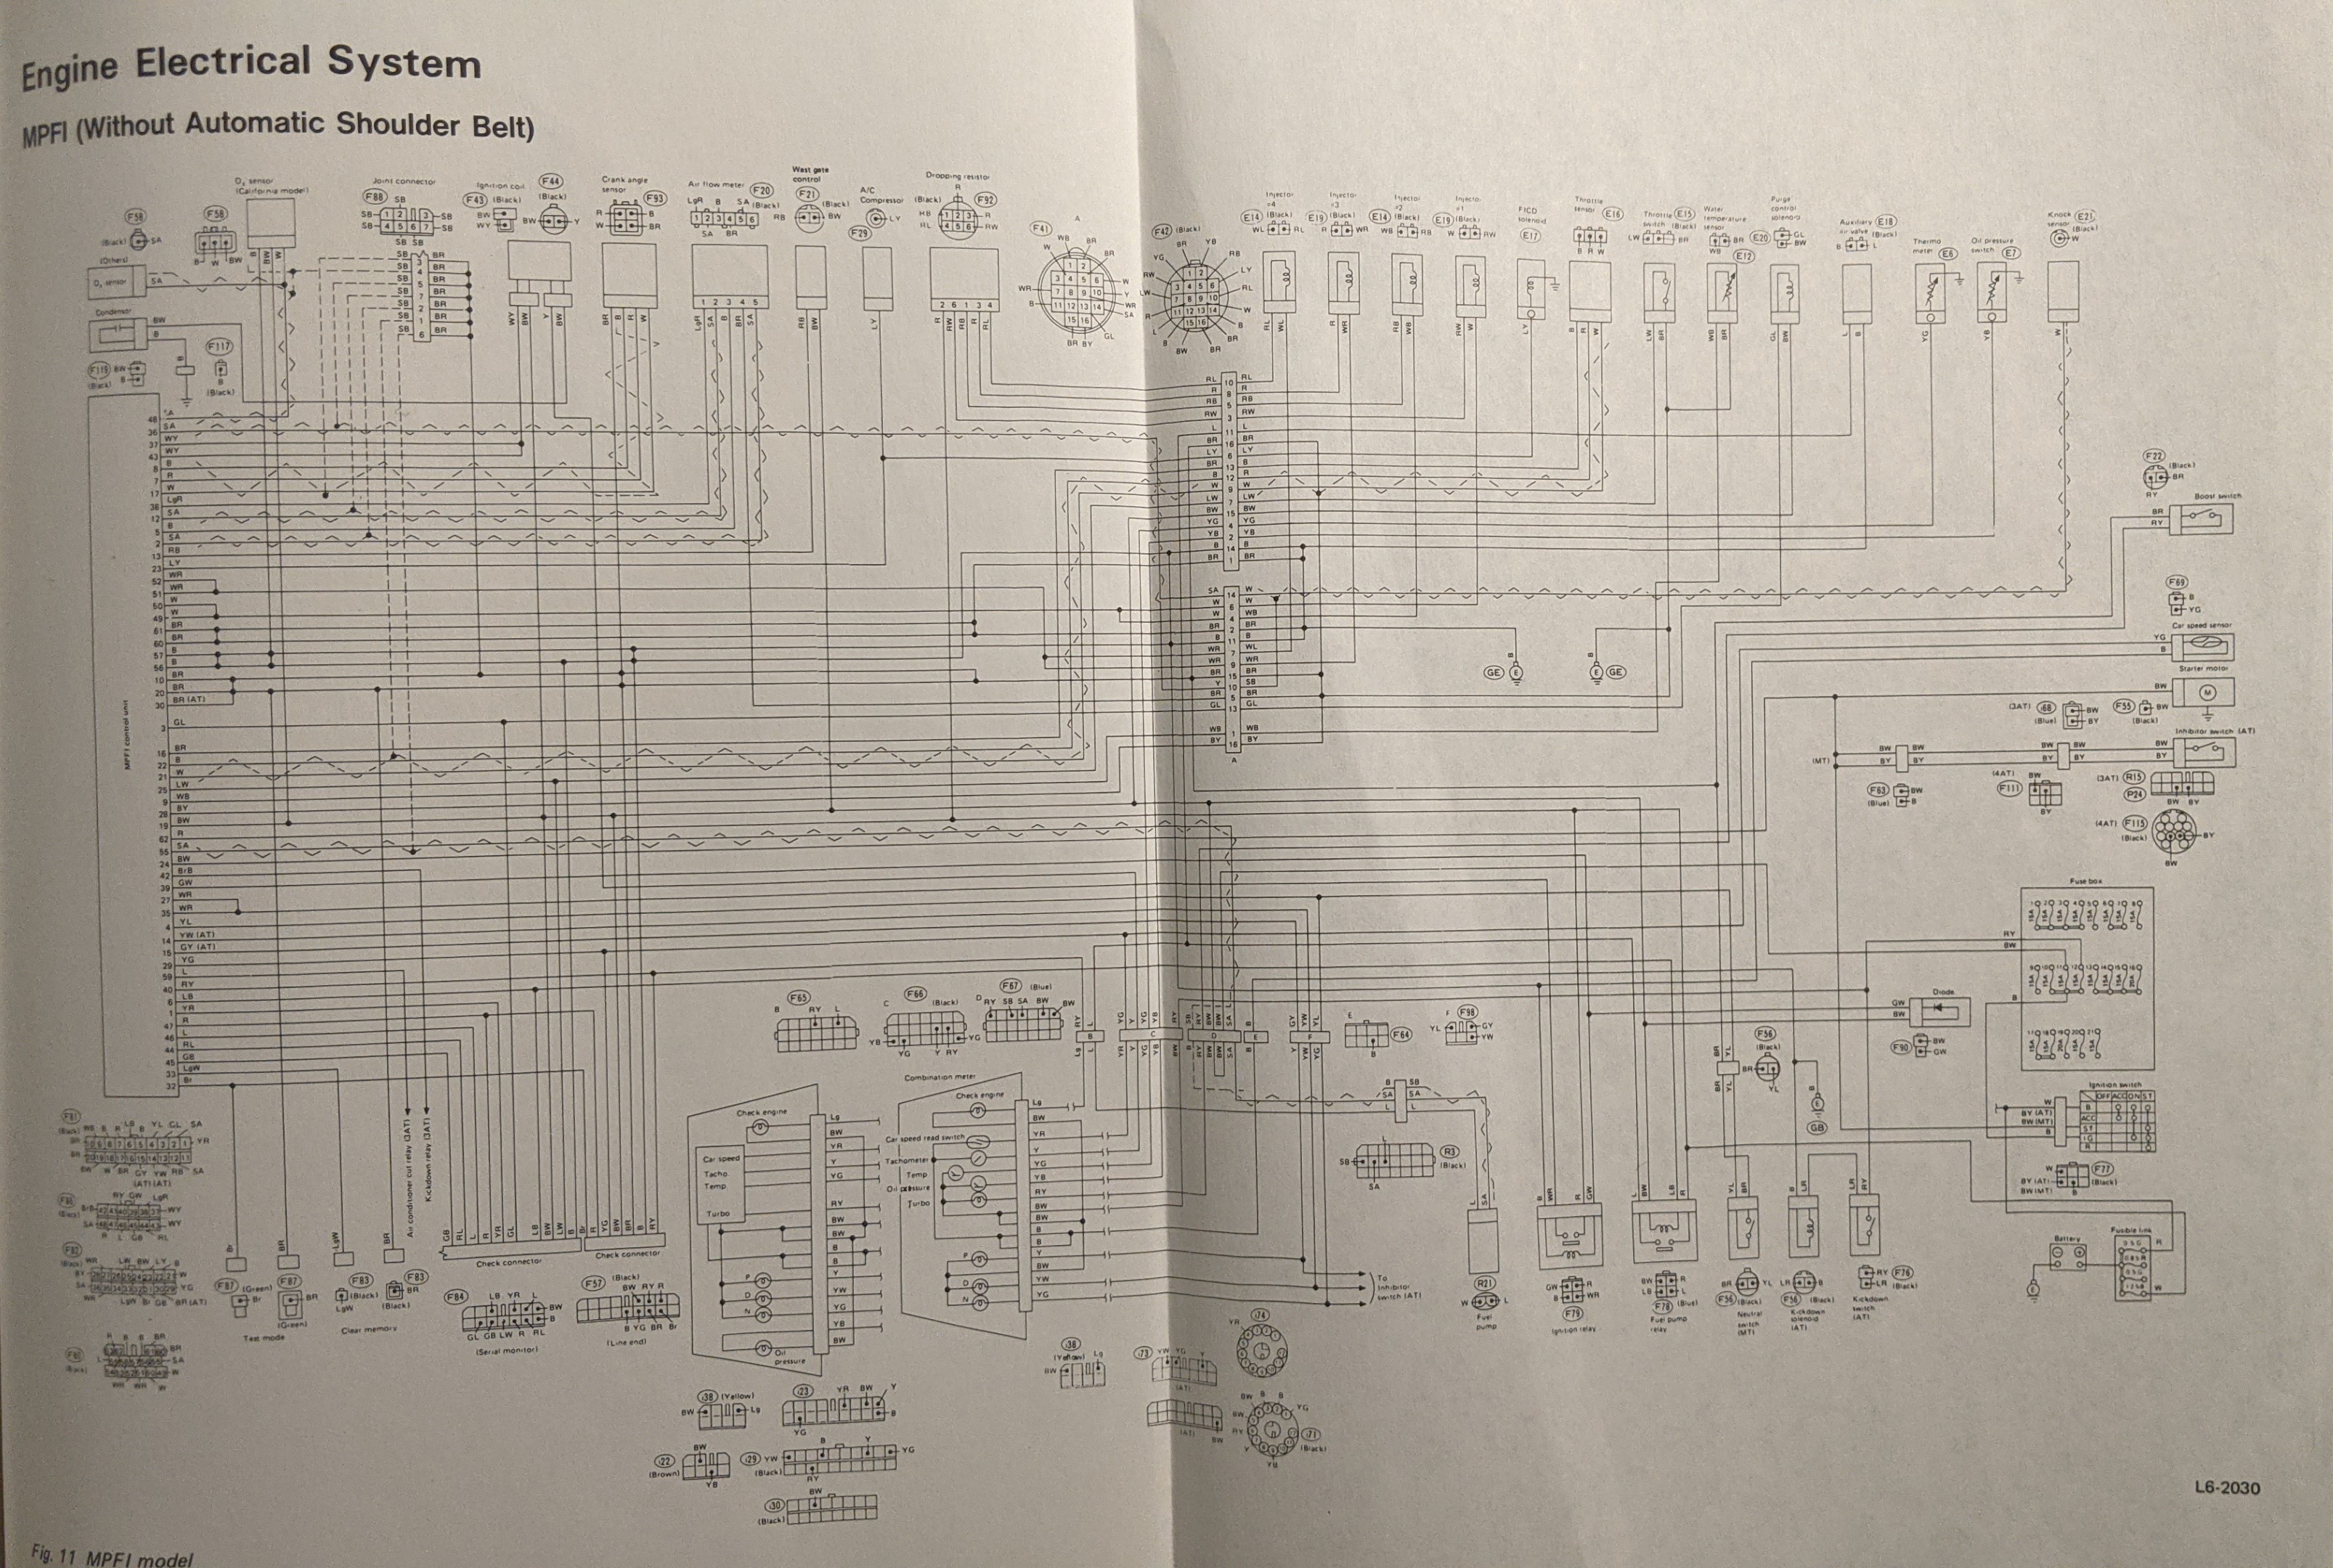
I have a service manual with wiring diagrams. I'll post photos later tonight after work. It's an '89 service manual so wire colors and connector colors may vary but terminal positions should be the same, your mileage may vary so it wouldn't hurt to confirm continuity between terminals with a multimeter. :]
-
The parts manual I have is '85 -'90 so take this with a grain of salt. Rear Spring: 21091GA530 Left Front Spring: 21091GA260 Right Front Spring: 21091GA250 Front Strut Mount: 21033GA040... You could also use KYB SM5364 :]
-
I used King Overload Springs, they ride rough at first but they improved the car's stability and load capacity greatly. Later tonight I'll look up the part number for the springs and post em here. Rear springs are a piece of cake to replace. Only hang-up I had was the upper mount bolts were torqued to infinity and beyond and it took a few minutes of whacking with a 500 ft/lb impact before they finally came loose. A few months ago I did see a few listings for NOS OEM springs, they are still out there but I went with King Springs for the handling and carrying capacity as well as the more consistent availability. :]
-
Fuel Pump Whine
SuspiciousPizza replied to SuspiciousPizza's topic in Old Gen.: 80's GL/DL/XT/Loyales...
I do have an aftermarket radio, and it's an absolute rat nest underneath the steering column and behind the glovebox. I figured this was a good candidate to begin diagnostics. There is plenty of wire nuts, misc wire gauges, and "good enough" wiring *facepalm* indeed. Would anyone have a wiring diagram for an '89 radio? I don't even know which model of radio came with the car from factory, let alone the wiring. Alternator does seem to be pushed pretty close to its capacity, but I'm not convinced it's the alternator. Voltage drop during turn signal flashes is 2-4 volts according to the volt meter in the gauge cluster, a big drop. Alternator is a Nissan Maxima VG30E alternator mod. Pretty commonplace. :] -
I currently have my GL all torn apart to address some well entrenched gremlins. The main issue I have a question regarding is why does my fuel pump bog and whine when I use my turn signals? Fuel pump operates as it should (although I don't have a fuel pressure gauge hooked up at the moment, I will be adding several gauge pods, including a fuel pressure gauge, once I get the engine back in my car.) However, whenever I used my turn signals my fuel pump would whine a different tone only when the turn signals blinked. Between blinks it would have a normal tone. The negative terminal arcs when I plug in the battery, indicating a short (?) Obviously I'd assume it's a wiring or ground issue (almost all the grounds in the engine bay were caked in oil, grease, and dirt but I've been thoroughly cleaning the engine bay with Simple Green and a multi-pack of tooth brushes while I have the space to do so.) Would anyone have any pointers? Would I be able to use the fuse box to check which circuit is shorting? I can read a multimeter, have a very basic understanding of circuitry and have a full set of service manuals at my disposal. Thanks! :]
-
If the socket is still functional, I'd just RTV it to the housing. The plastic is old and just breaks down over time. If it doesn't work, you have a few options. 1: Find a side marker assembly online and use the socket outta that, but again with the plastic being so old, it's a shot in the dark if it's lugs are broken or not. 2: Buy a universal #194 lightbulb socket (Amazon, eBay) and RTV that to the housing. You may get lucky with some searching (I found some Loyale sockets with a Google search along the lines of "Subaru GL 194 lightbulb socket".) Good luck on your search!
- 1 reply
-
- 1
-

-
Seized ea81 engines
SuspiciousPizza replied to gazza01's topic in Old Gen.: 80's GL/DL/XT/Loyales...
@gazza01 Not to hijack the thread, but how do you stand the engine when using your timber + hammer method? I have a seized EA82 I desperately want the con rods out of. I worry about gouging the deck surfaces if I stand the engine on end. I also worry too much padding to protect the deck surface would absorb impacts. Thanks -
Mine also has the "hose to nowhere". I don't know how the emissions system fully operates, other than observationally ("this hose goes there, this one is for vacuum, etc") but my guess is that it's an overflow tube. You're good to just stuff the hose through that hole below the headlight mount.
-
Seized ea81 engines
SuspiciousPizza replied to gazza01's topic in Old Gen.: 80's GL/DL/XT/Loyales...
I believe welding supply stores sell liquid nitrogen but you may need a dewar flask or a specific container, some places are picky and may not let you use any old yeti cup. I know for a fact welding supply stores sell dry ice though and it's cheap. Just bring a cooler. -
Seized ea81 engines
SuspiciousPizza replied to gazza01's topic in Old Gen.: 80's GL/DL/XT/Loyales...
Totally shooting from the hip here, these are all ideas and I've never done any of these methods. 1. Maybe you could fill the piston from the bottom (use it as a bowl) and fill it with dry ice or liquid nitrogen. Maybe you could get the piston cold enough to get it to shrink and you could use your timber+hammer method to remove it then. You may have a temperature transfer to the cylinder walls so this may not work. But the sleeves and piston should contract at different rates. 2. Pour water into the cylinder all the way to the top. Reinstall the head (maybe add some cheap RTV or the like) and stick the block half with the head on into the freezer. Maybe the hydraulic pressure from the water freezing could remove the piston. Or you'll end up cracking the block or head so best use a head that is already too far gone. -
That EGT sensor is correct. P/N 22629AA000.
-
I'm away from my service manual at the moment, but I'll check it later today to see what's up with the California emissions setup. I'd scan for codes first because that'd tell you if a sensor is sending out-of-spec values. Under the steering column, remove the two plastic panels. The panel closest to the pedals has a metal c-clip going around the steering shaft, just force the panel downwards and it'll pop right off. With the panels off you'll see the ECU with the three large connectors going to it. On the ECU will be a hole with a small LED inside. Turn the key to ON and watch the LED. Long light flashes are values of 10 short flashes are values of 1. So 2 long flashes and 4 short ones will give you a code 24, for example. There will be short pauses between codes. Let it cycle a few times to be sure you count the flashes properly. You can look up the codes online or in a hardcopy service manual if you have one. I'd imagine the EJ18 sensor you've shown above is different from the EA82 sensor. But I'm not super familiar with all the emissions hoopla you Californians have to deal with so I could be wrong. I can get you the part number for the sensors later today.
-
Calling All Dual Range Owners
SuspiciousPizza replied to SuspiciousPizza's topic in Old Gen.: 80's GL/DL/XT/Loyales...
Since this information is difficult to track down - I have a "Identification number" to part number match that I'm quite positive is correct. ID# 95AC-23 is part number SOA925H300R1 The axle in question is for the following models per my '85 GL/DL - '90 Loyale parts catalog. Hatchback: '88-'90 DL/GL/RS with SPFI '86 - '90 DL/GL/RS/Single Range 4WD (only turbo models) 4-Door: '85 GL-10 turbo with 3AT '88 - '90 DL/GL with SPFI '86 - '89 4WD turbo & RX turbo with automatic transmission '85 DL turbo/GL-10 turbo/RX turbo '86 - '90 DL turbo/ Single Range 4WD turbo/ RX turbo '88 - '89 full-time 4WD turbo with automatic transmission '86 - '90 DL turbo/ GL-10 turbo (2WD & automatic transmission only) Station Wagon '85 4WD turbo with automatic transmission '88 - '90 DL SPFI/GL SPFI/GL turbo/GL-10 turbo '86 - '89 4WD turbo with automatic transmission '86 - '89 DL turbo/ GL turbo/ GL-10 turbo/ Single Range 4WD turbo '88 - '89 full-time 4WD turbo with automatic transmission '86 - '90 DL turbo/GL turbo/GL-10 turbo (2WD and automatic transmission only) Alternate P/N's. 23221GA372, 23221GA373, 23221GA592, 23221GA593 If you have information that contradicts with anything above, please share. Thanks :] -
I got my hands on a factory parts catalog and it's lead me down a confusing rabbit hole. I have an '89 GL, SPFI with the dual range transmission. It has the front CV axles with the ribbed inner joint and the two identification bands on the axle shaft near the outer joint. ID #87AC. The service manual says these axles are for the CARBED engine, not the fuel injected. If the reader of this post has an SPFI with the dual range, what axles do you have? Because I'm starting to think I may have the wrong axles (?) The parts manual is a joy to decipher on its own but the best I can tell the 87AC axles are not for the SPFI with dual range (I'm thinking the correct axles are the 95AC-23). Or does the SPFI fall under the "Carbureted" category since it's basically the e-cig version of the carburetor? Thanks :]
-
EA82 Compatible Con Rods
SuspiciousPizza replied to SuspiciousPizza's topic in Old Gen.: 80's GL/DL/XT/Loyales...
No, P/N 12100AA310 is NOT compatible with 12100AA011. None of the dimensions are the same. Too large of bearings and center-to-center distance is too long. Bummer. I hope I don't need rods or else I'm tearing into my spare ea81. I'm saving it for a TBI conversion. -
There is no scan tool for these cars. Under the steering column (you gotta remove the two plastic panels beneath the steering column) you'll see the computer with the three large connectors. On the computer you'll see a hole with an LED, this light will flash and display the codes when you turn the key to On. Long flashes are values of 10, short flashes are values of 1. So 3 long flashes and 2 short flashes would give code #32, for instance. There will be short pauses between codes. The computer only reads electrical faults, it will not indicate a mechanical fault. You can find codes lists online as well as the service manuals. I'd deal with the codes first, in the order the computer displays, if that doesn't solve it, then dig further into the service manuals.
-
I've been Johnny Cash one-piece-at-a-time(ing) everything I need to build a fresh EA82 and I've been stumped on sourcing connecting rods. On several parts websites I've seen that EJ rods (P/N 12100AA310) are allegedly compatible with EA82 rods. However, the stock P/N for EA82 rods (12100AA011) doesn't show up in the supersession list. Has anyone tried putting EJ rods in an EA82? I've heard of others trying to get EJ pistons to work but I haven't heard of using EJ rods in an EA82. Thanks :]
-
Loyale 89 front bushings
SuspiciousPizza replied to Starlite's topic in Old Gen.: 80's GL/DL/XT/Loyales...
I used DRW bushings. They work well and I've heard good things about them. Some bushings will need to be burned out with a blow torch and cleaned up with a steel pipe brush. Some bushings have metal sleeves that allowed them to be pressed in upon assembly at Fuji. If you burned out a bushing and the replacement one doesn't fit, check to see if there's a sleeve. The sleeves have to be cut out with a hacksaw (some bushings are designed to fit inside the sleeves so double-triple check before you go cutting away) It may be a good idea to inspect all the other bushings as well as your strut mounts. -
XT Turbo drive shafts in Europe
SuspiciousPizza replied to joostvdw's topic in Old Gen.: 80's GL/DL/XT/Loyales...
Personal opinion: I'd stick to OEM axles over aftermarket ones. Specifically when looking for fronts, OEM axles will have the identification bands on the axle shaft. Aftermarket ones occasionally don't even have spline counts listed on the listings and this makes it a real crap-shoot trying to find the proper axle. I know rears are your main priority, but I do have a used axle (I haven't torn it down to check condition) and a new-in-box factory rebuilt axle. I believe both are for FT4WD. They have 3 bands on the axle shaft. I don't have a FT4WD transmission so I won't be using them anytime soon. I bought them as part of my crap-shoot trying to find 2-band axles for a D/R 5MT. If you're interested in them, I'd be willing to sell them or perhaps trade if you've got any 2-band axles or an EA82 cylinder head with single-port intake that isn't cracked. :] -
SPFI EA82 Idle Stutter and Rattle
SuspiciousPizza replied to SuspiciousPizza's topic in Old Gen.: 80's GL/DL/XT/Loyales...
Solved I had a broken wire in my engine harness going to my IAC valve. Spliced in a new wire and she's been running good for over a week. Now I'm back to searching high and low for engine parts. I plan to do a full engine rebuild come summer and I am trying to plan for the worst. If anyone knows someone who knows someone who has parts, by all means any leads are appreciated. :] btw cotter pins slotted into female harness connectors make testing for continuity while bending wires a lot easier. -
SPFI EA82 Idle Stutter and Rattle
SuspiciousPizza replied to SuspiciousPizza's topic in Old Gen.: 80's GL/DL/XT/Loyales...
I believe the coolant leak from the radiator cap was caused by a worn plastic lip on the radiator. In the next few weeks I'll be doing a pressure test on the coolant system and a smoke test on the intake and vacuum system, as well as verify my timing (just gotta wait for the tools). More blurbs to come in a few weeks. If I don't see ya before the end of the year, happy holidays to all! :] -
SPFI EA82 Idle Stutter and Rattle
SuspiciousPizza replied to SuspiciousPizza's topic in Old Gen.: 80's GL/DL/XT/Loyales...
Replaced the timing belts, tensioners, and pulley. All went well. Started up, but I still had to keep my foot down. When I lifted my foot it did it's "normal" flutter idle at 250 RPM whereas before it was at 750 RPM (before it'd die below 500 RPM so small victory). Loud clicking from the center of the engine still there. As I went to go check on the clicking, it was PISSING coolant from the radiator cap. Well that's new. Could a head gasket issue cause the flutter and coolant leak? I'll keep posting as I chase this cornucopia of mysteries. Any suggestions or ideas are always welcome. :] Noah -
Holy tinfoil hats, Batman! I love how planned obsolescence destroys good things. I'd almost rather the conspiracy of the parts being destroyed by a tsunami or nuclear disaster be true than dealers destroying parts. The search is the tedious, fun part for me. Requires networking, you meet cool people, and there's always a story. Keep 'em alive. If they've should have been thrown away then don't make them a blast to drive (modern vehicle corporations have picked up on this.)